Needle Localization
The preoperative localization of a nonpalpable breast abnormality is necessary for the accurate identification of the lesion and its removal. The procedure involves an integration of breast imaging, surgery, and pathology, with close interaction by all members of this team to assure optimization of the procedure. Careful communication of the information regarding the case is needed among the radiologist, surgeon, and pathologist to confirm that the correct area is removed and that the lesion is identified within the specimen.
The preoperative localization of a nonpalpable mammographic abnormality offers multiple advantages. Using preoperative localization, a smaller amount of tissue can be excised than without radiographic guidance. This is important not only from the patient’s standpoint, because of a lesser degree of postoperative deformity, but also from the pathologist’s standpoint, because the ease and accuracy of identifying a tiny focus of carcinoma in situ are improved when the amount of tissue to be sectioned is less.
Prior to the Procedure
Prior to the procedure, the radiologist must carefully review the mammogram, other imaging studies, and pathology records if the lesion already has been biopsied. As percutaneous breast biopsy has evolved, the vast majority of suspicious lesion on mammography are biopsied by core biopsy methods instead of surgical excision. Prior to this era, clinically occult, mammographically detected lesions were excised following needle localization. Now, few lesions are excised for diagnosis. Instead, the vast majority of needle-localized lesions are cancers, high-risk lesions, or lesions that were insufficiently sampled or unable to be sampled percutaneously.
Prior to the procedure, it also is important that the complete imaging evaluation be performed of the patient who has not already undergone a percutaneous biopsy. A complete diagnostic mammogram is needed to confirm that the lesion is actually suspicious and warrants biopsy. For example, magnification views and a mediolateral (ML) view are necessary in the case of microcalcifications, to evaluate them and to confirm that they do not represent milk of calcium. The ML view also is necessary to plan the approach to the lesion, because it is the orthogonal view to the craniocaudal (CC) view.
If the lesion has been already biopsied, the post-biopsy mammogram should be reviewed for several reasons. First, one must determine if the mammographic finding is still present. Second, if a clip was placed following biopsy, one should verify whether the clip is at the biopsy site or if it is deep or shallow to it. If one is planning to target the clip, it is critical to know that the clip is deployed at the biopsy site. Once the image review and plan for the procedure are complete, the procedure is explained to the patient, and informed consent is obtained.
Mammographically Guided Needle Localization
The techniques for localization are varied, and have included triangulation and needle placement (1), needle localization with dye injection (2,3), and needle localization with wire placement (4,5,6). A number of wires are available, most of which have a type of hook (4) (Fig. 15.1) or J configuration (5) when released from the needle. The spring hookwire breast lesion localizer designed by Kopans (4,7), combined with a rigid compression plate, allows for accurate and safe localization of breast lesions. The compression plate has a fenestrated window, which maintains the breast in position and allows for insertion of the needle containing the hookwire in a direction parallel to the chest wall. Once deployed, the wire is in position and cannot be repositioned or withdrawn. In the situation in which a hookwire is placed in a position suboptimal for surgical excision, a second wire should be placed rather than trying to reposition the first wire.
A J-wire was designed by Homer (8,9) to allow retraction and repositioning of the wire if needed. The curved-end wire has a memory that allows it to be retracted into the needle and readvanced into the breast tissue in the
same shape. This type of wire is also thicker and not transected during surgical dissection.
same shape. This type of wire is also thicker and not transected during surgical dissection.
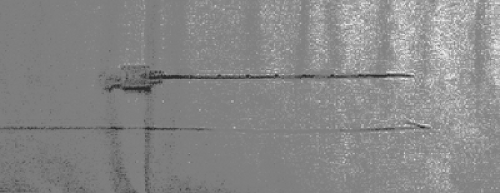 Figure 15.1 A typical needle and hookwire used for needle localization. The wire has a stiffener near the distal end that aids the surgeon in identifying it on palpation. |
Many mammographic units are equipped with a localization device. Two basic designs are available: a rectangular aperture or multiple 1-cm round perforations (6) in a plastic compression plate (Fig. 15.2). The technical performance of needle localization is improved with the use of digital mammography. Dershaw et al. (10) found that the time to complete a needle localization was reduced by 50% when digital mammography was used, and the mean glandular dose was reduced by a similar amount.
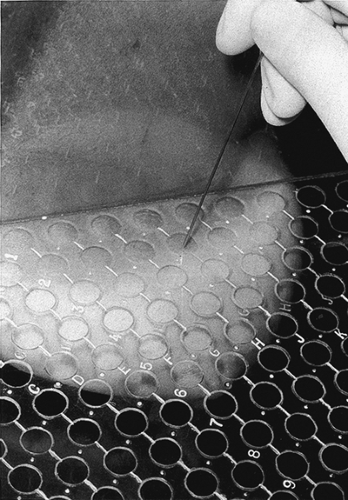 Figure 15.2 A localization plate with 1-cm round perforations is in place with the breast compressed for needle localization. |
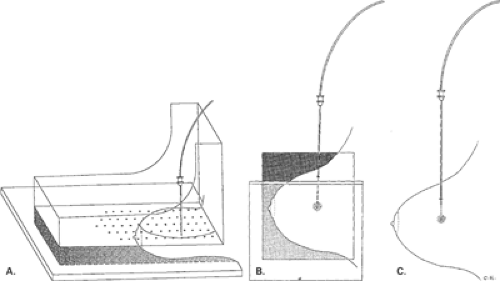 Figure 15.3 Procedure for mammographically guided needle localization. The needle is placed into the breast through the appropriate aperture (A), the opposite view is made to determine the depth of the needle, the needle position is adjusted if necessary (B), and the wire is ejected (C). |
Prior to the localization, a 90-degree lateral (ML) view is obtained if only CC and mediolateral oblique (MLO) projections are available. From these images, the closest skin surface to the abnormality is determined—superior, medial, lateral, or inferior. The localization plate is placed over the surface determined, and an image is obtained (Fig. 15.3). While the patient remains in position with her breast compressed, the coordinates of the aperture overlying the lesion are determined. A localization needle is placed into the breast, parallel to the chest wall at the indicated location; the depth of placement is estimated only, because the breast is compressed by the localization device. An image is obtained with the needle in place, to determine if the placement is accurate.
The localization plate is then carefully removed, leaving the needle in place, and the orthogonal view is made. If the needle is too deep, it is withdrawn until the tip is within the lesion, and then the wire is deployed. Most wires have a mark that, when positioned at the hub of the needle, indicates that the tip of the wire is at the tip of the needle. The wire is deployed by advancing this mark into the needle hub by about 1 cm. The needle is removed, the wire is taped to the skin, and two final images—CC and ML views—are made to show the position of the hook relative to the lesion (Fig. 15.4). Information regarding the procedure is communicated to the surgeon. This should include the location of the lesion targeted, the approach to the lesion used, the length of wire within the breast, the position of the hook relative to the lesion, and the need for a specimen radiograph.
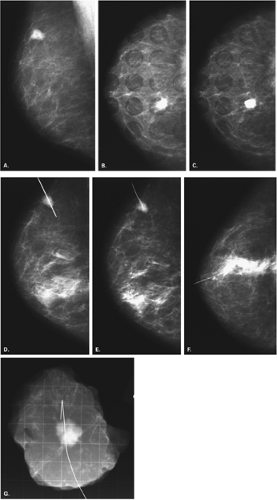 Figure 15.4 Needle localization series performed for a mass in the left breast that was found to be malignant. Left ML (A) and CC (B) views show the dense, lobular, indistinct mass in the 12 o’clock position. On the CC image, the localization plate is in place over the superior surface of the breast. Because the lesion is closest to the superior aspect of the breast (12 o’clock position), the localizer plate was placed in this position to provide the shortest distance for needle insertion. The needle has been placed into the aperture directly over the lesion on the CC view (C). The localizer plate has been removed, and the ML view (D) obtained, showing that the needle is directly through the lesion. Focal asymmetry is present inferior to the mass, which developed during the procedure, representing a small hematoma. The needle was withdrawn slightly and the wire was deployed. Postprocedure ML (E) and CC (F) views show that the hookwire position is accurate. The specimen film (G) shows that the lesion is contained within the specimen and that a margin of normal tissue appears to be present around it. |
For a dye localization, the needle is placed in a similar manner but, instead of placing a hookwire through the needle, dye is injected. Because the dye dissipates rather quickly, the scheduling of the localization and the operating room must be coordinated carefully to avoid a prolonged lapse between the two procedures. Because of the
dissipation of the dye, a prolonged time lapse leads to the excision of an unnecessarily large specimen. Dye alone is uncommonly used today, but some surgeons prefer a combined localization using both dye and a wire in case the wire is inadvertently displaced.
dissipation of the dye, a prolonged time lapse leads to the excision of an unnecessarily large specimen. Dye alone is uncommonly used today, but some surgeons prefer a combined localization using both dye and a wire in case the wire is inadvertently displaced.
The types of dye that have been used include methylene blue, isosulfan blue, and toluidine blue. Methylene blue may interfere with estrogen-receptor assays (11). Isosulfan blue has been developed as an alternative to methylene blue (12), because it does not interfere with
receptors, and it is commonly used for sentinel node mapping as well. Toluidine blue has also been suggested as an alternative to methylene blue because it diffuses less quickly (13).
receptors, and it is commonly used for sentinel node mapping as well. Toluidine blue has also been suggested as an alternative to methylene blue because it diffuses less quickly (13).
Stereotactically-Guided Needle Localization
Stereotaxis affords a rapid and precise way to visualize and localize a lesion for surgical excision. Early experience with stereotactic guidance was negative (14,15), because the hookwires were deployed either too shallowly or too deeply, relative to the lesion. The challenge with stereotaxis is understanding how to handle the wire with the breast compressed along the plane of insertion, as it is in stereotactic procedures. Once this is understood, the procedure is a very accurate and fast way of localizing the lesion.
For stereotactic localization (16), the breast is compressed with the aperture placed over the skin surface at a point that represents the shortest distance to the lesion. If the lesion has already been biopsied percutaneously, the same trajectory used for the biopsy is used for the localization procedure (Fig. 15.5). The technologist positions the patient with the aperture of the compression plate over the area of the lesion. A 0-degree scout image for confirmation may be obtained, followed by a stereotactic pair of images at a fixed angle of obliquity specific to the type of unit (usually 10 or 15 degrees) (Figs. 15.6 and 15.7). The reference point on the stereotactic images is confirmed, and the target point is identified. The length of the localization needle (not the wire) is programmed into the unit, and the coordinates are transferred to the table or are entered. The needle guides are positioned over the lesion on the X and Y axes by dialing the guides to a ΔX = 0 and ΔY = 0 position. At this position, no difference is present in the position of the target point in the lesion and the needle guide on the X or Y axes. For needle localizations, the ΔZ-position of the needle is ideally placed at 10mm deep to the lesion. This is a vital step for a successful procedure. Depending on the type of stereotactic unit, this may be a plus or minus ΔZ-position.
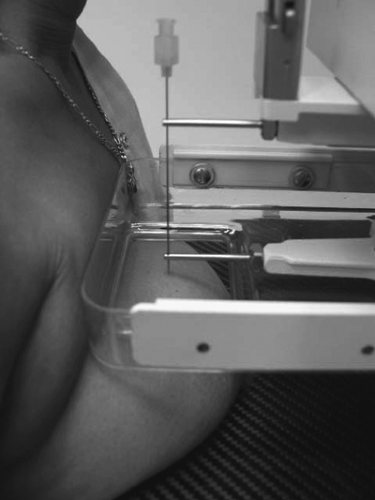 Figure 15.5 Patient in position for needle localization with stereotactic guidance using an upright unit. She is seated because a superior approach to the lesion is being utilized for this case. She would be lying on her side if an inferior, medial, or lateral needle placement were being performed. If the localization were performed on a stereotactic prone table, the patient would be lying prone for any needle placement. |
After the needle has been placed at ΔX = 0, ΔY = 0, ΔZ = (±) 10.0, a stereotactic pair of images is obtained. On this set of images, the needle tip should appear to be just through the lesion on both views, because the ΔZ is set past or deep to the lesion. Once the needle position has been confirmed, the wire is deployed. Errors can occur in this second vital step. The wire is inserted until its tip is at the needle tip. On most wires, an indicator mark on the wire is present that, when placed at the level of the needle hub, indicates that the wire tip is at the needle tip. The wire is not inserted further. Instead, the wire is grasped firmly, and the needle is withdrawn over it. Compression is released, the patient is moved from the stereotactic unit, and the final postprocedure CC and mediolateral (ML) views are obtained. Because the breast is compressed along the plane of needle insertion, any advancement of the wire can cause it to be very deep to the lesion, once the compression is released. Similarly, allowing the wire to slip back as the needle is withdrawn causes the hook to deploy very superficially to the lesion.
Ultrasound-Guided Needle Localization
Ultrasound guidance is an excellent method for needle localization (17,18). For lesions visible on sonography, guidance using ultrasound affords a fast and accurate method for localization that is associated with no radiation exposure. Sonography is particularly useful for localization of a mass that is awkward to approach using a fenestrated plate, or for patients who have difficulty sitting up.
Several companies have developed clips embedded in materials (collagen, Gelfoam) that are visible on ultrasound.
If a patient has a percutaneous breast biopsy, and one of these clips is placed, the area may be evident on ultrasound several weeks later. If surgical excision is needed, the clip may be evident on ultrasound and is used as the target point for the localization procedure using sonographic guidance.
If a patient has a percutaneous breast biopsy, and one of these clips is placed, the area may be evident on ultrasound several weeks later. If surgical excision is needed, the clip may be evident on ultrasound and is used as the target point for the localization procedure using sonographic guidance.
When ultrasound guidance is used for needle localization, a vertical needle insertion (Fig. 15.8) is preferred (18). The technique, as described by Fornage (18), allows for the shortest distance to the lesion from the skin. The lesion is visualized in the middle of the scan field, and the needle is inserted at the transducer’s midpoint. The degree of obliquity of the needle insertion depends on the depth of the lesion. A more vertical angle is used for deeper lesions. Using this method, the needle tip is not seen until it crosses the scan plane at the depth of the lesion. Care must be taken to not penetrate the chest wall; therefore, this technique is not for inexperienced interventionalists.
 Figure 15.6 HISTORY: 31-year-old with a palpable thickening in the right upper outer quadrant. MAMMOGRAPHY: Right MLO (A) and CC (B) views show a small indistinct mass located at 11 o’clock (arrow). This was biopsied using ultrasound guidance, and a clip was placed. Pathology showed invasive ductal carcinoma. Post biopsy images (C) and (D) show the clip at the site of the abnormality, which is no longer evident after core biopsy. Stereotactic needle localization was performed, and post–wire placement ML (E) and CC (F) views show accurate hookwire placement at the site. IMPRESSION: Successful localization of invasive ductal carcinoma. Surgical pathology from the lumpectomy showed residual invasive ductal carcinoma. |
A safer angle of insertion is an oblique (Fig. 15.9) or horizontal placement of the needle. The lesion is visualized at the edge of the scan field, and the needle is placed at the end of the transducer. The needle is visualized in its entirety when it is within the scan plane. This technique is best for lesions located near the chest wall, in patients with very thick breasts, and in patients with implants. This technique also should be used by those with less interventional experience. The disadvantage is that the length of wire within the breast is greater than it is for the vertical procedure and, therefore, the surgery may be more difficult. With either a vertical or horizontal approach, however, ultrasound guidance is a fast and accurate method of needle localization that has a high level of patient comfort and acceptance (Fig. 15.10).
Problematic Localizations
Related posts:

Stay updated, free articles. Join our Telegram channel

Full access? Get Clinical Tree


