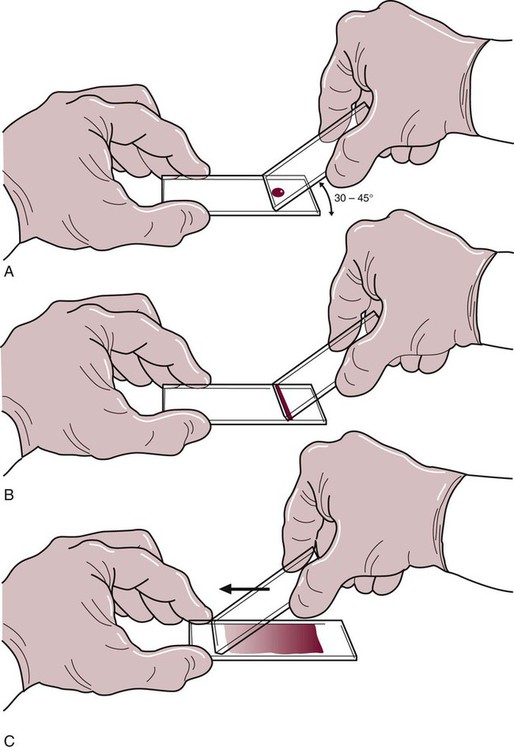
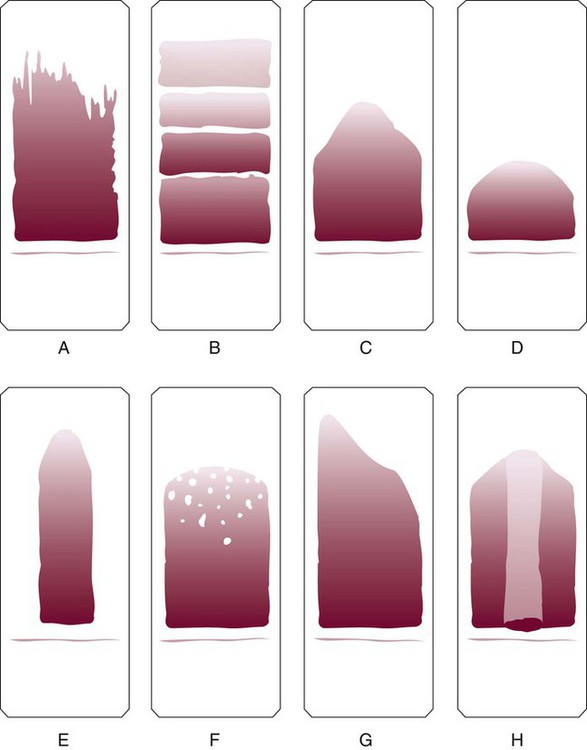
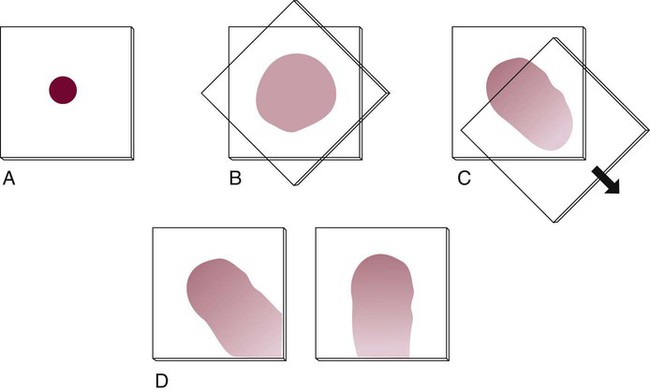
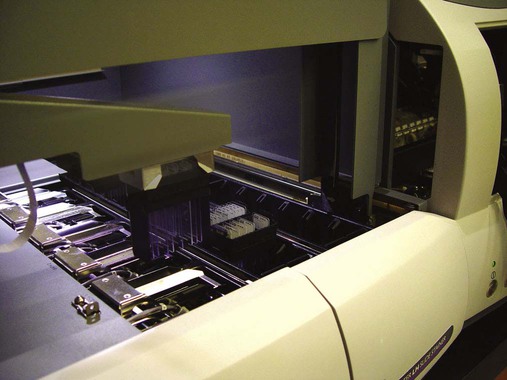
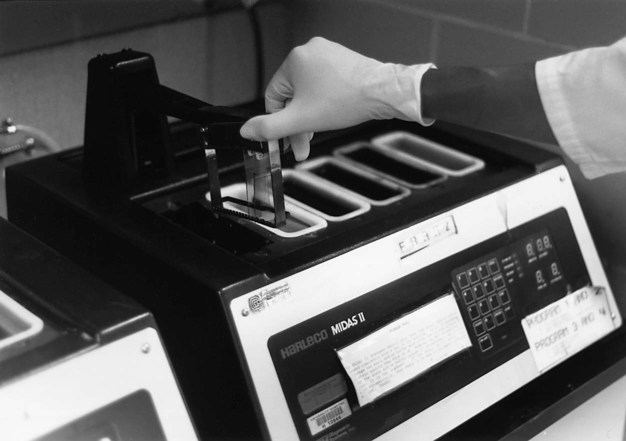
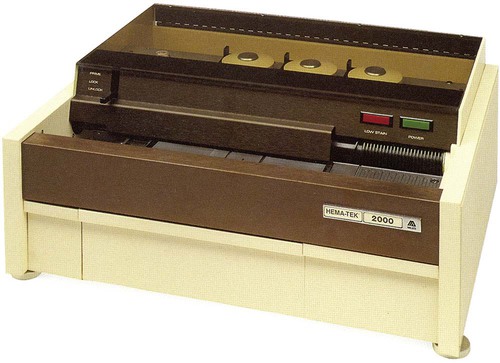
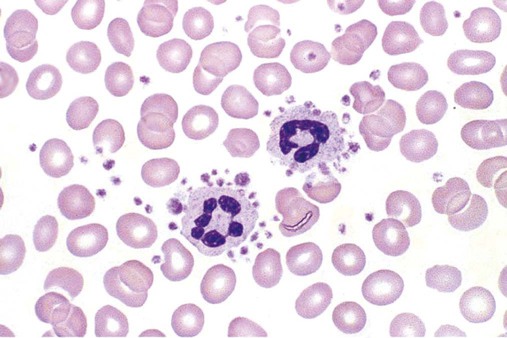
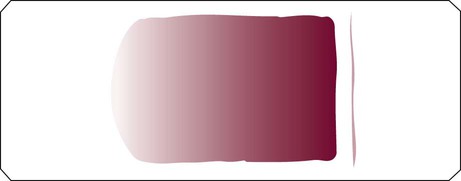
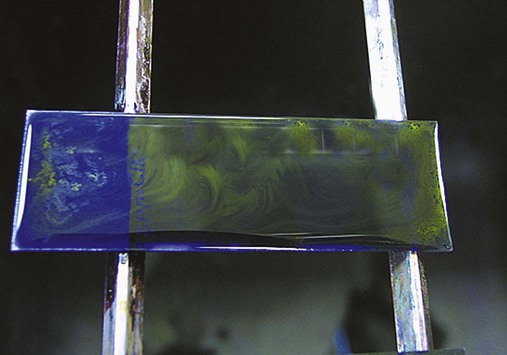
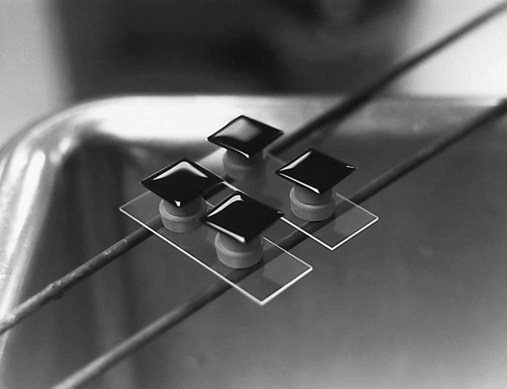
After completion of this chapter, the reader will be able to: 1. List the specimen sources and collection processes that are acceptable for blood film preparation. 2. Describe the techniques for making peripheral blood films. 3. Describe the appearance of a well-prepared peripheral blood film, recognize a description of a slide that is consistent or inconsistent with that appearance, and troubleshoot problems with poorly prepared films. 4. Explain the principle, purpose, and basic method of Wright staining of blood films. 5. Identify and troubleshoot problems that cause poorly stained blood films. 6. Describe the proper examination of a peripheral blood film, including selection of the correct area, sequence of examination, and observations to be made at each magnification. Recognize deviations from this protocol. 7. Given the number of cells observed per field and the magnification of the objective, apply formulas to estimate white blood cell (WBC) counts and platelet counts. 8. Explain the effect that platelet satellitosis and clumping may have on automated complete blood count (CBC) results. Recognize examples of results that would be consistent with these effects. 9. Follow the appropriate course of action to recognize and correct ethylenediaminetetraacetic acid–induced pseudothrombocytopenia and pseudoleukocytosis. 10. Implement a systematic approach to interpretation of CBC data that results in a verbal summary of the numerical data and communicates the blood picture succinctly. The peripheral blood film was examined, and the only abnormal finding was “platelets in clumps.” 1. Describe the blood picture succinctly using proper terminology for red blood cells, white blood cells, and platelets. 2. What automated results should be questioned? 3. What is the best course of action to handle this problem? The peripheral film evaluation is the capstone of a panel of tests called the complete blood count (CBC) or hemogram. The CBC includes enumeration of cellular elements, quantitation of hemoglobin, and statistical analyses that provide a snapshot of cell appearances. These results can be derived using the manual methods and calculations described in Chapter 14 or using the automated instruments described in Chapter 39. Regardless of method, the numerical values should be consistent with the assessment derived by examining the cells microscopically. Careful examination of the data in a systematic way ensures that all relevant results are noted and taken into consideration in the diagnosis. Essentially all specimens received for routine testing in the hematology section of the laboratory have been collected in lavender (purple)–topped tubes. These tubes contain disodium or tripotassium ethylenediaminetetraacetic acid (EDTA), which anticoagulates the blood by chelating the calcium that is essential for coagulation. Liquid tripotassium EDTA is often preferred to the powdered form because it mixes more easily with blood. High-quality blood films can be made from the blood in the EDTA tube, provided that they are made within 2 to 3 hours of drawing the specimen.1 Blood films from EDTA tubes that remain at room temperature for more than 5 hours often have unacceptable blood cell artifacts (echinocytic red blood cells [RBCs], spherocytes, necrobiotic leukocytes, and vacuolated neutrophils). Vacuolization of monocytes normally occurs almost immediately with EDTA but causes no evaluation problems. The main advantages of making films from blood in the EDTA tube are that multiple slides can be made if necessary and they do not have to be prepared immediately after the blood is drawn. In addition, EDTA generally prevents platelets from clumping on the glass slide, which makes the platelet estimate more accurate during film evaluation. There are purists, however, who believe that anticoagulant-free blood is still the specimen of choice for evaluation of blood cell morphology.2 Although some artifacts can be avoided in this way, samples made from unanticoagulated blood pose other problems (see later). Under certain conditions, use of a different anticoagulant or no anticoagulant may be helpful. Some patients’ blood undergoes an in vitro phenomenon called platelet satellitosis3 when anticoagulated with EDTA. The platelets surround or adhere to neutrophils, which potentially causes pseudothrombocytopenia when counting is done by automated methods (Figure 15-1).3,4 In addition, spuriously low platelet counts and falsely increased WBC counts (pseudoleukocytosis) can result from EDTA-induced platelet clumping.5 Pseudoleukocytosis occurs when platelet agglutinates are similar in size to WBCs and automated analyzers cannot distinguish the two. The platelet clumps are counted as WBCs instead of platelets. Platelet-specific autoantibodies that react best at room temperature are one of the mechanisms known to cause this phenomenon.6 In these circumstances, the examination of a blood film becomes an important quality control strategy, identifying these phenomena so that they can be corrected before the results are reported to the patient’s chart. Another source of blood for films is from finger and heel punctures. In general, the films are made immediately at the patient’s side. There are, however, a few limitations to this procedure. First, some platelet clumping must be expected if films are made directly from a drop of finger-stick or heel-stick blood or if blood is collected in heparinized microhematocrit tubes. Generally, this clumping is not enough to interfere with platelet estimates if the films are made promptly before clotting begins in earnest. Second, only a few films can be made directly from blood from a skin puncture before the site stops bleeding. If slides are made quickly and correctly, however, cell distribution and morphology should be adequate. These problems with finger and heel sticks can be eliminated with the use of EDTA microcollection tubes, such as Microtainers (Becton, Dickinson and Company, Franklin Lakes, N.J.) (see Chapter 3). A drop of blood (about 2 to 3 mm in diameter) from a finger, heel, or microhematocrit tube (nonheparinized for EDTA-anticoagulated blood or heparinized for capillary blood) is placed at one end of the slide. The drop also may be delivered using a Diff-Safe dispenser (Alpha Scientific Corporation, Malvern, Penn.). The Diff-Safe dispenser is inserted through the rubber stopper of the EDTA tube, which eliminates the need to remove the stopper.7 The size of the drop of blood is important: too large a drop creates a long or thick film, and too small a drop often makes a short or thin blood film. The pusher slide, held securely in the dominant hand at about a 30- to 45-degree angle (Figure 15-2, A), is drawn back into the drop of blood, and the blood is allowed to spread across the width of the slide (Figure 15-2, B). It is then quickly and smoothly pushed forward to the end of the slide to create a wedge film (Figure 15-2, C). It is important that the whole drop be picked up and spread. Moving the pusher slide forward too slowly accentuates poor leukocyte distribution by pushing larger cells, such as monocytes and granulocytes, to the very end and sides of the film. Maintaining an even, gentle pressure on the slide is essential. It is also crucial to keep the same angle all the way to the end of the film. When the hematocrit is higher than normal, as is found in patients with polycythemia or in newborns, the angle should be lowered (i.e., 25 degrees), so the film is not too short and thick. For extremely low hematocrit, the angle may need to be raised. If two or three films are made, the best one is chosen for staining, and the others are disposed of properly. Some laboratories make two good films and save one unstained in case another slide is required. 1. The film is two thirds to three fourths the length of the slide (Figure 15-3). 2. The film is finger shaped, very slightly rounded at the feather edge, not bullet shaped; this provides the widest area for examination. 3. The lateral edges of the film are visible. 4. The film is smooth without irregularities, holes, or streaks. 5. When the slide is held up to the light, the thin portion (feather edge) of the film has a “rainbow” appearance. Figure 15-4 shows unacceptable films. The coverslip method of film preparation is an older technique that is now used only rarely for peripheral blood films, but it is sometimes still used for making bone marrow aspirate smears. The only advantage of this method is that it produces an excellent leukocyte distribution, which lends itself to more accurate determination of differential counts. For routine morphologic evaluation, however, this technique is neither convenient nor practical. Impeccably clean glass coverslips must be used.2 Labeling, transport, staining, and storage of these small, breakable smears present many problems. This technique requires that a small drop of blood or bone marrow be placed on one clean coverslip (22 × 22 mm) and another coverslip be placed on top, with the blood allowed to spread across the two coverslips. One is then pulled across the other to create two thin films, one film on each coverslip (Figure 15-5). The two films can be stained and mounted on a 1-inch × 3-inch glass slide. When bone marrow smears are made using this technique, very slight pressure is applied to the coverslips between the index finger and thumb to help spread the bone marrow spicule before the two smears are pulled apart (this is sometimes called a crush preparation). Refining the skills required to make high-quality crush preparation bone marrow smears takes practice. Too much pressure on the coverslips causes cell rupture, which makes morphologic evaluation impossible. Inadequate pressure prevents the spicule from spreading to a satisfactory monolayer. Bone marrow crush preparations similar to this can be made using regular glass slides instead of coverslips, and the smears are of equal quality. The Sysmex SP-1000i (Sysmex Corporation of America, Mundelein, Ill.) is an automated slide making and staining system. After the instrument has performed a CBC for a specimen, a conveyor moves the racked tube to the SP-1000i, where the barcode is read. The computer already has determined from the automated results whether a slide is required. Criteria for a manual slide review are determined by each laboratory based on its patient population. Dependent on the hematocrit reading, the system adjusts the size of the drop of blood used and the angle and speed of the spreader slide in making a wedge preparation. After each blood film is prepared, the spreader slide is automatically cleaned and is ready for the next blood film to be made. Films can be produced approximately every 30 seconds. Information such as name, number, and date for the specimen is printed on the slide. The slide is dried, loaded into a cassette, and moved to the staining position, where stain and then buffer and rinse are added at designated times. When staining is complete, the slide is moved to a dry position, then to a collection area where it can be picked up for microscopic evaluation. Smears made off-line, such as bone marrow smears and cytospin preparations, may be stained using this system as well. Other blood analyzer manufacturers, such as Beckman Coulter (Brea, Calif.), also have automated slide making and staining instruments (Figure 15-6) (see Chapter 39). Pure Wright stain or a Wright-Giemsa stain (Romanowsky stain)8 is used for staining peripheral blood films and bone marrow smears. These are considered polychrome stains because they contain both eosin and methylene blue. Giemsa stains also contain methylene blue azure. The purpose of staining blood films is simply to make the cells more visible and to allow their morphology to be evaluated. Traditionally, Wright staining has been performed over a sink or pan with a staining rack. Slides are placed on the rack, film side facing upward. The Wright stain may be filtered before use or poured directly from the bottle through a filter onto the slide. It is important to flood the slide completely. The stain should remain on the slide at least 1 to 3 minutes to fix the cells to the glass. Then an approximately equal amount of buffer is added to the slide. Surface tension allows very little of the buffer to run off. The laboratory professional can blow gently on the slide to mix the aqueous buffer and the alcohol stain. A metallic sheen (or green “scum”) should appear on the slide if mixing is correct (Figure 15-7). More buffer can be added if necessary. The mixture is allowed to remain on the slide for 3 minutes or more (bone marrow smears take longer to stain than peripheral blood films). The timing may be adjusted to produce the best staining characteristics. When staining is complete, the slide is rinsed with a steady but gentle stream of neutral-pH water, the back of the slide is wiped to remove any stain residue, and the slide is air-dried in a vertical position. Coverslip-type blood films must be stained by the manual method. These films are placed on evacuated test tube rubber stoppers on the staining rack over a sink (Figure 15-8). Numerous automated slide stainers are commercially available. For high-volume laboratories, these instruments are essential. Once they are set up and loaded with slides, staining proceeds without operator attention. In general, it takes about 5 to 10 minutes to stain a batch of slides. The processes of fixing/staining and buffering are similar in practice to those of the manual method. The slides may be automatically dipped in stain and then in buffer and a series of rinses (Midas II, EM Science, Gibbstown, N.J. [Figure 15-9]) or propelled along a platen surface by two conveyor spirals (Hema-Tek, Siemens Healthcare Diagnostics, Inc., Deerfield, Ill. [Figure 15-10]). In the Hema-Tek device, stain, buffer, and rinse are pumped through holes in the platen surface, flooding the slide at the appropriate time. Film quality and color consistency are usually good with any of these instruments. Some commercially prepared stain, buffer, and rinse packages do vary from lot to lot or manufacturer to manufacturer, so testing is recommended. Some disadvantages of the dip-type batch stainers are that (1) stat slides cannot be added to the batch once the staining process has begun, and (2) working or aqueous solutions of stain are stable for only 3 to 6 hours and need to be made often. Stat slides can be added at any time to the Hema-Tek stainer, and stain packages are stable for about 6 months. Properly staining a peripheral blood film is just as important as making a good film. Macroscopically, a well-stained blood film should be pink to purple. Microscopically, the RBCs should appear orange to salmon pink, and WBC nuclei should be purple to blue. The cytoplasm of neutrophils should be pink to tan with violet or lilac granules. Eosinophils should have bright orange refractile granules. Faulty staining can be troublesome for reading the films, causing problems ranging from minor shifts in color to the inability to identify cells and assess morphology. Trying to interpret a poorly prepared or poorly stained blood film is extremely frustrating. If possible, a newly stained film should be studied. Hints for troubleshooting poorly stained blood films are provided in Box 15-1.
Examination of the Peripheral Blood Film and Correlation with the Complete Blood Count
Case Study
Peripheral Blood Films
Specimen Collection
Sources of Specimens
Peripheral Film Preparation
Types of Films
Manual Wedge Technique
Features of a well-made wedge peripheral blood film
Coverslip Technique
Automated Slide Making and Staining
Staining of Peripheral Blood Films
Wright Staining Methods
Manual Technique
Automated Slide Stainers
Features of a Well-Stained Peripheral Blood Film

