In order to surgically manage gynecologic malignancies, it is frequently necessary to perform surgical procedures beyond the genital tract. These include selected operations on the intestinal and urologic tracts, and plastic reconstructive operations such as the creation of a neovagina. In addition, central venous access is frequently required for hyperalimentation or chemotherapy. In some centers, most of the operations are performed by the gynecologic oncologist, while in other centers, the emphasis is on the development of a multidisciplinary team with involvement of urologists, colorectal, upper gastrointestinal and plastic surgeons for the surgical procedures, and anesthesiologists for the central lines. The techniques for these nongynecologic procedures are presented in this chapter.
Central Lines
Central venous-access catheters are often necessary in the critically ill gynecologic oncology patient for either central venous pressure monitoring, centrally administered hyperalimentation, or chemotherapy (1–3). The most frequently used veins are the subclavian and the jugular. The brachial veins are used for peripherally inserted central catheters (PICC lines) (4). The results of three-pooled meta-analyses have shown that ultrasound-guided placement of central venous access devices reduces the number of complications, failures, and the insertion time (4–6). Static ultrasonic images can help localize the veins using the traditional anatomic landmark techniques, but dynamic images can also be used to guide the needle into the vein in real-time.
Subclavian Venous Catheter
Infraclavicular Technique
Although there are many different techniques for the insertion of a central venous catheter into the subclavian vein, the infraclavicular technique remains the one most commonly employed and the simplest. The subclavian vein lies immediately deep to the clavicle within the costoclavicular triangle, where the vein is more commonly approached from the right side (Fig. 20.1A). The costoclavicular-scalene triangle is bounded by the medial end of the clavicle anteriorly, the upper surface of the first rib posteriorly, and the anterior scalene muscle laterally (1). The anterior scalene muscle separates the subclavian vein anteriorly from the subclavian artery posteriorly. Just deep to the subclavian artery are the nerves of the brachial plexus. The subclavian vein is covered by the medial 5 cm of the clavicle. Just deep to the medial head of the clavicle, the right internal jugular vein joins the right subclavian vein to form the innominate vein, which then descends into the chest, where it joins the left innominate vein to form the superior vena cava in the retrosternal space.
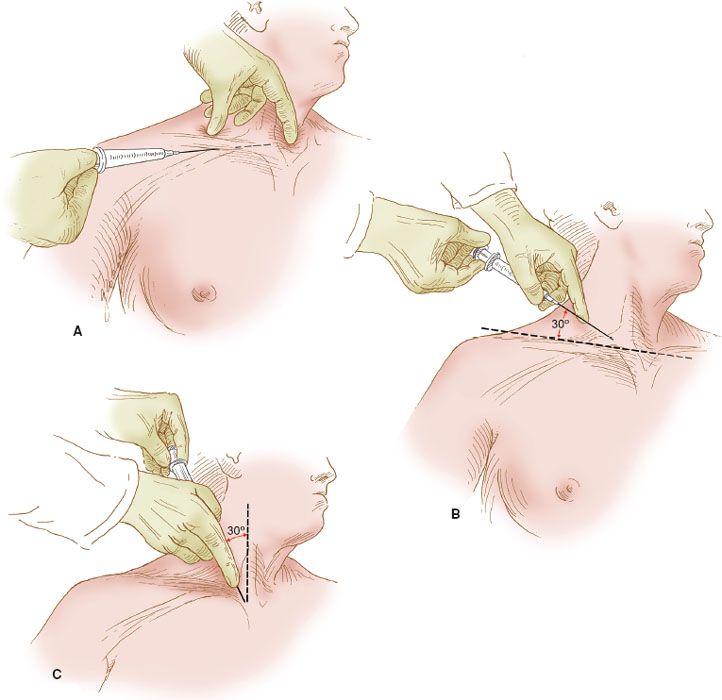
Figure 20.1 Central venous catheter insertion sites. The right subclavian and right internal jugular venous insertion sites are illustrated. The insertion sites for the subclavian venous catheter: (A) via the infraclavicular technique; (B) via the supraclavicular technique; (C) the site of insertion for the internal jugular vein. The needle is directed toward the suprasternal notch.
There are several other vital structures in the scalene triangle. The phrenic nerve courses anterior to the anterior scalene muscle and therefore lies immediately deep to the subclavian vein. If the deep wall of the vein is penetrated, the phrenic nerve can be injured. If the subclavian artery is penetrated, the brachial plexus, lying just deep to the vessel, can be injured. The right lymphatic duct and the thoracic duct on the left enter their respective subclavian veins near the junction with the internal jugular veins and therefore may be injured by a misplaced needle. The most common injury is to the pleura, the apex of which is just beneath the subclavian vein at the junction of the internal jugular vein.
The technique for infraclavicular insertion of a catheter into the right subclavian vein is as follows:
1. The patient is placed in the supine position, with the foot of the bed elevated about 1 foot so that the patient is in the Trendelenburg position. If possible, a bed that can be tilted into this position should be used. This position creates venous distention and increases the intraluminal pressure within the subclavian vein. The patient’s head should be tilted away from the site of insertion so that the landmarks can be identified easily.
2. After careful skin preparation with chlorhexidine gluconate solution, the skin and subjacent tissues are anesthetized by means of lidocaine without epinephrine.
3. The site of insertion is located at the junction of the middle and medial thirds of the clavicle, approximately 1 cm below the bone’s inferior margin.
4. Before insertion of the catheter needle, a probe needle is used to localize the subclavian vein and to identify the presence of dark venous blood. An 18-gauge needle attached to a 10-mL syringe filled with normal saline solution is used.
5. A 14-gauge Intracath needle is used to insert the catheter (Fig. 20.1A). The needle attached to the syringe is inserted into the skin with the bevel directed toward the heart. The needle should be held and directed parallel to the anterior chest wall.
6. After insertion through the skin, the needle is directed medially and advanced along the undersurface of the clavicle in the direction of the suprasternal notch.
7. The syringe is pulled gently to apply suction as the needle is inserted. The patient should exhale during insertion to avoid an air embolus.
8. After a free flow of blood has been obtained, the needle is held carefully in place, the syringe is detached, and the central venous catheter is advanced inside the lumen of the needle. The catheter should advance freely, and there should be blood returning through the catheter. The catheter is advanced into the innominate vein and then into the superior vena cava. The catheter should be aspirated, and if blood is easily withdrawn, the needle is removed.
9. While the needle is in place, the catheter should not be withdrawn because the tip can be sheared off and embolize.
10. The end of the catheter is connected to an intravenous set, and the catheter is sutured to the skin.
11. The position of the catheter is verified by a chest radiograph. It should be located in the superior vena cava, not in the right atrium or ventricle, as this can result in trauma to the heart.
If central venous pressure readings are to be determined, the intravenous line is attached to a manometer, and the base of the water column is positioned at the level of the right atrium, which is about 5 cm posterior to the fourth costochondral junction when the patient is in the supine position. The normal central venous pressure should be between 5 and 12 cm of water.
The complication rate for central venous catheter insertion through the subclavian route is about 1–2% (1). Most serious complications are related to puncture of the pleura and lung or perforation and laceration of vessels, resulting in a pneumothorax or hemothorax. Catheter-related infection is seen in about 0.5% of patients, and the catheter should be removed if this source of infection is suspected.
Supraclavicular Insertion
An alternative route of insertion into the subclavian vein is the supraclavicular route (Fig. 20.1B). Some prefer this to the infraclavicular route, but the morbidity of insertion is comparable with the two methods, and the preference is related to the technique that is most comfortable for the operator.
The technique for insertion is identical to that of the infraclavicular route, except that the needle is inserted above the clavicle, approximately 5 cm lateral to the midsternal notch. The angle of insertion is about 30 degrees from a line drawn between the two shoulders and directed caudally. The needle is aimed at the suprasternal notch.
Jugular Venous Catheterization
Another alternative for central venous access is the use of the jugular veins, either the internal or external vein. Jugular venous catheterization is frequently the method of choice when the catheter is inserted intraoperatively and the catheter is to be used primarily for acute monitoring. The advantage is that there is relatively easy access while the patient is anesthetized and draped for surgery, whereas the disadvantage is that it is more difficult to anchor the catheter because the neck is more mobile than the anterior chest wall. The location for the insertion site is illustrated in Figure 20.1C.
The technique for insertion is as follows:
1. The patient is placed in the Trendelenburg position. With the patient’s head turned away from the side of insertion, the needle is inserted just above the medial head of the clavicle between the medial and middle heads of the sternocleidomastoid muscle, where a small pocket is readily apparent and helps to localize the site for insertion.
2. The angle of insertion is about 20 to 30 degrees from the sagittal median of the patient, and the direction is toward the heart.
3. As with subclavian catheterization, the use of a probe needle will help to localize the appropriate vessel.
4. The technique of catheter placement is the same as described above for the subclavian catheter. However, the length of catheter that must be inserted is less, as the distance to the proper location in the superior vena cava is less.
5. The position of the line inserted intraoperatively is checked with a chest radiograph obtained in the recovery room if the catheter is to be left in place.
External jugular catheters may also be used in patients who are under general anesthesia. Some patients have relatively prominent external jugular veins, and they are very easily catheterized. The external jugular is not durable, however, and this route is not useful for central hyperalimentation. The complication rate for jugular venous catheterization is essentially the same as that for the subclavian route.
Dynamic Ultrasonic Technique
When using dynamic images to guide the needle, several additional steps are necessary to ensure successful placement:
• Steps should be taken to ensure the sterility of the probe using a sterile probe cover.
• Ultrasonic gel should be applied to the head of the probe and any air bubbles forced out.
• Sterile ultrasonic/conductive gel should be applied between the skin and the probe cover.
When the ultrasonic probe is ready:
• The target vein should be centered on the ultrasonic picture.
• The focus should be focused on the needle tip rather than the shaft, which can be accomplished by moving the needle up and down within the tissue to better see it, or by rocking the probe back and forth.
• When in the vein, the probe can be removed and the remaining steps accomplished according to the traditional techniques.
Semipermanent Lines
The placement of semipermanent lines is useful in patients who require prolonged access to the central venous system, such as those with a chronic intestinal obstruction or fistula who are to receive hyperalimentation after discharge from hospital (1).
Broviac, Hickman, and Quinton Catheters
The most common types of lines are catheters made of flexible, synthetic rubber (e.g., Broviac, Hickman, or Quinton catheters). The catheters are available in several sizes, although the adult type is used for most patients; the length is adapted by cutting the catheters as necessary. The catheters are available with either a single or double lumen. The single-lumen catheters usually are sufficient for parenteral nutrition, whereas the double-lumen ones may be necessary for patients requiring frequent bolus medication, such as intravenous pain or antibiotic medications (2,3).
The most common site for insertion of a semipermanent catheter is the right subclavian vein. The method of insertion is initially identical to the technique employed for the insertion of a temporary catheter, but an insertion cannula, called a Cook introducer, can simplify and facilitate insertion of the catheter (Fig. 20.2). It is preferable to insert the catheter under fluoroscopic guidance.
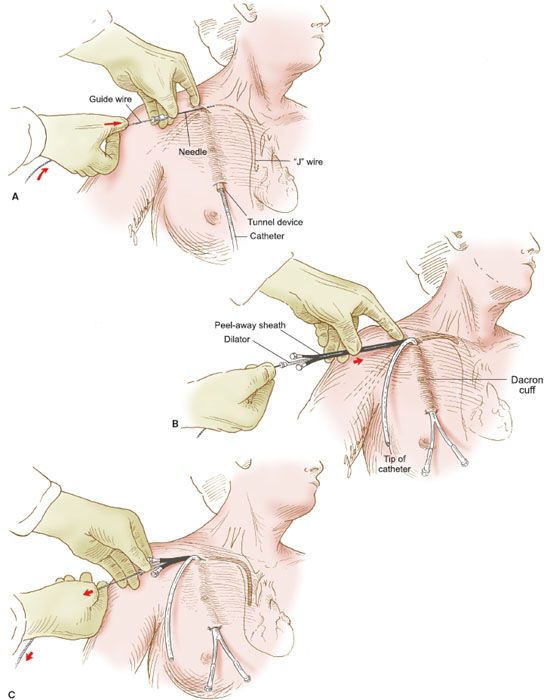
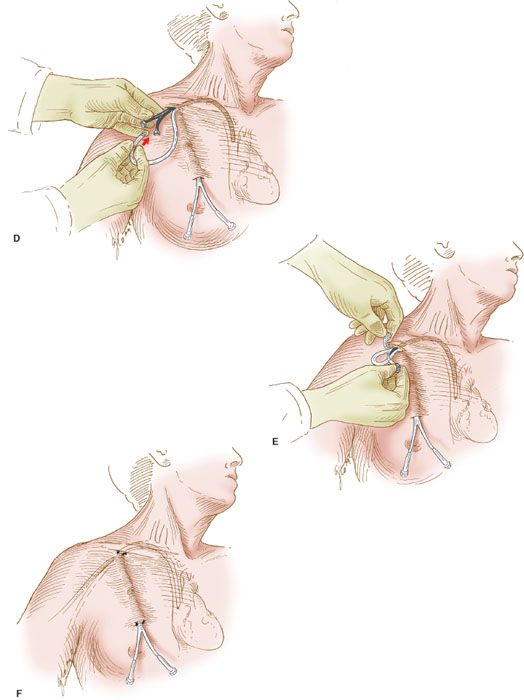
Figure 20.2 Semipermanent catheter insertion. The technique for insertion of the semipermanent (e.g., Hickman) catheter. A: After the catheter is tunneled in the subcutaneous tissue, a needle is inserted into the right subclavian vein, a guide wire is inserted through the needle, and the needle is withdrawn. B: The Cook introducer then is inserted over the guide wire. C: After the introducer with its outer sheath is in place in the right subclavian vein, the wire is withdrawn. D: The central catheter of the Cook introducer is withdrawn, and the free end of the semipermanent catheter is inserted through the outer sheath. E: The outer sheath of the Cook introducer is peeled away. F: The semipermanent catheter is tunneled in the subcutaneous tissue under the skin of the right side of the chest, and the free end is exteriorized.
The technique is as follows:
1. After the patient has been properly positioned and the anterior chest and clavicular areas prepared, the subclavian vein is identified in the manner described above.
2. A premade kit is available for the Cook introducer. An 18-gauge needle is used to introduce a guide wire into the subclavian vein, and the guide wire is passed into the superior vena cava under fluoroscopy (Fig. 20.2A).
3. The proper position of the guide wire is documented, and the Cook introducer is fed over the guide wire and advanced into the subclavian vein (Fig. 20.2B).
4. The introducer has an inner catheter and an outer sheath. After insertion of the entire apparatus, the central cannula is removed (Fig. 20.2C) and the semipermanent catheter is threaded through the outer sheath, which remains in the subclavian vein (Fig. 20.2D).
5. After the semipermanent catheter has been inserted, the outer sheath is peeled away, leaving the catheter in place (Fig. 20.2E).
6. The proximal end of the semipermanent catheter is tunneled under the skin of the anterior chest wall and exteriorized through a stab incision in the skin as illustrated (Fig. 20.2F).
7. An intravenous line is connected to the catheter’s adapter, and fluid is run into the line to establish its patency. The catheter is sutured into place.
Peripherally Inserted Central Catheter Lines
Another type of semipermanent line is inserted through a peripheral access site and is called the peripherally inserted central catheter or PICC line. The PICC line is inserted into the brachial vein in the antecubital fossa. The catheter is passed cephalad until it reaches the central subclavian vein. This line is suitable for the infusion of parenteral nutrition as well as chemotherapy. The PICC line may be more desirable than a totally implantable line when short-term use is contemplated, for example, 3 to 4 months.
This approach is less durable than the centrally inserted catheters and somewhat more cumbersome because of the location of the insertion site. However, its main advantage is that it can be easily inserted at the bedside (7). Furthermore, it can be placed by a certified nurse or an intravenous technician trained in the insertion technique. Alternately, an implantable port can be inserted in the antecubital fossa by a physician.
Peritoneal Catheters
Peritoneal catheters are used in gynecologic oncology for the instillation of intraperitoneal chemotherapy. A commonly used catheter is a completely implantable single lumen 9.6-Fr MRI safe Port-a-Cath. This catheter has not been associated with an increased risk of complications or treatment discontinuation (8,9). Alternatively, a Hickman venous access catheter can be used.
The catheter is implanted into the peritoneal cavity lateral to the midline laparotomy incision (Fig. 20.3). The catheter is tunneled in the subcutaneous tissue and brought out through a stab incision lateral to the fascial incision. The tip of the catheter in the peritoneal cavity is directed toward the pelvic cul-de-sac.
An alternative approach is the use of a completely implantable port, which is attached directly to a fenestrated peritoneal catheter or venous access catheter. The port is inserted into the subcutaneous tissue and positioned in the left or right lower quadrant of the anterior abdomen, or over the lower anterior rib cage for ready access (Fig. 20.4). Both laparotomy and laparoscopy can be utilized for port placement. Postprocedure, the port is entered percutaneously with a 21-gauge needle.
The reported rate of catheter-related complications ranges from 3–34% (8,10–14). In the most recent phase III study of IP versus IV chemotherapy for the treatment of ovarian cancer, Walker et al. reported that 40 (19.5%) of 205 patients randomized to the IP arm had complications, including infection (n = 21); blockage (n = 10); leakage (n = 3); access problems (n = 5); and vaginal leakage of fluid (n = 1) (10). Of the 119 patients (58%) discontinuing IP therapy, catheter-related complications accounted for 34% of cases (40 of 119). Both Tenckhoff or implantable ports with attached fenestrated or venous (Hickman) catheters were used.
Minor infections can be treated with antibiotics, and low-grade peritonitis can be treated by the instillation of antibiotics directly via the catheter. For persistent and severe infections, the peritoneal catheter may require removal. In other studies, the most common problem associated with the catheters has been blockage (14), as there is no effective way to prevent deposition of fibrin around the catheter. Occasionally, this produces a “ball valve” effect; that is, fluid will flow in but will not flow out. While some authors report higher fibrin sheath formation and adhesions in association with fenestrated catheters and dacron cuffs, a recent retrospective study of fenestrated peritoneal catheters reported that only 9 of 342 patients (3%) required discontinuation secondary to catheter complications (8).
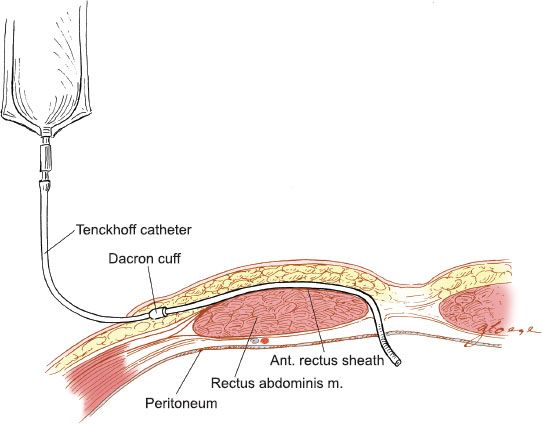
Figure 20.3 Tenckhoff peritoneal catheter. The placement of the Tenckhoff catheter into the peritoneal cavity is illustrated.
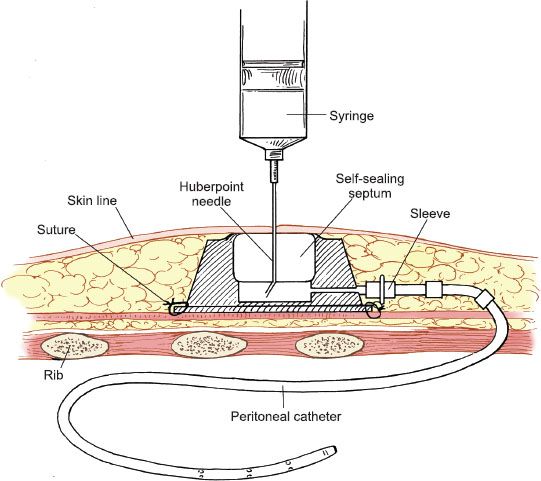
Figure 20.4 Port-a-Cath peritoneal catheter. The totally implantable peritoneal access catheter is tunneled through the subcutaneous tissues into the peritoneal cavity.
Incisions
Particularly important in the operative plan for any patient is the determination of the type of incision to be made. The surgeon should have a general philosophy and modus operandi when planning the surgical procedure. There are certain incisions that are more appropriate in patients who are undergoing surgery for cancer rather than for benign conditions. In addition, special guidelines for the closure of incisions should be followed.
Vertical Incisions
Abdominal incisions used in the gynecologic oncology patient are most commonly vertical. Transverse incisions are also appropriate in certain circumstances. The indications and techniques for these incisions and their modifications are discussed.
Patients with suspected malignancies of the ovary or fallopian tube are best explored through a vertical abdominal incision. With a vertical incision, the patient’s disease can be staged properly. Also, this approach permits the removal of any upper abdominal metastases, which cannot always be appreciated preoperatively. The most likely site of resectable upper abdominal disease is the omentum. For an omentectomy, access to the region of the splenic and hepatic flexures is required.
A vertical incision is also necessary in patients being explored for intestinal obstruction or fistulae. The performance of a para-aortic lymphadenectomy is facilitated by a vertical incision. Patients being explored for recurrent malignancies or for possible pelvic exenteration also require a vertical abdominal incision.
The most commonly used vertical incision is in the midline. This incision has the advantage of being easy to perform; it can be accomplished quickly, because the midline is the least vascular area of the abdominal wall, and the smallest depth of tissue must be divided. The principal blood supply to the anterior abdominal wall is from the inferior epigastric vessels, which are located laterally in the rectus sheath posterior to the rectus abdominis muscles, and these vessels are avoided by the midline incision.
The principal problem associated with the midline incision is that it has the highest rate of wound dehiscence when compared with all other incisions. The wound disruption rate is about 0.1–0.65% (15,16), although this rate may be higher in patients with cancer, particularly those with ascites and malnutrition, or those needing postoperative radiation.
Dehiscence rates as high as 2–3% have been reported in obese, diabetic patients with cancer (16). The majority of wound dehiscences are associated with wound infection or poor closure technique. The occurrence of a ventral hernia is associated with wound disruption secondary to infection and is more common in patients with malignancy (17).
Transverse Incisions
In patients with a probable benign condition who are undergoing abdominal exploration for the first time, a lower transverse abdominal incision is frequently employed. The advantage of this incision is that it is more cosmetic, generally less painful, and associated with fewer incisional hernias (18). The disadvantage is the relative problem of upper abdominal exposure and the more frequent occurrence of wound hematomas.
If exposure to the upper abdomen is required, the surgeon has several choices. The incision can be modified by division of the rectus abdominis muscles in a transverse direction at the level of the incision (i.e., a Maylard incision), or the rectus abdominis muscles may be detached from the symphysis pubis (i.e., the Cherney incision). After division or mobilization of the rectus muscles, the inferior epigastric vessels are ligated bilaterally and, if necessary, the incision is further extended laterally by incising (with the diathermy) the “strap” muscles of the anterior abdominal wall. The conversion of the incision to a Maylard or a Cherney incision always provides considerably more exposure in the pelvis and low para-aortic area.
If better access to the upper abdomen is required, the incision can be modified further by extending the incision cephalad to form a “J,” a reverse “J,” or a “hockey stick” incision. In general, any of these techniques is preferable to the making of a second incision, that is, a midline incision coincident with the transverse incision, a so-called “T” incision. The principal difficulty with the latter approach is the weakness of the incision at the point of intersection of the two incisions.
In patients undergoing radical hysterectomy and pelvic lymphadenectomy for early-stage cervical cancer, a lower abdominal transverse incision is adequate.
Incisional Closure
Of primary importance is the technique of incisional closure. The closure can be accomplished by closing the peritoneum, fascia, subcutaneous tissue, and skin individually, or a bulk closure can be performed that incorporates the peritoneum and the fascia together. This bulk closure or internal retention suture, the “Smead–Jones” closure, is the strongest closure technique (16). Mass closure with a continuous, single strand of polyglyconate monofilament absorbable suture (Maxon) or polydioxanone (PDS) has been shown to be an effective, safe alternative to the use of interrupted sutures, even in vertical midline incisions (17,19,20).
Internal Retention Suture
The Smead–Jones, or internal retention, technique uses interrupted sutures that are placed as illustrated in Figure 20.5. The sutures are placed in a far-far, near-near distribution, which is a modified figure-of-eight. The first suture is placed through the anterior fascia, rectus muscle, posterior fascia, and peritoneum and the second through the anterior fascial layer only. The key is to place the sutures at least 1.5 to 2 cm from the fascial edge and not more than 1 cm apart (19). The disruption rate for midline incisions closed with this technique should be less than 0.2%.

Figure 20.5 Internal retention abdominal closure. The “Smead–Jones” far-far, near-near closure.
Suture Material
The choice of suture should be dictated by the circumstances (20). If there is evidence of significant infection, as with an abscess or an intestinal injury, a monofilament, nonabsorbable suture is most appropriate. The most frequently used substances are nylon sutures, such as Prolene. For vertical incisions, an absorbable, long-lasting synthetic suture offers the best combination of strength, durability, and ease of use. Most suitable is either monofilament polyglyconate suture (Maxon) or monofilament polydioxanone (PDS). Braided, polyglycolic acid (PGA) suture, such as Vicryl or Dexon, is suitable for transverse incisions (20,21). A grade 0 or 1 suture is necessary to provide a suitably strong closure. The tissue reactivity to these synthetic materials is less than that of chromic catgut. Nonabsorbable polyfilament materials, such as cotton and silk, should not be used for closure of incisions because of the higher potential for “stitch abscess” formation (17).
External Retention Suture
Retention sutures that are external can be used to prevent evisceration in patients who are at high risk of this potentially catastrophic occurrence. The routine use of internal retention sutures has reduced the need for the external retention sutures. However, in patients who are morbidly obese, have a major wound infection, or whose incisions have eviscerated in the past, the addition of external retention sutures may be indicated. These sutures should be placed in a manner similar to internal retention sutures, that is, far-far, near-near, with the far sutures also placed through the skin so that the retention sutures are knotted externally. The preferable suture material for this closure is nylon. The external retention sutures are inserted through a rubber “bolster” that helps to protect the skin from injury from the suture. Sutures are placed at approximately 2- to 3-cm intervals, and interrupted fascial sutures are placed between them.
Skin Closure
Primary Closure
Skin closure of vertical incisions in cancer patients generally should be interrupted, preferably with metal skin clips. Subcuticular closures are not appropriate in most circumstances for vertical incisions, but they are quite cosmetic and acceptable for small transverse incisions where the risk of wound infection is low (22).
Secondary Closure
A delayed or secondary skin closure is useful in patients whose incisions are infected, that is, after the drainage of an intra-abdominal abscess or repair of an intestinal fistula. This is achieved by placement of interrupted mattress sutures in the skin, which are not tied, so that the skin remains unapproximated. Thus the skin can be closed later, usually after 3 to 4 days, when the infection is under control. Negative pressure wound therapy may help in accelerating the healing process but definitive evidence is lacking (23).
Intestinal Operations
Preoperative Intestinal Preparation
If bowel resection is planned or contemplated, a mechanical and antibiotic “bowel preparation” may be undertaken preoperatively. If the intestine is prepared properly, the segment is well vascularized, and there is no sepsis, prior irradiation, or evidence of tumor at the site of anastomosis, colonic reanastomosis can be accomplished without leakage in 98% of the cases (24). More proximal resection of the small intestine can be performed without a bowel preparation, because this portion of the intestine does not contain bacteria.
An effective protocol for bowel preparation is presented in Table 20.1. Recently, the FDA issued a Safety Alert discussing the risk of acute phosphate nephropathy, a rare type of renal failure associated with oral sodium phosphate bowel cleansing that may lead to permanent renal impairment. Increased risk has been associated with multiple factors including advanced age, kidney disease, and use of medications affecting renal perfusion and function. In response, over-the-counter oral sodium phosphate preparations such as Fleet Phospho-soda have been recalled. Bowel preparation regimens should be individualized for patients after assessment of risk factors. Alternative bowel preparation regimens include magnesium citrate and Golytely.
There is controversy regarding the use of bowel preparations in general as well as the optimal “bowel prep,” as it is uncertain whether, in addition to the mechanical preparation, the antibiotic preparation is necessary (25,26). Several meta-analyses of patients undergoing elective colorectal procedures have found either no difference or increased rates of anastomotic leakage and wound infection when prophylactic mechanical bowel preparation is used (26,27). However, bowel resections for gynecologic malignancies are performed in a different patient population, often in the presence of ascites, extensive carcinomatosis, and multiple sites of bowel involvement.
Table 20.1 Intestinal Preparation
Lacking studies in the gynecologic oncology population, the use of mechanical bowel preparation and antibiotics is predominantly determined by surgeon preference. Before laparotomy for small intestinal obstruction caused by ovarian cancer, in selected cases, it may be useful to insert a nasogastric (NG) tube for 24 to 48 hours preoperatively to avoid the possibility of vomiting and aspiration (28).
Minor Intestinal Operations
The most common intestinal operations are lysis of adhesions, repair of an enterotomy, and creation of an intestinal stoma.
Repair of Enterotomy
Intestinal enterotomy is a common inadvertent occurrence in abdominal surgery, and it can occur in the most experienced hands. Factors that predispose to serosal and mucosal injury include extensive adhesions, intra-abdominal carcinomatosis, radiation therapy, chemotherapy, prior abdominal surgery, and peritonitis.
An enterotomy usually does not cause any problems, provided it is identified and repaired. Any defect should be repaired when it occurs or marked with a long stitch so that it will not be overlooked later. At the completion of any intra-abdominal exploration necessitating significant lysis of adhesions, the surgeon must “run the bowel,” carefully inspecting it to exclude either a serosal injury or an enterotomy.
Serosal defects through which the intestinal mucosa can be seen must be repaired. Less complete defects must be repaired in all patients who have had radiation treatment to the abdomen. When in doubt, the defect should be repaired to minimize the risk of intestinal breakdown, peritonitis, abscess, and fistula.
When there is an enterotomy, the repair should be made with interrupted 3-0 or 4-0 sutures on a gastrointestinal needle, placed at 2- to 3-mm intervals along the defect. The suture materials most commonly employed are PGA (Vicryl or Dexon). The direction of closure should be perpendicular to the lumen of the bowel to minimize the potential for lumenal stricture (Fig. 20.6).
With small defects (i.e., <5 to 6 mm), the closure can be accomplished with a single layer of sutures passed through both the serosa and the mucosa. However, it is preferable to close more extensive defects in two layers: an inner full-thickness layer covered with an outer seromuscular layer. Care should be taken to approximate the tissues carefully without cutting through the fragile serosa.
Gastrostomy
A gastrostomy may be necessary in patients with chronic intestinal obstruction, usually from terminal ovarian cancer. It is particularly useful in those who require prolonged intestinal intubation, and in whom the underlying intestinal blockage cannot be relieved adequately. This procedure may permit the removal of an uncomfortable NG tube that is irritating to the nasopharynx. While surgically placed gastrostomy tubes have been the norm for many years, percutaneously or endoscopically placed gastrostomy tubes have more recently gained wide acceptance, since they tend to be less costly and faster to perform, with similar complication rates (29). Open gastrostomies are still useful when the tubes cannot be placed endoscopically or radiologically, or in patients undergoing a separate procedure. The two most common surgical approaches are the Witzel and the Stamm gastrostomies (30–32).
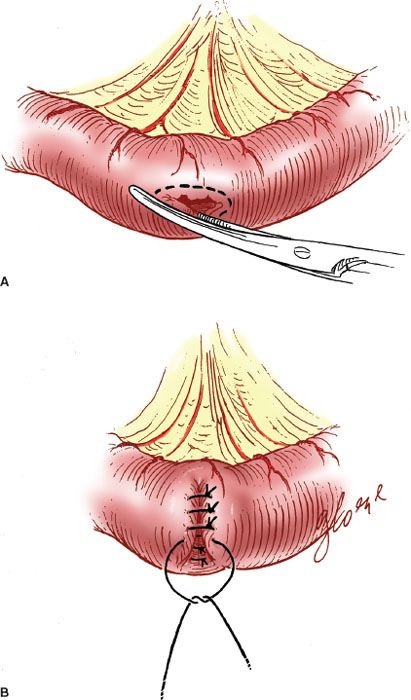
Figure 20.6 Closure of an intestinal enterotomy. A: The edges of the enterotomy are trimmed. B: The enterotomy is closed perpendicular to the lumen in two layers.
Stamm Gastrostomy
The simplest technique is the Stamm gastrostomy, in which a small incision is made in the inferior anterior gastric wall. A Foley catheter with a 30-mL balloon is brought into the peritoneal cavity through a separate stab incision in the left upper outer quadrant of the abdomen. Two or three successive purse-string sutures with 2-0 absorbable suture material are used to invert the stomach around the tube. Interrupted 2-0 silk or PGA sutures are placed in the serosa, and the same material is used to suture the serosa to the peritoneum, approximating the gastric wall to the anterior abdominal wall in an effort to prevent leakage.
Witzel Gastrostomy
The Witzel technique is similar, but the catheter is tunneled within the gastric wall for several centimeters with Lembert sutures of 2-0 PGA. This technique results in a serosal tunnel that may further reduce the risk of leakage. The most important step in preventing gastrostomy leakage is approximation of the gastric serosa to the anterior abdominal wall.
Percutaneous Gastrostomy
Another technique for gastrostomy in patients not otherwise undergoing laparotomy is the percutaneous placement of a catheter into the stomach. This method involves the initial passage of a gastroscope. The site for catheter insertion is illuminated by a fiberoptic light source through the gastroscope, and the catheter is introduced into the stomach percutaneously.
Cecostomy
The performance of a cecostomy may be useful in the occasional patient who has an obstruction of the colon and a grossly dilated cecum and in whom a simple palliative measure to relieve the obstruction is indicated. A more definitive procedure for relief of the obstruction may be appropriate when the patient’s condition is more stable.
The cecostomy is performed by placement of a Foley catheter into the dilated portion of the cecum. The tube is sutured into place by the technique employed for a Stamm gastrostomy. The tube is exteriorized through a stab incision in the right lower quadrant of the abdomen and attached to gravity drainage.
Colostomy
Colostomies may be temporary or permanent. A temporary colostomy may be indicated for “protection” of a colonic reanastomosis in patients who have had prior radiation therapy or to palliate severe radiation proctitis and bleeding. It is indicated also in patients who have a large bowel fistula (e.g., rectovaginal fistula) to allow the inflammation to subside before definitive repair. A permanent colostomy is indicated in patients who have an irreparable fistula or a colonic obstruction from a pelvic tumor that cannot be resected. A permanent colostomy is also indicated in patients undergoing total pelvic exenteration, unless the distal rectum can be preserved and the colon reanastomosed, and in those who require anoproctectomy because of advanced vulvar cancer.
The site of the colostomy should be selected so that the stomal appliance and bag can be applied to the skin of the anterior abdominal wall without difficulty. The best site is approximately midway between the umbilicus and the anterior iliac crest. The most distal site possible should be employed in the large intestine. After selection of the stomal site, a circular skin incision is made to accommodate two fingers. The subcutaneous tissue is removed, and the fascia of the rectus sheath is incised similarly (Fig. 20.7). The end of the colon is brought through the stoma and sutured to fascia with interrupted 2-0 silk or PGA suture, and the stoma is everted to the skin to form a “rosebud” with the use of interrupted 2-0 or 3-0 absorbable braided suture.
Temporary
For patients who require temporary diversion, a transverse or sigmoid colostomy is usually created. The most distal portion of the colon should be used to allow the most formed stool possible. A loop colostomy is usually created: A loop of the colon is brought out through an appropriately placed separate incision in the abdominal wall. The loop is maintained by suturing it to the fascia beneath it. It can be reinforced with a rod of glass or plastic passed through a hole in the mesentery. The stoma can be opened immediately by means of an incision along the taenia coli in the longitudinal direction. Alternatively, the loop may be “matured” 1 to 2 days later to minimize the risk of sepsis if the bowel is unprepared.
The colon can be brought out as an end colostomy, which requires transection of the colon. This can be readily accomplished by means of a gastrointestinal anastomosis (GIA) stapler, which closes and transects the colon simultaneously. The distal end is sutured to the fascia, and the proximal end is brought out as the colostomy. If the distal colon must also be diverted (because of distal obstruction), a double-barrel colostomy can be created.
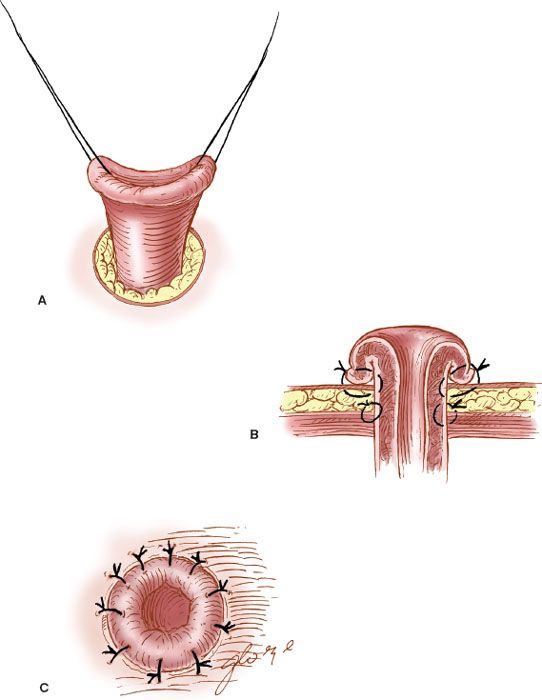
Figure 20.7 The formation of a colostomy. A: The end of the colon is brought through the abdominal wall. B: It is sutured to the fascia and skin. C: The “rosebud” stoma is formed.
Permanent
A permanent colostomy is an end or terminal colostomy, performed as far distally as possible. The distal loop of the transected colon may be oversewn to create a Hartman’s pouch if there is no distal obstruction. In patients in whom there is complete distal obstruction, a mucous fistula should be created.
Enterostomy
If the colon is surgically inaccessible because of extensive carcinomatosis or radiation-induced adhesions, it may become necessary to palliate the bowel obstruction by the creation of a small intestinal stoma. Because the small-bowel contents are loose and irritating compared with colonic contents, an ileostomy or a jejunostomy should be undertaken only when absolutely necessary.
Major Intestinal Operations
Intestinal Resection and Reanastomosis
After a segment of bowel, along with its wedge-shaped section of mesentery, has been resected, a reanastomosis may be performed. The most commonly used technique for reanastomosis is the end-to-end anastomosis (EEA), which is performed as either an open two-layered closure or a closed one-layered anastomosis. An end-to-side anastomosis may be used to create a J-pouch, that is, a segment of bowel created to improve low colonic continence (24). A side-to-side anastomosis may be useful to increase the size of the lumen at the site of anastomosis.
Increasingly, the use of surgical stapling devices has permitted more rapid performance of the reanastomosis, which is particularly useful when more than one resection is being carried out or when the duration of the procedure is of major concern.
Hand-sewn Anastomosis
End-to-end Enteroenterostomy
When the reanastomosis is to be hand sewn, the proximal and distal ends are clamped with Bainbridge clamps (Fig. 20.8A), and the posterior interrupted, seromuscular Lembert stitches are placed with 3-0 PGA sutures (Vicryl or Dexon) (Fig. 20.8B). The clamps are removed, the devitalized ends are trimmed, and an inner continuous full-thickness layer of 3-0 PGA suture is placed to complete the posterior portion of the anastomosis. After the corner is reached, the needle is brought through the wall to the outside, and the continuous layer is completed anteriorly with a Connell stitch (outside-in, inside-out) to complete the inner layer (Fig. 20.8C). The anterior seromuscular layer is then placed with interrupted 3-0 PGA sutures (Fig. 20.8D). The defect in the intestinal mesentery is repaired.
A single-layered closed technique is occasionally used for colonic reanastomosis in obstructed, unprepared bowel in an effort to minimize peritoneal contamination (33–35). In these circumstances, however, the use of the surgical staplers is now recommended (36).
Side-to-side Enteroenterostomy
The side-to-side anastomosis is particularly useful in patients who are undergoing intestinal bypass rather than resection to palliate bowel obstruction, for example, in patients with unresectable or recurrent tumor. The loops of intestine are aligned side to side, and linen-shod clamps are applied to prevent spillage of intestinal contents. A posterior row of 3-0 PGA sutures is placed with interrupted Lembert sutures, and the lumina are created. An inner layer of continuous, full-thickness 3-0 PGA sutures is placed and continued anteriorly to complete the layer with a Connell stitch. The anastomosis is completed by placement of an anterior seromuscular layer with the use of interrupted 3-0 PGA sutures.
Intestinal Staplers
The principal advantage of the gastrointestinal staplers is the speed with which they can be employed. There is no increase in the complication rate with the use of staplers as compared with hand-sewn anastomoses (24,36,37). The staplers are especially useful in facilitating reanastomosis after low resection of the rectosigmoid colon, because a hand-sewn anastomosis is technically difficult when performed deep in the pelvis. A disadvantage of the staplers is their increased cost, and staplers are difficult to use when the intestinal tissues are very edematous.
Types of Stapling Devices
The staplers are available in either reusable metal devices or in single-use disposable devices (Fig. 20.9A–C).
Thoracoabdominal Stapler
The thoracoabdominal (TA) stapler comes in several sizes, the TA-30, TA-55, TA-60, and TA-90, corresponding to the length, in millimeters, of the row of staples. Individual staples are either 3.5 or 4.8 mm long. The TA closes the lumen in an everting fashion. A TA device is available with a flexible, rotating end, called a Roticulator 55 that can be adjusted for placement into narrow areas (e.g., the deep pelvis).
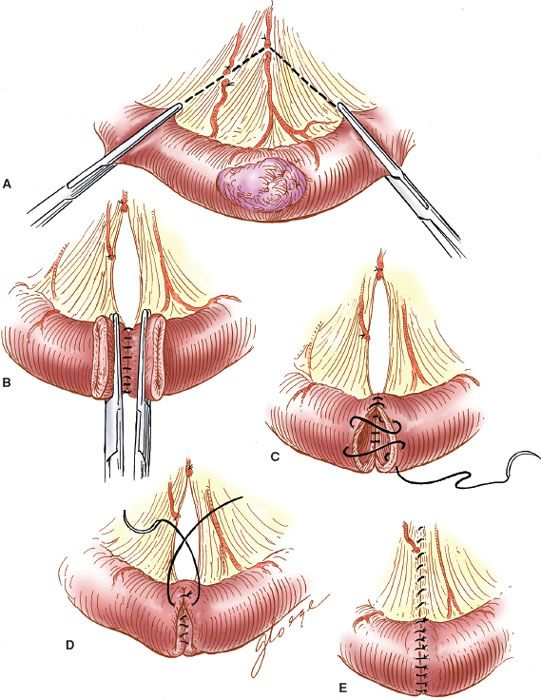
Figure 20.8 Hand-sewn end-to-end enteroenterostomy. A: The tumor and bowel are resected along with the mesentery. B: The posterior seromuscular layer is sutured. C: The Connell stitch is placed. D: The anterior seromuscular layer is placed. E: The completed anastomosis.
Related posts:

Stay updated, free articles. Join our Telegram channel

Full access? Get Clinical Tree


