Cytopathology
Histopathology
Fine needle aspiration (e.g. thyroid cyst)
Biopsies (e.g. biopsy of a breast mass)
Smears (e.g. cervical)
Surgical specimens (e.g. prostatectomy)
Bodily fluids (e.g. urine)
Autopsy specimens (e.g. kidney)
2.3 Specimen Examination and Sampling
Grossing of histopathology specimens [7] involves careful examination by the pathologist including a specimen description, weight, and measurement of dimensions [8]. Photographs can be taken and relevant surgical margins inked. Thorough dissection is performed in order to locate representative areas suitable for sampling. Biobanking [9] can also be completed at this stage, which involves taking small samples of fresh tissue and is used, for instance, to create cell lines, isolate stem cells, generate organoids or ex vivo organotypic cultures [10, 11] for storage in a tissue biobank. Touch preparations (or “touch preps”) can also be made using fresh tissue [12, 13], where the specimen is gently touched against a clean glass slide, an imprint made, and later examined.
2.4 Preparation of Histological Slides
The sampled tissue is placed into a plastic cassette and undergoes a series of steps in order to prepare the tissue for histological examination. Table 2.2 highlights the various stages of tissue preparation and summarizes the purpose of each stage mentioned below.
Table 2.2
The stages of tissue preparation and the purpose of each stage
Stage | Purpose |
|---|---|
Sampling | To choose the most representative areas of the specimen |
Fixation | To preserve tissue morphology and chemical composition |
Dehydration | To remove fixative and cell water and replace with dehydrating fluid |
Clearing | To remove dehydrating fluid and replace with clearing fluid |
Embedding | To impregnate with liquid paraffin and make the tissue resistant to sectioning |
Sectioning | To make tissue sections available for histological analysis |
2.4.1 Fixation of Tissue
Fixation involves submerging the sampled tissue in chemical substances (i.e. fixatives) in order to prevent tissue digestion by enzymes or bacteria and to preserve as much as possible of its morphologic and chemical characteristics. Fixatives promote cross-links between proteins and form a gel that maintains the in vivo relations of tissue components to each other [14]. There are a number of reagents that can be used for fixation, each of which has differing penetration rates. Formaldehyde [15] is the most commonly used agent for histopathology and when dissolved in water, it is referred to as “formalin.” One part formalin is typically diluted with nine parts water to produce a 10 % formalin solution, a concentration that is optimal for tissue fixation [16]. This solution penetrates tissue at about 1 mm an hour [17], therefore, biopsies are generally submitted for processing the same day as received, while larger specimens (e.g. a mastectomy) are not processed the same day as received as they require a longer fixation period.
2.4.2 Processing of Tissue
The processing of tissue includes dehydration, clearing, and embedding steps. Dehydration involves the removal of fixative and water from the tissue and their replacement with dehydrating agents by placement in increasing concentrations of ethanol. Next, the clearing step involves replacing the dehydrating fluid with a lipid solvent (e.g. xylene). The tissue is subsequently removed from the cassette and placed in a molten wax-filled mold for embedding. At this point, orientation of the tissue within the mold is critical, as it will determine the plane through which the section will be cut. Incorrect placement of tissues may result in diagnostically important areas being missed or damaged later [18]. Elongate tissues should be placed diagonally across the block (e.g. core biopsy), while tubular structures (e.g. vas deferens) are embedded so as to provide transverse sections showing all tissue layers. Specimens that have an epithelial surface (e.g. skin surface) are embedded in such a way as to provide sections in a plane at right angles to the surface.
2.4.3 Sectioning of Tissue
The waxed cassette is next placed in an instrument with fine blades called a microtome. Rotation of the drive wheel moves the block holder a controlled distance forwards, the blade’s edge strikes the tissue block, and thin sections are cut and affixed to a glass slide. Sections are usually four microns thick so that a single layer of cells can later be seen under the microscope. Following thorough drying of the tissue sections are ready for staining.
2.5 Staining of Tissue
As most tissues are colorless, methods of staining tissues have been developed to make them visible, while also allowing distinctions to be made between tissue components. This is done by using mixtures of acidic or basic dyes that selectively stain various tissue elements. The constituents that react with basic dyes do so because of acid in their composition (e.g. nucleoproteins), while acidic dyes stain basic tissue components (e.g. cytoplasmic proteins). Of all routine stains, the combination of hematoxylin and eosin, or the “H&E stain” [19], is the most commonly used and dates as far back as the 1870s. This stain is considered the gold standard in histology and in a typical tissue section, nuclei are stained blue/purple, whereas the cytoplasm and surrounding matrix have varying degrees of pink staining [20]. Therefore, the H&E stain has the ability to reveal structural information with specific functional implications. Special stains [21] use a slightly different technique to stain particular structures (e.g. Masson’s trichrome for muscle and collagen fibers [22]) or pathogens (e.g. Ziehl–Neelsen for acid-fast bacteria [23]). When routine or special staining cannot provide all the diagnostic answers required, histopathologists can use advanced staining techniques including immunohistochemistry (IHC) or in situ hybridization (ISH).
2.5.1 Immunohistochemistry
IHC is a multistep technique involving the interaction of a target antigen (i.e. the protein of interest) with a specific antibody tagged with a visible label [24]. The aim is to detect the presence of elevated levels or the absence of a particular target antigen. Antibodies can be coupled with an enzyme, such as horseradish peroxidase (HRP), requiring the use of a light microscope for visualization, or with fluorescent chemical compounds requiring the use of a fluorescent microscope. Different labeling techniques are available including the direct or indirect labeling method. In a direct assay, a fluorophore-labeled antibody, such as fluorescein isothiocyanate, can react directly with the target antigen. This tag allows immediate visualization of the antigen. In contrast, in an indirect assay, an unlabeled primary antibody is used. This binds to the target antigen and an enzyme-labeled secondary antibody binds to the primary antibody. In general, primary antibodies are raised against the antigen of interest and are unlabeled, while secondary antibodies are raised against IgG of the primary antibody. Finally, a chromogenic substrate must be added for visualization (e.g. diaminobenzidine), which reacts to produce a brown precipitate in the presence of the HRP enzyme. A simplistic illustration of these two assays is shown in Fig. 2.1. Recent advances in this area include multiplexing of antigens [25, 26], whereby multiple stains can be performed on the same tissue section, followed by analysis using digital imaging software.
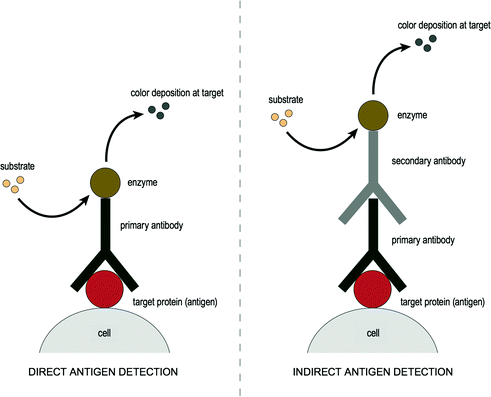

Fig. 2.1
Illustration of immunohistochemistry
2.5.2 In Situ Hybridization
While IHC involves the detection of marker proteins in tissue, ISH can detect target ribonucleic acid (RNA) or deoxyribonucleic acid (DNA) sequences [27]. Different detection systems are then used to visualize the presence of the target sequence. Fluorescence ISH (FISH) uses fluorescent dyes and fluorescent microscopy while chromogenic ISH (CISH) uses chromogenic dyes and brightfield microscopy [28]. In this process, a complementary DNA strand (or probe), or RNA strand (or riboprobe) is used to localize a specific DNA or RNA sequence. The probe hybridizes to the target sequence with elevated temperature (i.e. denaturation) and excess probe is washed away. If the probe is already fluorescent, it will detect the site of hybridization directly. If the probe is chromogenic, an additional step is needed to visualize the probe [29]. A simplistic illustration of ISH is shown in Fig. 2.2. Multiplexing using ISH can also be performed [30], followed by spectral imaging for the detection and subsequent deconvolution of multiple signals.
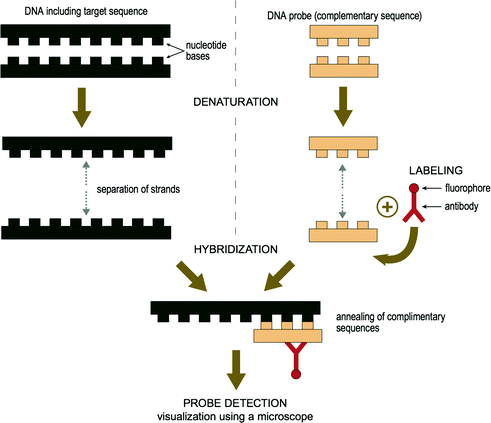

Fig. 2.2
Illustration of in situ hybridization
2.6 The Frozen Section
The “frozen section” is an alternative tissue preparation technique where, in contrast to routine processing, is a rapid histological examination done on fresh tissue. The sample is quickly placed into cryoprotective embedding medium and cut in a refrigerated microtome (i.e. cryostat). The sections are then stained with H&E. This technique is used, for example, where the surgeon needs a tumor margin to be examined to ensure that it has been adequately removed, or to confirm a diagnosis of cancer intraoperatively [31, 32]. The diagnosis should ideally be conveyed to the clinician within 20 min after receipt of the tissue within the pathology laboratory, termed “the turnaround time” [33]. Despite the speed of the procedure, one major disadvantage of the frozen section technique is that “freezing artifacts” are frequently seen which can obscure tissue morphology and cellular detail. Examples of freezing artifacts seen, include nuclear ice crystals, bubbles, vacuolated cytoplasm, nuclear chromatin changes, tissue cracking, etc. Therefore, this method is only used when an urgent intraoperative diagnosis is needed.
2.7 Tissue Microarray Construction and Evaluation
The tissue microarray (TMA) construction process [34] involves a region of interest first being identified and marked on a histology slide. This same area is then marked on the corresponding paraffin tissue block (i.e. the donor block) and core biopsies are taken [35]. The cores are then inserted into a separate paraffin block (i.e. the recipient block) [36] in a precisely spaced, array pattern. This process is repeated multiple times where finally, one paraffin block is made up of hundreds of tissue core biopsies from many donor blocks (Fig. 2.3). Simultaneous analysis of molecular targets at the DNA, mRNA, and protein levels can then be performed under identical conditions. Epidemiologists, histopathologists, and researchers can subsequently analyze data following quantitative digital image analysis [37]. Therefore, the development of TMA technology has allowed the efficient study hundreds of different tissue samples concurrently [38] and is an invaluable research tool.
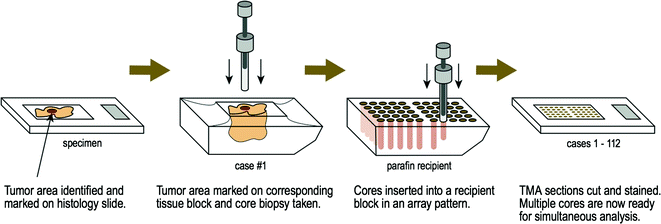

Fig. 2.3
Tissue microarray construction
2.8 Microscopes, Automated Imaging, and Digital Software
Many different microscopes are available today, each of which have varied applications and modifications that contribute to their usefulness (Table 2.3). The upright microscope is the most common configuration and has binocular eyepieces, high power compound objective lenses, and a precision sample stage [39]. In contrast, an inverted microscope is essentially an upside-down, upright microscope. As brightfield and fluorescence microscopy are the most frequent types performed in histology labs, only these will be introduced in this chapter.
Table 2.3
Classification, type, light source, and function of various microscopes
Classification | Microscope type | Light source | Description |
|---|---|---|---|
Optical | Light microscope (or “compound”) | Visible light | This is the most commonly used microscope with strong magnifying power, used for the study of cells, chromosomes, and DNA |
Dissecting microscope (or “stereoscope”) | Visible light | This contains lenses in different angles that provides 3D viewing, used for forensics, fine repair, microsurgery | |
Fluorescence microscope | UV light | This is a special type of light microscope where, instead of light reflection and absorption it uses UV light to view cells | |
Digital microscope | Visible light | This makes use of the optical lens and charge-coupled device (CCD) sensors to magnify objects and includes a camera for high quality recording | |
Electron | Transmission electron microscope (TEM) | Electron beam | This microscope is used for studying cells and microorganisms and can produce images as small as 1 nm in size |
Scanning electron microscope (SEM) | Electron beam | This is less powerful than the TEM but can provide 3D viewing of objects and is used for studying cells and small particles of matter |
Brightfield microscopy is performed using a light microscope with a light source commonly projecting from the back of the microscope. This light travels upwards from beneath, projects through the field diaphragm and condenser lens beneath the stage, up through the histology slide containing tissue, into the objective lens, and finally up to the camera and/or eyepiece. A simplistic illustration of this light path is shown in Fig. 2.4. The fluorescence microscope is similar to the conventional brightfield microscope with added features to enhance its capabilities [39]. While the conventional microscope uses visible light (~400–700 nm), the fluorescence microscope uses much higher intensity light source that causes excitation of fluorophores (i.e. the excitation light). The light is absorbed by the fluorophores, which causes them to emit a longer, lower energy wavelength light. This fluorescent light (i.e. the emission light) can be separated with filters designed for that specific wavelength. In the fluorescence microscope (Fig. 2.4), the light initially travels to a filter cube. Inside the filter cube it passes through an excitation filter to a dichroic mirror (or beamsplitter), which sends light down through the objective lens and onto the histology slide containing tissue. The emitted fluorescence from the specimen then travels back up through the objective lens, into the filter cube, through the dichroic mirror and through an emission filter. From here it continues traveling upwards toward the camera and/or eyepiece and can be recorded or viewed [39].
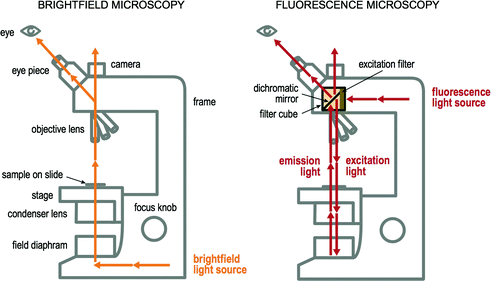

Fig. 2.4
Light paths of brightfield and fluorescence microscopes
Modern digital pathology combines the power of the microscope with electronic detection and advanced computerized analysis and is now progressively replacing previously subjective, semiquantitative manual scoring with precise quantification of protein expression [40]. A sensor is used to obtain an image, which is then displayed on a computer monitor using charge-coupled device technology. Automated scanning can also be performed using a robotic loader. Associated imaging software packages for both brightfield and fluorescence purposes provide complex algorithms for quantitation of immunostaining. Tissue can be automatically segmented into gland or stromal targets and cells can also be segmented into nuclei and cytoplasm using various algorithms. This allows the translation of extent and intensity of immunostaining into a continuous variable, more amenable to large-scale bioinformatics analyses.
2.9 The Normal Human Cell and its Components
The human cell is the basic structural and functional unit of the body and its main compartments are the nucleus and the cytoplasm, which are completely separate entities that work together to keep the cell functioning [41]. Histologically, the nucleus, nucleolus, and cytoplasm can easily be distinguished on routine H&E. Antibodies can also be used to selectively stain the nucleus, cytoplasm, or cytoplasmic membrane also, depending on the target of interest. While the structures within the nucleus and cytoplasm cannot be seen using routine microscopy, their functions are introduced briefly, as knowledge of this basic information is imperative for an understanding of the topics discussed in forthcoming chapters.
2.9.1 The Cytoplasm and its Organelles
The cytoplasm surrounds the cell nucleus and is surrounded by a plasma membrane, which separates the interior of the cell from the outside environment. This membrane is selectively permeable and controls the movement of substances in and out of the cell. The cytoplasm is made largely of cytosol fluid containing multiple organelles (“little organs”) suspended within it that carry out specific directions of the nucleus. These organelles include mitochondria, endoplasmic reticula, the Golgi apparatus, vacuoles, and lysosomes (Fig. 2.5) among others. Mitochondria function to produce most of the cell’s energy in the form of adenosine triphosphate (ATP) [42] and are also involved in processes such as cell signaling [43], cellular differentiation [44], cell growth [45], cell cycle control [46], and cell death [47]. There are two types of endoplasmic reticula, the rough endoplasmic reticulum (RER) and the smooth endoplasmic reticulum (SER) [48]. The SER is involved in lipid metabolism [49], carbohydrate metabolism, and detoxification, while the RER contains ribosomes on the surface where active protein synthesis occurs [50, 51]. The Golgi apparatus concentrates and packages proteins from the RER inside the cytoplasm prior to being transferred to their appropriate destinations [52]. Vacuoles are involved in the storage and intracellular digestion of molecules and lysosomes contain enzymes responsible for the breakdown of proteins, nucleic acid, carbohydrates, lipids, cellular debris, and foreign organisms [53].
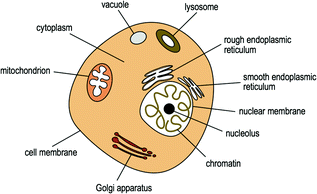

Fig. 2.5
The human cell and its components
2.9.2 The Nucleus and Gene Expression
The nucleus is the largest organelle found in human cells and is surrounded by a nuclear envelope with nuclear pore complexes that allow material to move in and out [54]. It contains genetic information in the form of DNA. DNA is a complex molecule consisting of two antiparallel strands of nucleotide bases, each with a backbone of sugar (deoxyribose) molecules linked together by phosphate groups [55]. Each sugar molecule is linked to a base, which is attached by hydrogen bonds to a base on the other strand in a complementary fashion so that adenine (A) bonds with thymine (T) and guanine (G) bonds with cytosine (C) [56]. DNA is organized into highly compact, regular units called chromosomes. Within the nucleus is a structure called the nucleolus, which contains RNA, ribosomal proteins, and functions as the site of ribosome synthesis. RNA differs from DNA in that RNA molecules are single-stranded, the backbone sugar is ribose, and it contains uracil (U) in place of thymine [57].
Human genetic testing has made significant advances in the past decade [58]. The identification of certain sequences in order to diagnose genetic diseases can be done by performing sequencing on a blood sample, fresh tissue, or paraffin embedded tissue. DNA sequencing [59] is the process of determining the nucleotide order of DNA fragment. As mRNA is generated by transcription from DNA, reverse transcription must be performed (using a reverse transcriptase enzyme) for RNA sequencing [60]. Following this, complementary DNA (cDNA) fragments are generated, PCR amplification executed, a library created, and sequencing performed comparing results to a reference genome.
2.10 Basic Histology of Normal Tissues
“Tissues” refer to groups of similar cells performing similar functions (e.g. cardiac myocytes). “Organs” refer to groups of tissues (e.g. the heart) and “organ systems” include groups of organs that function together (e.g. the cardiovascular system). Tissue is composed of various cells together with a surrounding extracellular matrix (ECM). There are four fundamental tissue types including epithelia, connective tissue, muscle and nervous tissue, each of which will be introduced separately below.
2.10.1 Epithelia
Epithelial cells are generally classified as “covering and lining epithelia” which are found lining the cavities of the body and surfaces of structures, or as “glandular (or secretory) epithelia” [41]. Glands refer to single cells or groups of cells that secrete protein, mucus, or lipid. This includes “endocrine glands” which secrete into extracellular spaces (i.e. secrete internally) and “exocrine glands” which secrete into ducts (i.e. secrete into the external environment). Epithelial cells can also be classified based on the number of cell layers present and the shape of the cells in the top layer (Fig. 2.6). Epithelial tissue can, therefore, be one cell thick (i.e. simple epithelium), or two or more cells thick (i.e. stratified epithelium) [61]. There are three basic cell shapes based on microscopic appearance, including squamous (flat and wide), columnar (tall), and cuboidal (cube shaped) cells. Consequently, by describing the number of cell layers and the surface cell shape the different forms of epithelia can easily be classified. In some cases a third feature, namely specialization of the cell surface, e.g., keratinization [62] or the presence of cilia [63], is included. Stratified squamous epithelium that is exposed directly to the environment (e.g. the skin), can show keratinization (i.e. a layer of dead cells is present on the surface), while those that are not directly exposed (e.g. the oral cavity) are only partially keratinized or nonkeratinized. The presence of cilia (i.e. hair-like motile processes) is another specialization seen in simple columnar epithelium present on the surface of these cells. This surface adaptation helps propel substances along, e.g., the airways contain cilia to propel mucus.
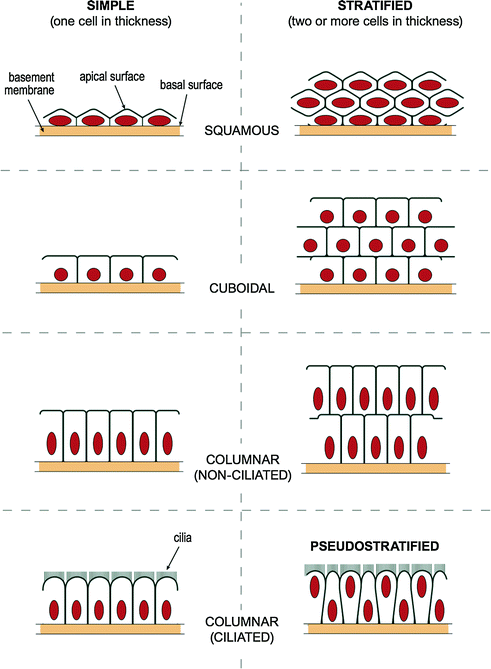

Fig. 2.6


Illustration of epithelial cell types
Stay updated, free articles. Join our Telegram channel

Full access? Get Clinical Tree


