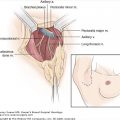
Since April 2005 the senior author, (Erwin B. Brown) has placed more than 1600 ports at the University of Texas MD Anderson Cancer Center for breast cancer patients, using ultrasound guidance. Although the routine use of ultrasound guidance is not required, the National Institute of Clinical Excellence advocates the use of 2-dimensional ultrasound when obtaining venous access in elective cases.1
Central venous access can be divided into 2 types of access: (1) implanted central venous catheters, including chest ports (using jugular or subclavian vein) and arm ports (eg, Passport), and (2) nonimplanted central venous access, including peripherally inserted central catheter (PICC) lines, subclavian catheters, and tunneled catheters without implanted subcutaneous ports. Currently, arm ports are not being inserted at MD Anderson Cancer Center. Central venous access can be achieved using various puncture sites, but the most common are the internal jugular veins, the subclavian veins, and the upper limb veins for PICCs. Femoral veins are seldom used, but may be necessary in selective situations. The choice of access route depends on multiple factors, including the reason for central venous catheter insertion, the anticipated duration of access, the intact venous sites available, and the skills of the operator. The internal jugular vein is preferred over the subclavian vein for implanted ports at our institution, compared with the cannulation of the subclavian vein.
A dedicated central venous access team is essential for central venous access in breast oncology patients. Adequate sedation facilitates safe and efficient central venous access in this patient population. This can be achieved by using conscious or unconscious sedation. Our institution’s preferred method of sedation is unconscious sedation or general anesthesia. A basic preoperative health evaluation should be performed, including history, current medications (including herbals), allergies, and physical exam. Cardiac and respiratory evaluations should also be conducted. At the start of the procedure, all essential staff and equipment should be in place. Control of personnel traffic is vital.
A knowledge of the surface anatomical landmarks is essential (Fig. 71-1A). The patient should be prepared and draped in the standard sterile fashion for surgical vascular access and then placed in Trendelenburg position. Using a sterile marker, the proposed infraclavicular skin incision should be outlined parallel to the clavicle. The subcutaneous tunnel should be outlined from the wire entrance site to the proposed infraclavicular incision (Fig. 71-1B). The ideal location for the reservoir is thought to be along the anteromedial aspect of the second rib. This high medial position keeps the port away from the breast tissue and reduces the risk of inadvertent retraction of the catheter.
Figure 71-1
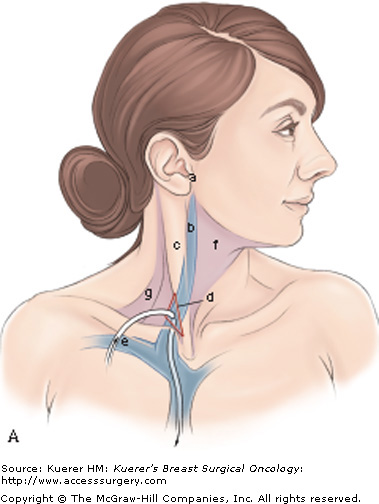
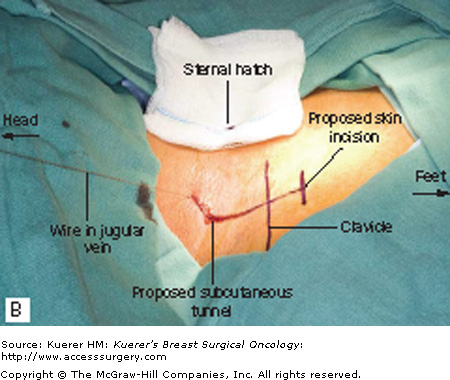
A. Anatomical landmarks. Surface anatomy of the internal jugular vein: a, intertragic notch; b, internal jugular vein; c, sternocleidomastoid; d, internal jugular vein between sternal and clavicular heads of sternocleidomastoid; e, subclavian vein passing under the clavicle; f, anterior triangle of the neck; and g, posterior triangle of the neck. The red triangle shows the area where intravenous access is obtained. B. Premarking the infraclavicular skin incision. The proposed infraclavicular skin incision should be outlined parallel to the clavicle. The subcutaneous tunnel should be outlined from the wire entrance site to the proposed infraclavicular incision. The ideal location for the reservoir is thought to be along the anteromedial aspect of the second rib. This high medial position keeps the port away from the breast tissue and prevents inadvertent retraction of the catheter
The internal jugular and subclavian veins should be visualized with ultrasound. Our preference is the Site-Rite ultrasound (Bard Access Systems; Salt Lake City, Utah) with its needle guides. The veins are then confirmed to be compressible and patent. The internal jugular is preferably used at our institution. Using 1% local anesthetic (eg, lidocaine) a skin wheal is created at the point of percutaneous access. A Micro-Introducer Kit (Vascular Solutions; Minneapolis, Minnesota) is used to access the jugular vein. Under ultrasound guidance, a 21-gauge needle is used to percutaneously access the internal jugular vein. This needle allows safe access into the venous system with a 0.018-in diameter guidewire, versus the 0.035-in J-wire and 19-gauge needle included with most venous access catheters. In breast surgical oncology patients, a micropuncture needle system is ideal, as it facilitates the safe puncture of veins in patients with coagulopathy. The use of ultrasound avoids attempting to access thrombosed veins and decreases the risk of arterial puncture. The glide wire is then threaded through the needle. Once the wire has been negotiated into the central circulation, its location should then be checked under fluoroscopy and confirmed to be in an appropriate position in the superior vena cava and devoid of kinks. Additional local anesthesia is injected in the infraclavicular region at the port site and along the proposed subcutaneous tunnel.
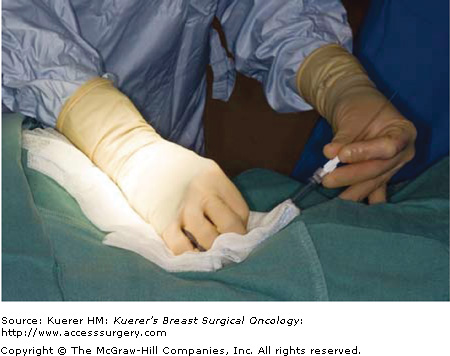
Next, the premarked infraclavicular incision should be made, and the incision should be carefully deepened to the pectoralis fascia. A pocket is then bluntly created at the level of the pectoralis fascia to accommodate the port. A small skin incision is made at the wire entrance site. A 4-French introducer is then passed over the wire. The J-wire is then threaded through the introducer, which is then removed. The position of the J-wire should be checked under fluoroscopy. Using mosquito forceps, any subcutaneous tissue around the J-wire should be gently freed2 from around the J-wire. The appropriate-sized introducer should then be passed gently over the J-wire, being certain that the J-wire moves freely within the introducer as it is being inserted (Fig. 71-2).
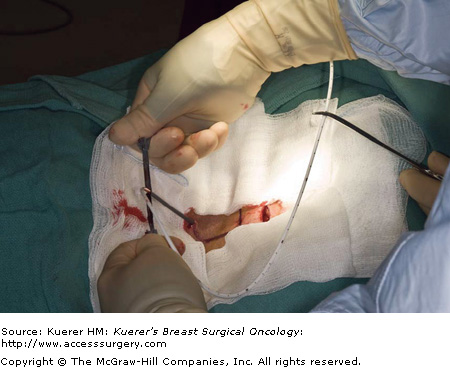
The wire and vein dilator are removed, and the catheter is threaded through the peel-away introducer. The sheath is than peeled away, leaving the catheter in situ (Fig. 71-3). Pinching the peel-away sheath during the introduction of the catheter through this sheath is important to decrease the complication of air embolism. Placing the patient in the Trendelenburg position before the start of the procedure can also minimize the risk of air embolus. If an air embolism does occur, the patient should be immediately positioned in the left lateral decubitus position so that the air can remain in the right heart chambers until it can be syringe aspirated. Life support measures should then be initiated as clinically appropriate.
A tunneler is passed between the cervical incision and the infraclavicular incision. The catheter is then attached to the tunneler and is drawn from the cervical incision to the infraclavicular incision through the subcutaneous tunnel. Care should be used to avoid kinking or twisting the catheter. The catheter is advanced or withdrawn under fluoroscopic guidance until the tip of the catheter is in optimal position in the distal superior vena cava or the region of the cavoatrial junction. The catheter is trimmed to the appropriate length and is attached to the port with the locking device. The port is then positioned within the pocket and sutured to the underlying pectoralis fascia with nonabsorbable monofilament sutures to prevent it from twisting or rotating within the pocket. The catheter should then be checked again under fluoroscopy to confirm satisfactory position. There should be a gentle curve in the catheter at its apex in the neck. The pocket is then irrigated with normal saline and exquisite hemostasis should be achieved.
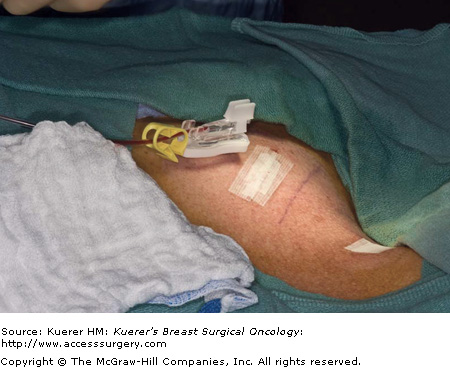
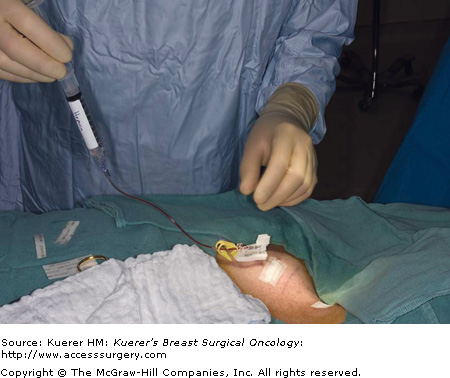
The infraclavicular incision should then be closed with absorbable sutures. The cervical incision should be closed with a subcuticular suture. The skin around both incisions should be prepped after closure with ChloraPrep (Cardinal Health Skin Prep Solutions; El Paso, Texas). Steri-strips (3M; St. Paul, Minnesota) should then be applied. The port should then be accessed with a ¾- or 1-in Gripper needle. There should be excellent blood return from the catheter system (Fig. 71-4). Once this is confirmed, the catheter system should be flushed with heparinized saline. The heparinized saline should flush freely (Fig. 71-5). Sterile dressings are then applied.
When the subclavian vein is chosen as the catheter entrance site, the subclavian vein is accessed under ultrasound guidance with the 21-gauge needle. The wire is passed through the needle, and its position is confirmed with fluoroscopy. The skin incision is outlined with the marking pen parallel to the clavicle and centered upon the wire. The 4-French introducer is passed over the wire, and a J-wire is threaded through the introducer, which is then removed. The skin incision is made, and the pocket is created at the level of the pectoralis fascia. The peel-away introducer is passed over the J-wire. The catheter is threaded through the introducer, which is then peeled away, leaving the catheter in situ. The catheter is advanced out under fluoroscopic guidance until the tip of the catheter is in the distal superior vena cava or region of the cavoatrial junction. The catheter is trimmed to the appropriate length and attached to the port with the locking device. The port is positioned within the pocket and sutured to the pectoralis fascia with 2 nonabsorbable monofilament sutures. The incision is then closed, as with the internal jugular port.
Peripherally inserted central venous catheters with implanted subcutaneous port (Passport) are available, but are not currently being implanted at MD Anderson Cancer Center. There are some patients who present with arm ports placed at outside institutions.
Stay updated, free articles. Join our Telegram channel

Full access? Get Clinical Tree


