Fig. 12.1
Multiple automated spring-loaded biopsy guns are commercially available. Gauges range from 12 to 18
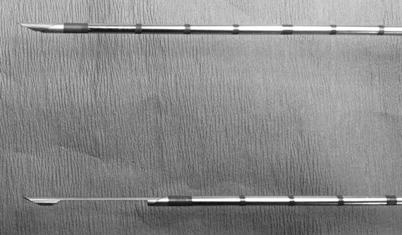
Fig. 12.2
Automated spring-loaded core needle tip in the unfired (top) and fired (bottom) position
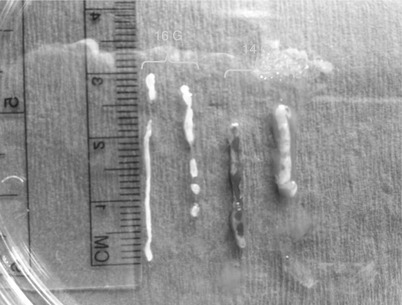
Fig. 12.3
Size of a 14-gauge samples versus 16-gauge samples obtained with an automated spring-loaded core device
Patient Preparation
Explanation, Stress Reduction, and Consent
Undergoing a breast biopsy can be a very stressful event for a patient. Typically the psychological stress is far more bothersome than the physical discomfort experienced during the procedure. Although we routinely offer premedication with anxiolytics for our stereotactic patients, premedication of our US patients is more variable. Music is routinely used in our procedure rooms or patients may bring in their own music/listening devices. Studies have shown both music and anxiolytics decrease procedure-related anxiety in breast biopsy patients [17]. 5–10 mg of valium or 0.25–0.5 mg of alprazolam are often used for outpatient procedures. Medications are given in the department approximately 30 min prior to the procedure and after informed consent has been obtained. We require all patients to have someone available to drive them home.
In our department patients usually undergo a prebiopsy consultation, ideally performed the same day as the diagnostic imaging that resulted in a biopsy recommendation. The aim is to discuss the biopsy, answer any questions, go over consents, address stress reduction techniques, etc. Patients are instructed to avoid aspirin and NSAIDs (such as ibuprofen) prior to biopsy. Patients referred from outside facilities may be consulted over the phone. When the patient arrives in the biopsy suite, the procedure is discussed in detail with the patient, if this has not been done ahead of time. Informed consent must be obtained from the patient. Risks, benefits, and alternatives should be discussed as well as a thorough discussion of what the patient should expect during the biopsy. Immediately prior to the procedure, a universal “time-out” is performed.
US Approach and Positioning
The patient is placed supine on the table, with the ipsilateral arm elevated above the head. The physician then scans to confirm lesion location and determine the best approach to use. If needed the patient may be repositioned to an oblique angle for better access to a lateral lesion. Needles will pass more easily through fatty and glandular tissue than dense echogenic fibrous tissue. As such, finding an approach path with fatty tissue rather than dense tissue is preferred when possible (Fig. 12.4a, b). Use of Doppler may be helpful to avoid vessels. The subareolar region should be avoided if possible as this tends to be a very tender and sometime challenging area to anesthetize. If the mass is located in the subareolar region, a “nipple block” may be performed with topical lidocaine (such as EMLA®, AstraZeneca) with an occlusive dressing, followed by intradermal injection of lidocaine circumferentially around the nipple-areolar complex [18].
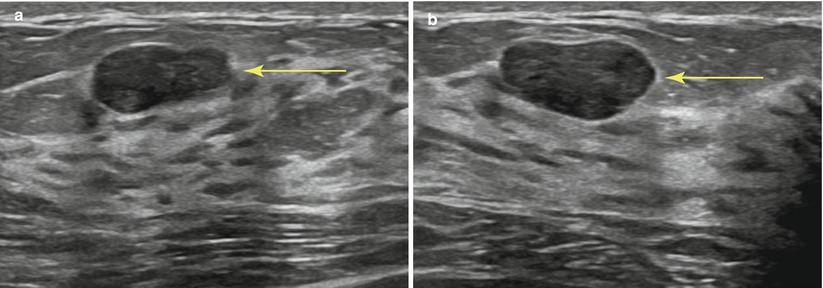
Fig. 12.4
(a, b) Planning your approach: the breast should be scanned from various angles to choose the optimal path of the needle (arrow). Transversing dense breast tissue with the needle (a) is more difficult than transversing fatty tissue (b)
As a general rule, the shortest distance from the skin to the lesion should be used, keeping in mind the basic principles of ultrasound guidance. Although a vertical approach may be the shortest distance, a more lateral or oblique approach is required for ultrasound visualization. The intensity of the echoes produced by the needle increases as the angle of incidence decreases, with the most useful specular reflections taking place when the ultrasound beam strikes the reflector at 90° to the surface of the needle. The needle must be parallel to the long axis of the transducer to produce the maximal number of reflected echoes for visualization. The needle should also be as parallel to the chest wall as possible (Fig. 12.5a–c).
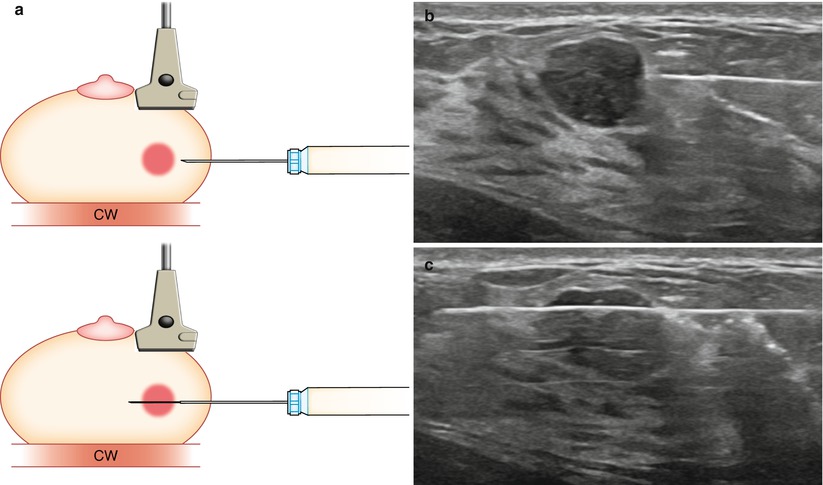
Fig. 12.5
(a) Transducer should be parallel to the needle to allow for maximum visualization of the needle and needle tip. Chest wall (CW). (b) Prefire location. (c) Postfire location
Images should be obtained documenting lesion location, approach, and any pertinent findings (adjacent chest wall, skin, implant, etc.).
Biopsy Procedure: ASL
Skin Prep, Anesthesia, and Incision
After choosing the best approach, the biopsy tray is assembled as per physician preference. The tray and supplies should be positioned to ensure maximum accessibility and ease of use (Fig. 12.6). When setting up the tray, one should always be cognizant of accidental needle sticks or contamination. Examining your equipment prior to use to ensure no defects is always good practice. Many radiologists perform a test firing of the biopsy device to confirm proper function. This also provides an opportunity to warn the patient of the sound to avoid a startle reaction during the actual procedure. It should be noted, however, that some device manuals specifically precaution “never test the product by firing into the air” [19]. The breast is prepped and draped in the normal sterile fashion. Betadine solution is used to cleanse the skin and a sterile drape is placed. The transducer is routinely cleansed or a sterile probe cover can be used. One percent lidocaine (with or without epinephrine 1:100,000) is used for local anesthesia. Use of lidocaine with epinephrine can decrease bleeding and subsequent bruising. We prefer to buffer our lidocaine to decrease the pain associated with dermal injection. Ten milliliters of 1 % lidocaine (with or without epinephrine) is diluted with 1 mL of 8.4 % sodium bicarbonate [20, 21]. A 30-G needle is used for the initial superficial injection which also significantly reduces discomfort, with most patients reporting minimal to no pain with injection. This is followed by deeper injection with a 25-G 1 ½ needle. Ultrasound guidance should be used while giving anesthesia as this gives the radiologist a feel for the angle and approach that will be needed for the actual biopsy, a sort of trial run. Additionally any distortion (fluid pockets or hemorrhage) caused by the lidocaine can be seen real time so as not to confuse the subsequent biopsy. The lidocaine syringe should be well flushed before use to avoid introduction of air into the target field, which could obscure lesion visualization. The lidocaine placement can also be used to “move” the lesion as necessary, such as elevating a deep lesion off the chest wall by injecting the lidocaine deep to the lesion and “pushing” it more superiorly. Alternatively it can be used to make a shallow lesion “deeper.”
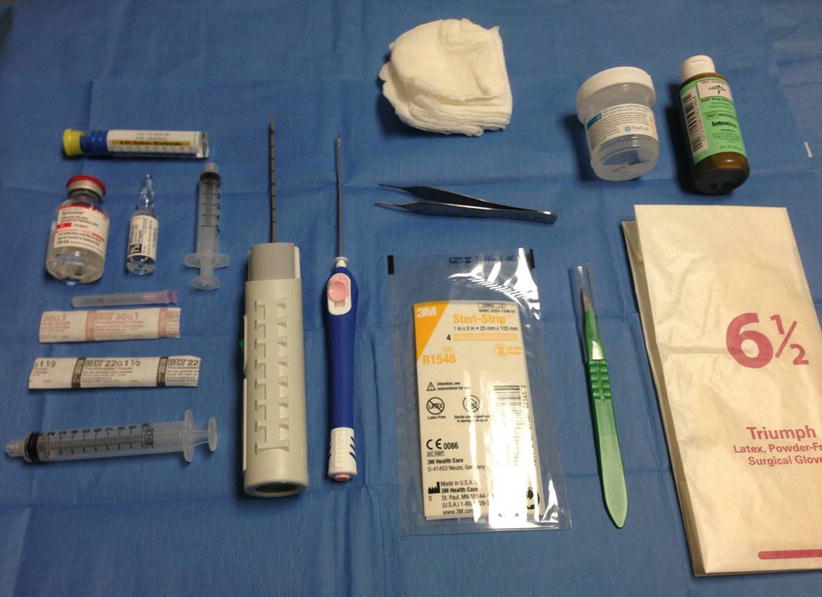
Fig. 12.6
Supplies for ultrasound-guided core needle biopsy
Insertion, Correct Positioning, and Firing of the Needle
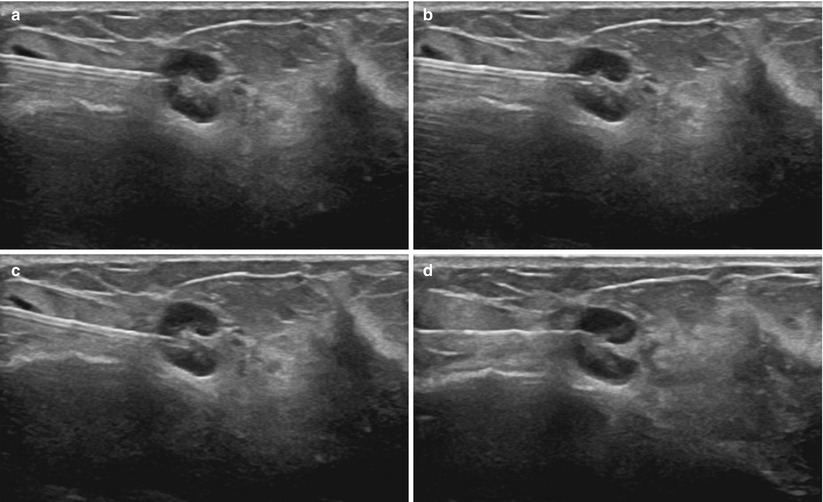
A small skin nick is made with a #11 blade scalpel. Although targeting systems are available, the freehand method is preferred by most radiologists and is used at our institution. The physician holds the transducer in one hand (usually the nondominant hand) and the biopsy device in the other. Alternately, a well-trained technologist can hold the transducer allowing the physician to have both hands free for the biopsy. The skin entry point should be shallow, located 1–2 cm from the edge of the transducer to ensure a needle path that is parallel with the transducer (Figs. 12.7, 12.8a–e, 12.9a, b, and 12.10a, b). As such, the angle of incidence is zero, creating maximal specular reflection and allowing visualization of the entire needle and tip. Steep angles and short axis imaging can lead to inaccurate needle tip location and poor sampling.
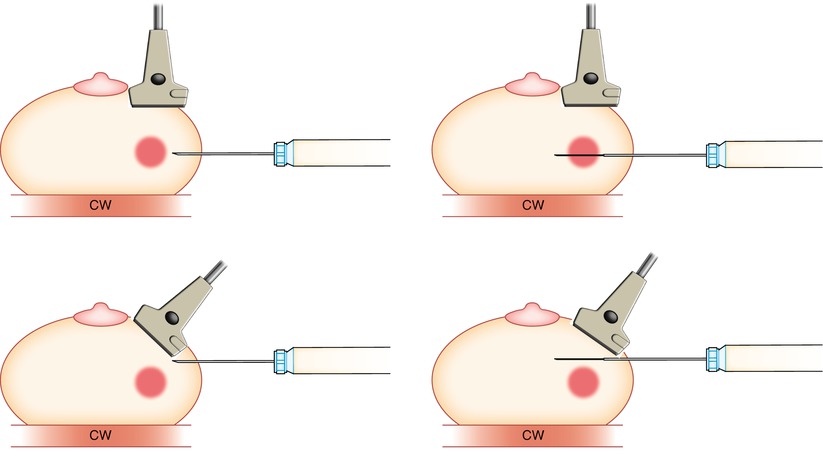
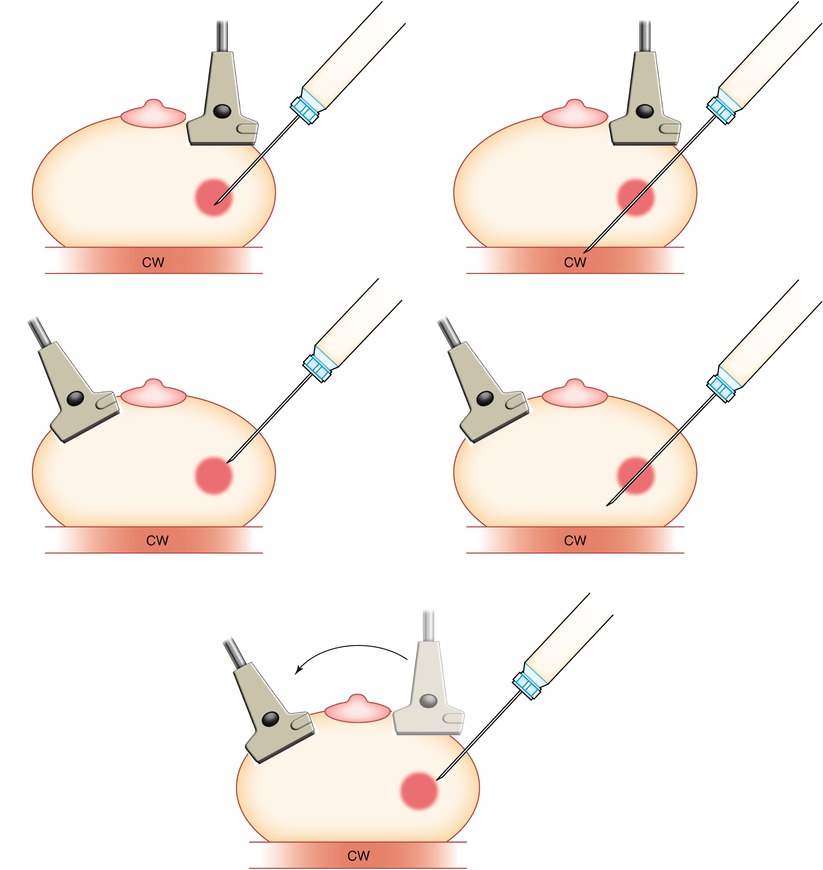
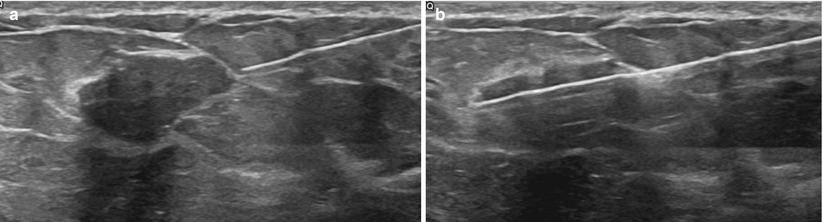
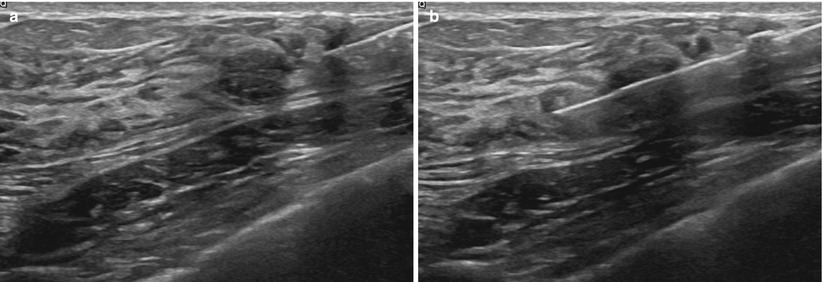
Fig. 12.7
It is important to keep the transducer parallel (top) to the needle to ensure proper targeting of the lesion. If the plane of the transducer is not parallel (bottom) to the needle, then although it may appear that the needle is in/in front of the lesion, errors in targeting will occur chest wall (CW)
Fig. 12.8
(a–e) If a steep-angled approach is necessary, caution must be used to avoid piercing the chest wall (CW). Prefire (a) and postfire (b) show incorrect probe angle for a steep approach. The angle of the probe must be changed (c). Prefire (d) and postfire (e) correct angle and accurate biopsy
Fig. 12.9
(a, b) Pre- (a) and postfire (b) images demonstrating proper targeting
Fig. 12.10
(a, b) Pre- (a) and postfire (b) images demonstrating proper targeting
The needle is inserted and advanced under the long axis of the transducer. The transducer hand should now be fixed and still. Your eyes should be in the habit of mostly looking at the breast, not the screen. With a “mental image” of where the mass is, the needle is moved to the transducer. Once in position, a prefire image is obtained for documentation. The needle should be positioned in or at the edge of the mass. Prefire positioning depends on several variables. First you must be aware of the penetration depth or “throw” of the needle. Most throws are ~2.2 cm, meaning the needle tip will be advanced 2.2 cm from the original prefire tip location. The length of the sample notch is ~1.9 cm. There is also a small ~6–7-mm dead space at the needle tip. It is important to be aware of the throw, dead space length, and notch size of whatever needle you are using (Fig. 12.11a, b). If sampling a large lesion, the prefire position may be just in front of the mass to sample both the edge (perilesional) and the center portion of the lesion (Fig. 12.12). Alternatively the tip can be placed within the lesion, especially if the mass moves and the needle “bounces off” the mass. In smaller lesions, the needle tip must be further away from the mass to ensure the mass lies within the sample notch postfire. Prior to firing the needle, one must estimate the postfire needle position to insure no unwanted structures are in the expected path.

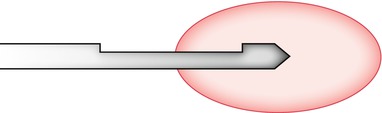
Fig. 12.11
(a, b) Close-up of the cutting notch. The stylet (ST) advances into the lesion and a sample falls into the notch (SN). A sheath is then closed over the notch, coring a sample of tissue in the notch. The dead space of the needle (DS) is also depicted
Fig. 12.12
Biopsy needle shown with the cutting notch encompassing both the lesion and the perilesional tissue
Obtaining a rim of normal perilesional tissue can aid the pathologist in making the correct diagnosis. Multiple areas of the lesion should be sampled to decrease sampling error and improve diagnosis (Fig. 12.13a, b). Another key point to remember is to use the spring to your advantage. Some lesions tend to be “pushed away” from the needle as it is advanced. The rapid forcefully fired spring mechanism can help combat this in many cases (Fig. 12.14a, b). Another useful trick in very dense tissue is using a 16 G instead of a 14 G. The smaller diameter will often pierce the tissue better and achieve nice specimens, especially of “hard” lesions.
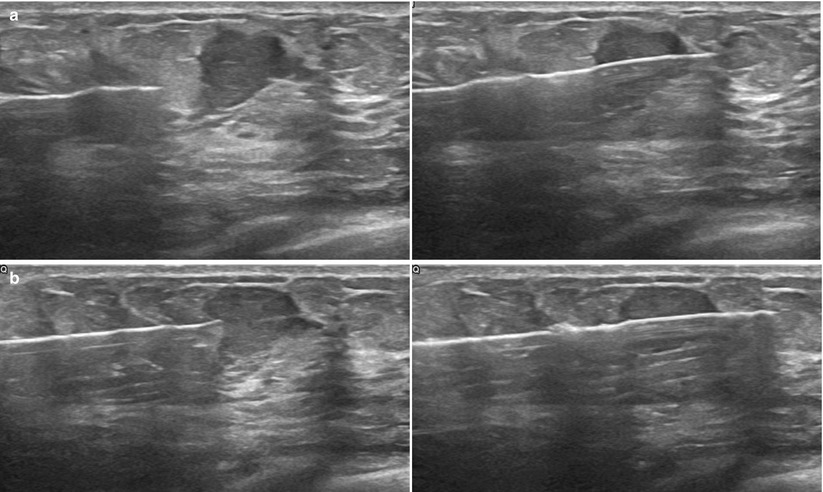
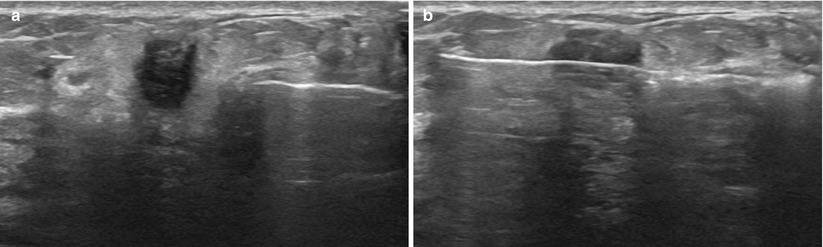
Fig. 12.13
(a, b) It is helpful to sample the edge of the lesion, including some the normal margin to aid the pathologist in diagnosis. (a) This can be accomplished by positioning the needle slightly away from the mass to ensure the notch captures some normal breast tissue before entering the mass. (b) If positioned close to the mass, the entire sample will likely arise within the mass
Fig. 12.14
(a) As seen on the image, the tissue can “bunch up” in front of the needle, as the lesion tries to move away from the advancing needle tip. (b) The spring action of the needle helps to eliminate this problem
A coaxial introducer may be used in conjunction with the biopsy gun. The introducer is placed similar to the needle placement described previously. Introducers are typically extremely sharp and do not usually require a skin incision. The trochar is then removed and the biopsy needle is placed through the introducer and into proper position to obtain a sample. This allows multiple samples to be obtained with only a single skin puncture. It decreases trauma to the surrounding tissue and can be very useful in dense, difficult to penetrate tissue.
In cases where automatic deployment is not safe, a device with a manual mode is advantageous. The Achieve® biopsy device (Cardinal Health, Dublin, OH) is available in several gauges, and the stylet can be deployed independently from the cutting cannula. An introducer must first be placed. The device, with the stylet prefired, is placed thru the cannula and the sample notch can be positioned as desired within the mass. The cutting cannula is then deployed directly over the stylet, with no additional needle tip forward advancement. This can be very useful in cases with masses very near implants or other sensitive structures.
Inspection of Specimen and Number of Cores
After obtaining a sample the needle is removed. Manual pressure should be applied over the incision by the technologist while the needle is out to aid in hemostasis and decrease bleeding. Care should be taken to maintain sterile technique. Tweezers or the tip of a needle can be used to remove the specimen from the sample notch and place it into formalin. Care should be taken not to crush or damage the specimen. A small amount of normal saline from a sterile syringe can also be used to “wash” the specimen out of the notch. The needle should not be placed directly into the formalin, as this would introduce a caustic substance into the patient. Some centers prefer to swish the needle tip in a small test tube of normal saline to remove the specimen. This can subsequently be transferred to a formalin container. The macroscopic evaluation of the specimen can yield important information regarding quality. Intact, firm, white or dark red-brown cores that sink are favorable signs. Fragmented, yellow, floating oily cores are less likely to yield a conclusive diagnosis.
As per the ACR Guidelines, 3–6 core samples are generally recommended [15]. Several authors have advised not be “dogmatic” about the number of cores, with the exact number based on case-by-case assessment. Decisions regarding the optimal number of specimens should take into account the radiologist overall confidence in the specimens. Factors to consider include how well the lesion was seen before and during the procedure, needle location pre- and postfire, and visual evaluation of the specimen [16, 22].
Biopsy Procedure: VAC
Vacuum-assisted core needle biopsy may also be performed. Ultrasound-guidance principles are the same as automated spring-loaded devices. A range of needle sizes are available (7–14 gauge). The needle is usually positioned at the inferior margin of the lesion in the case of small lesions (Fig. 12.15). For larger lesions or non-mass-like areas, the needle may be centrally located within the mass. When the needle is in correct position, the vacuum is activated; the specimen is then pulled into the shaft and cut. The sample moves back down the needle to the container and the biopsy aperture is ready to obtain another specimen. Multiple samples can be obtained without moving the needle as the vacuum action continually sucks the lesion into the aperture. The shaft of the needle can also be rotated (directional control) to obtain specimens from various clock faces. Vacuum-assisted devices allow rapid acquisition of large volume specimens with a single insertion. An average of six cores is usually taken [6], although like spring-loaded cores numbers will vary. After the biopsy has been completed, lavage and aspiration of the biopsy cavity are performed to decrease bleeding and hematoma formation.
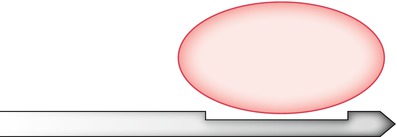
Fig. 12.15
The vacuum-assisted biopsy needle is usually placed along the undersurface of the lesion to be sampled
Marker Placement
Biopsy marker placement is essential for optimal patient management. Marker placement benefits [23]:
Marking multiple lesions
Insuring correlation across different imaging modalities
Follow-up of benign lesions
Monitoring neoadjuvant therapy
Preoperative surgical localization and postoperative specimen evaluation
Multiple lesions often reveal varying pathological analysis and require different treatments/intervention. The vast array of marker shapes (Figs. 12.16 and 12.17) allow for easy identification of multiple lesions. Occasionally correlation across varying modalities may be in doubt prior to biopsy; marker placement can help verify. Marker placement aids in correlation on future exams as well. Marking of benign lesions facilitates short-term follow-up as well as helps to prevent unnecessary rebiopsy, particularly in patients who undergo follow-up at different institutions. Some patients undergoing neoadjuvant therapy may have such an excellent response that no radiographically visible tumor is present after treatment, making a marker essential to preoperative localization of the original tumor bed.
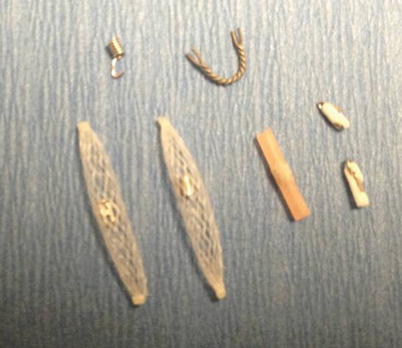
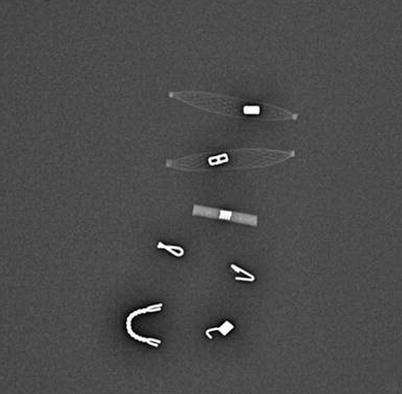
Fig. 12.16
Gross image of a sample of available breast markers
Fig. 12.17
Mammographic image of a sample of available breast markers
There are multiple commercially available markers on the market today. Some are designed to be deployed through the biopsy device (often the case in vacuum-assisted devices) others by freehand. Most markers are very small, 2–3 mm, and made of titanium or stainless steel. They may be imbedded with additional materials, such as collagen, PLA (polylactic acid), PGA (polyglycolic acid), interwoven polymer, or hydrogel to increase US visualization and decrease clip migration.
Choosing which marker to use is highly institution dependant. Different-shaped markers should be used when biopsying multiple areas with clear documentation in the report regarding which marker was placed into which lesion. Consideration may also be given to how one desires the marker to be visualized on subsequent exams. All commercial markers are seen well mammographically. However, some are better seen than others on US and MRI. US visualization can be increased with various embedding material such as woven polymer or hydrogel. MRI appearance depends on type (stainless steel creates a larger artifact than titanium), shape, and imaging parameters. Some marker material/shape combination will produce almost no MRI artifact with routine sequences, while others produce a fairly large MRI artifact. One that produces a clearly detectable but small artifact is usually best.
Marker placement utilizes the same basic ultrasound-guidance principles as described for CNB. In freehand placement, the tissue marker needle tip is advanced into the lesion/biopsy bed. A pre-deployment image is obtained. Under direct ultrasound visualization the marker is deployed. It should be seen extruding from the tip of the device (Fig. 12.18a). The needle is then removed and a post marker placement image is obtained (Fig. 12.18b). Care should be taken when removing the needle to ensure that it does not “drag” the marker back out, down the biopsy tract. It is good practice to inspect the deployment device after removal.
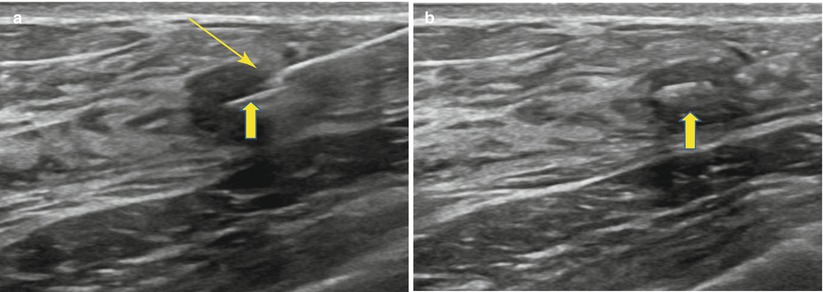
Fig. 12.18
(a, b) Clip deployment. (a) The breast tissue marker needle tip is inserted into the mass under direct ultrasound visualization. Clip (thick arrow) is deployed from the tip (thin arrow) or distal side port. (b) Clip (thick arrow) is well visualized within the mass following deployment
For vacuum-assisted devices, after the specimens have been obtained, the inner needle is usually removed and a compatible marker clip device is placed through the outer introducer sheath and deployed. Markers may also be placed freehand. As the marker is not anchored to the wall of the biopsy cavity, it can move within the breast tissue and result in clip migration. The marker should be within 1 cm of the lesion following placement. Causes of clip migration include the “accordion effect.” This refers to clip migration along the z axis. It can occur during decompression of the breast with stereotactic or MRI biopsy. Hematoma formation and distortion caused by excess bleeding may also cause migration. Fatty breasts may have more migration than dense breasts. Larger-gauge needles and larger biopsy cavities have also been implicated in increased risk of clip migration.
A PubMed literature review demonstrated no definite documented cases of breast marker allergic reaction. Two case reports show a possible exacerbation of preexisting atopic dermatitis with titanium breast clips. There are rare reports of titanium allergy with pacemaker contact sensitivity and some orthopedic implants [23, 24]. Markers may be removed under stereotactic guidance if needed [25].
Hemostasis, Post-biopsy Mammograms, and Post-Biopsy Care
Following marker placement, direct manual pressure is applied to the biopsy site for approximately 10 min to achieve hemostasis. The skin is then cleaned and a Steri-Strip™ (3 M) bandage is applied. The patient undergoes immediate postbiopsy mammogram. Craniocaudal and 90° lateral views are routinely obtained (Fig. 12.19a, b). Additional views may occasionally be required to visualize the marker. Marker placement and mammographic correlation are confirmed. A small ice pack is placed over the biopsy site. The patient is instructed on routine postbiopsy care and provided with written information. This includes keeping the wound clean and dry. Strenuous activity should be avoided for 24 h, and PRN ice packs (first 24 h) and heating pads (after 24 h) may be used. The patient is instructed to keep the wound dry for 24 h and avoid swimming pools and hot tubes for 1 week following the biopsy to allow for complete wound closure. OTC medications (acetaminophen) are advised for postbiopsy discomfort, which should be minimal. Aspirin and NSAIDs should be avoided for 48 h.
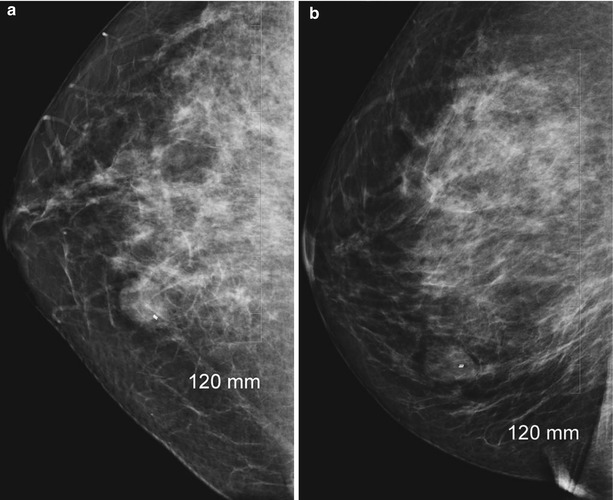
Fig. 12.19
(a, b) Post-biopsy mammogram (a, CC; b, LM) showing marker within the breast mass
Follow-Up
Imaging/pathology concordance is critical to assure appropriate patient care. The pathology report should be reviewed by the radiologist for concordance. (Please see Chap. 13 for discussion.) The patient and/or referring physician should be notified of the pathology and recommended follow-up. Concordant malignant findings should be referred to appropriate surgical/oncological consultation, as should discordance.
No BI-RADS recommendations exist regarding imaging surveillance for benign concordant core needle biopsy. Since CNB involves sampling, not removing lesions, imaging is required to demonstrate stability. However, there is no consensus regarding the timing of follow-up, with recommendations ranging from 6 months to 1 year. Salkowski et al. [26] found that rebiopsy recommendation rates and PPVs did not differ in the 6- and 12-month groups. They suggest yearly follow-up may be more appropriate, lower costs, decrease patient anxiety, and lower radiation dose. Practice at our institution varies between 6 months and 1 year. Several factors are taken into account, including but not limited to specific pathology, image findings, and patient/physician preference.
Biopsy Report
As per ACR guidelines, the radiologist report should include the following [15]:
1.
Procedure performed
2.
Left and/or right breast
3.
Description and location of the lesion with standard lexicon
4.
Type and amount of local anesthesia
5.
Gauge of needle and type of device
6.
Complications and treatment, if any
7.
Specimen radiographs or ultrasounds, if any
8.
Marker placement, if performed
9.
Postprocedure mammogram/ultrasound documenting marker placement and location of marker relative to sampled lesion
10.
Recommendations based on tissue sampling results, imaging information, and concordance
11.
Record of communication with the patient and/or referring physician
Complications of US CNB
The risk of complications in ultrasound-guided core needle biopsy is minimal. The reported risk of complications for automated spring-loaded CNB has been reported as less than 1 % [4, 27]. Complications with vacuum-assisted biopsy are reported as higher, ranging from 0 to 10 %, with a mean of 2.5 % [11, 27, 28]. The risk of severe complications (requiring surgical intervention) is lower with CNB (automated spring loaded or vacuum assisted) than with open surgical procedures, <1 % versus 2–10 % [1]. The most common complications include pain, bleeding, hematoma formation, and infection. Rare complications include pneumothorax, implant rupture/damage to implanted devices, and milk fistula/galactocele formation.
Pain
A study by Szynglarewicz [29] found a median pain rate of 4 (on an 11-point visual analogue scale of pain; 0 = none 10 = extreme) in women undergoing US-guided core biopsy. Specifically they compared pain experienced by patients undergoing US-guided biopsy with either a 14-gauge automated core needle or an 11-gauge vacuum-assisted CNB. Despite the larger gauge, the study found that less pain was experienced in the VA biopsy group. The authors believe this is due to contiguous collection of tissue without removing the needle. They reference similar findings in other studies. They also point out that while some studies indicate more pain with an 11-G VA needle biopsy than with a 14-G ASL needle biopsy, these studies were comparing 11 stereotactic procedures with 14-G US-guided procedures. The findings may be related to inherent differences in stereotactic guidance versus US guidance (longer procedure time, prone positioning, compression, etc.).
Hematoma/Bleeding
Most studies indicate hematoma formation and bleeding are more common in VA biopsies than in ASL biopsies [1, 5, 27, 30]. The fairly straightforward argument holds that a larger biopsy cavity creates more bleeding. A few studies demonstrate that hematoma/bleeding is less common (or equal) in VA biopsies compared to ASL biopsies [29, 31]. These authors argue that although more tissue is removed, the single insertion with subsequent decreased tissue trauma and the ability to evacuate the biopsy cavity with vacuum actually decreases hematoma formation.
Implant Injury
Although implant rupture is a risk, it is very low given the real-time imaging capability. In addition, manual devices such as the previously mentioned, Achieve®, and VA devices that do not require a “throw” can be helpful in challenging cases. Both stereotactic and US-guided biopsies are safe and accurate in augmented breasts [32].
Tumor Cell Displacement
Seeding of biopsy needle track with viable malignant cells was an initial concern with all diagnostic breast needle procedures. Tissue seeding has been reported in 37 % ultrasound-guided ASL biopsy and in 23 % of the cases following VA biopsy [16]. In a prospective study from the Netherlands [33], seeding was not felt to be clinically significant, as radiotherapy is performed and conclusions were that tumor cells do not survive displacement.
Size and Type Argument: VA Biopsy Versus ALS CNB
The volume of tissue removed with vacuum-assisted core (VAC) devices is significantly greater than the volume obtained with automated spring-loaded core devices (ASLC). (See Tables 12.1 and 12.2.) Although this has proved invaluable in stereotactic biopsy of calcifications, overall utility in ultrasound lesions is not as clear.
Table 12.1
Needle gauge comparison chart
Needle gauge | Nominal outer diameter (mm) |
|---|---|
8 | 4.2 |
9 | 3.8 |
10 | 3.4 |
11 | 3.1 |
12 | 2.8 |
13 | 2.4 |
14 | 2.1 |
15 | 1.9 |
16 | 1.7 |
17 | 1.5 |
18 | 1.3 |
Table 12.2
Volume of tissue obtained with various CNB devices
Gauge | Core needle biopsy (CNB) device type | Volume of tissue obtained (mg) |
|---|---|---|
16 | ASL | 5.3 |
14 | ASL | 12.7–17 |
14 | VA | 34–40 |
11 | VA | 94–100 |
7 | VA | 250 |
When choosing between the use of a 14-gauge automated spring-loaded core needle biopsy and a vacuum-assisted core needle biopsy (usually 9–11 gauge), many things should be considered [34, 35]. While the accuracy of biopsy is increased with VAC [1], there is also a significant increase in cost and complications (although increased complication rate seems to be under debate) [4, 11, 27, 28]. Increased accuracy may not justify the routine use of VAC. VAC may not be as accessible as ASLC. In the diagnosis of high-risk lesions (such as ADH, radial scar, papillomas), ASLCN is more likely to underestimate the presence of DCIS than VAC. Invasive carcinoma is more likely to be underestimated in DCIS specimens with ASLCN than VAC. However, as standard of care is to send these lesions to surgical excision, no carcinomas are missed. Verifying concordance also ensures carcinomas are not missed. In larger lesions where the overall outcome is very unlikely to be different; the increased cost, resources, and patient discomfort of VAC would argue against its routine use.
However, others argue that with increased large volume samples, select high-risk lesions may not require surgical excision when appropriately reviewed in a multidisciplinary setting. If so, this may justify the increased use of vacuum-assisted biopsy. There is also a fairly strong argument for using VAC in small (less than 1.5–1 cm) lesions [29]. As there is inherently increased risk for sampling error in smaller lesions, the use of VAC may beneficial. As detailed in the complications section of this chapter, there are a few studies that demonstrate decreased pain and complications with VAC compared to ASLC [29, 36]. Overall, VAC shows significant improved accuracy with calcifications, non-mass-like areas, and small masses (not larger masses) and cost more than ASLC. Results of pain and complication rates between the two procedures show varying results. More studies should be performed in addressing the optimum choice in various clinical scenarios.
Cyst Aspiration
Although aspiration of a simple cyst is not necessary for diagnostic purposes, tender or painful cysts may be aspirated for symptomatic relief. For a suspected but not definitive simple cyst by ultrasound criteria, cyst aspiration may be performed to confirm the cystic nature of the lesion. If such lesions prove solid, then the procedure can easily be converted to a core needle biopsy. Complex cysts with mural nodules or irregular septations should not be aspirated as cytology from such is often falsely negative even in the presence of intracystic carcinoma. In dealing with such lesions, vacuum-assisted CNB or surgical excision is advised. Cyst aspiration may also be performed to help improve clinical exam or help clarify imaging findings.
Preparation, local anesthesia, and guidance principles are the same for cyst aspiration as they are for the previously described ultrasound-guided core needle biopsy. Under direct ultrasound guidance an 18-G needle with an attached syringe is advanced into the cyst. You should usually be able to “feel” the needle enter the cyst, which is confirmed with images and documented. Being able to “freely rock” the needle tip within the lesion is very good indicator of a cystic or fluid component (Fig. 12.20a, b). The contents are then aspirated and inspected (Fig. 12.21a, b). Complete or near-complete resolution of the cyst should be confirmed with real-time imaging. Tip: It is often possible to aspirate a simple small cyst with the lidocaine needle/syringe, sparing the patient an additional stick. Occasionally when an aspirate is unable to be obtained, despite strong suspicion of a cystic nature, an attempt can be made with a 16-G needle. If this fails, we will usually proceed to core needle biopsy.
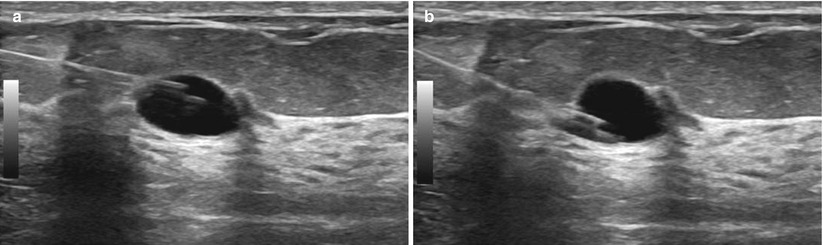
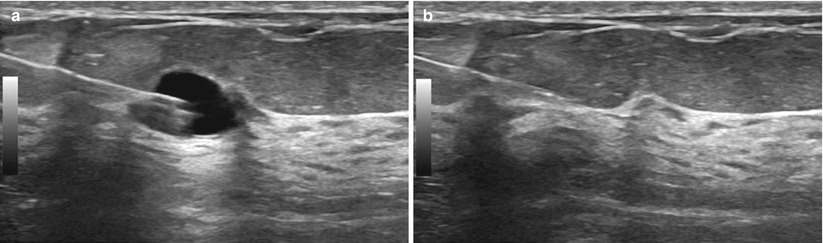
Fig. 12.20
(a, b) “Rocking” the needle tip. The needle tip can be moved up (a) and down (b) within the cyst. If this were a solid mass, rocking the needle up or down would move the entire mass up and down and the needle would remain in the same location within the mass
Fig. 12.21
(a, b) Cyst aspiration. (a) The needle tip is inserted into the cyst. (b) The cyst is then completely aspirated
Fine-Needle Aspiration (FNA) of Lymph Nodes
Ultrasound is increasingly being used in the evaluation of lymph nodes in the breast. Documenting lymph node metastasis is an important step in breast cancer management. Sentinel node biopsy is often performed to asses for metastatic disease of the axilla. Ultrasound and FNA can help select patients avoid the time, cost, and stress of sentinel lymph node biopsy. Fine-needle aspiration cytology involves collecting cells from a suspicious lymph node with a small hypodermic needle. FNA is fast, inexpensive, and minimally invasive. It can easily be performed when the patient undergoes CNB of their primary breast lesion. A screening ultrasound is performed of the axilla and the most suspicious lymph node is chosen for biopsy.
For evaluation of metastatic or suspected metastatic disease of the axilla, most studies describe the use of FNA. There have been reports of core needle biopsy as well, although much fewer in number. Ultrasound combined with CNB or FNA has specificity reported to be as high as 100 %. FNA sensitivities range from 21 to 95 %, and CNB have reported similar results, 40–91 % [37]. Preparation, local anesthesia, and guidance principles are the same for fine-needle aspiration as they are for the previously described ultrasound-guided core needle biopsy. Using ultrasound guidance, a small hypodermic needle (usually 21–25 gauge) can be used to obtain aspiration cytology. Larger 18-gauge needles are also sometimes used. The needle tip is advanced into the lymph node under ultrasound guidance. Once confirmed and documented in place, negative pressure is applied to the needle with an attached syringe as the tip is moved around in the mass to collect cells (Fig. 12.22a–d). No aspiration should be applied when removing the needle. This may add nonlesional material and increases track seeding [38]. Others prefer to use the capillary action of the needle, where cells are detached by the cutting edge of the needle and are conducted into the lumen by capillary force rather than aspiration. Typically between two and five needle passes are performed per suspicious lymph node. However, studies have shown that after four passes, the gain is minimal [39]. Having a cytologist immediately available to inspect the specimens for adequacy is very helpful in obtaining optimum FNAs.