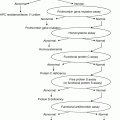
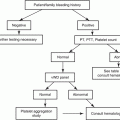
Fig. 4.1
Example of a validation checklist
4.3 Validation Studies
In the hemostasis laboratory, validation studies encompass the establishment of analytical performance expectations; calibration and calibration verification; determination of quality control ranges, reference intervals, and therapeutic ranges; crossover studies; inter-analyzer comparisons; verification of analyzer and computer set-up; evaluation of reports; verification of implementation readiness of laboratory staff and clinicians; and a “green light” from the laboratory director. This set of studies may be organized in a variety of ways and varies to some extent by the type of assay, number of components involved, and level of familiarity with the assay, analyzer, and reagents. A generic set of validation studies is presented in this section.
4.4 Validation Plan
A written validation plan should be developed and approved by the laboratory director or designee prior to the initiation of validation studies. A written plan helps assure that the extent of validation testing has been defined, expectations are clear for personnel who conduct validation studies, and the laboratory director will have the information necessary to confidently approve the implementation of the new test or method at the conclusion of validation testing.
4.5 Analyzer Set-up and Utilities
The first step in validation is to assure that the analyzer is set up, configured, and functioning according to manufacturer’s specifications [4]. Most manufacturers have an installation procedure to verify performance of mechanical, electrical, fluidic, and optical components, as well as software function and configuration. Adequacy of power sources and ambient temperature control are vital and, if deficient, should be rectified before proceeding further with assay validation [4].
4.6 Calibration and Calibration Verification
Calibration and calibration verification have long been considered the domain of the chemistry laboratory. In the hemostasis laboratory, clot-based methods and platelet function assays do not involve calibration. Fibrinogen and clotting factor assays require standard curves, but not calibration in the classical sense. On the other hand, many hemostasis assays, including quantitative D-dimer, protein C, protein S, von Willebrand factor, and others, are calibrated and directly measure the concentration or activity of an analyte using chromogenic, immunoturbidimetric, or enzyme immunoassay methods [5]. For these assays, it is important to conduct calibration and calibration verification prior to other validation studies. Indeed, proper calibration is requisite for other validation studies to be meaningful.
Calibrate the assay.
Calibration should be performed in accordance with the manufacturer’s instructions at the frequency defined by the manufacturer or when indicated by calibration verification results or other quality metrics.
Verify the calibration.
Calibration verification using samples that are different from the calibrators used in the calibration step may be prescribed by manufacturers as the final step in the calibration process. More often, calibration verification is performed as an independent process to assess the stability and suitability of the existing calibration. Calibration verification is typically required at a defined frequency, usually every 6 months, or with events that pose a risk of invalidating the current calibration, e.g., reagent lot changes, analyzer repairs or major service of analyzers, or that may indicate assay instability, e.g., drifting QC or shift in aggregate patients’ results [5, 6] Failed calibration verification may indicate the need to recalibrate, after checking for possible instrument and reagent issues.
4.7 Quality Control Ranges
Validation of quality control ranges consists of verifying that quality control range studies are appropriately conducted, control ranges (or control limits) are properly selected, and control ranges are correctly entered into the analyzers, laboratory information system (LIS), or quality control (QC) application, as applicable.
Establish quality control ranges.
Some guidelines for establishing quality control ranges are as follows:
Create a data set of control values. Ideally, obtain a minimum of 20 measurements made on separate days [7]. When this time frame is not feasible, test control material a minimum of 20 times distributed over at least 3 days. Performing measurements over a greater number of days will provide more robust control limits. It is inadvisable to generate the entire data set of control values in a single run or on a single day because the variance of the assay will be underestimated, perhaps grossly underestimated, resulting in control ranges that are unrealistically tight. It is also advisable to simulate the working environment rather than ideal conditions when conducting control range studies. For example, if a control sample may be used for 24 h after preparation, control studies should use control samples from throughout their 24-h “lifespan” rather than using only newly prepared samples. Similarly, control studies should encompass the lifespan of reagents.
Review a run chart of values to evaluate for trends or outliers. Reviewing a histogram of results may also help highlight outliers or precision problems. If trends are obvious or there are other indications of instability in the assay, the assay should be evaluated and stabilized, then the control range study should be repeated. Caution should be exercised in classifying values as outliers. Some good working definitions of an outlier are [8]:
1.
An observation whose difference from its closest observation is more than 1/3 of the range of all observations.
2.
An observation that exceeds the 3rd quartile (75th percentile) by more than 1.5 times the interquartile range (i.e., the difference between the 75th and 25th percentiles) or falls below the 1st quartile by more than 1.5 times the interquartile range.
Calculate the mean and standard deviation for each control, and compare these statistics with the manufacturer’s information, if any. The mean and standard deviations should also be compared with historical values. Substantial deviations from target means or excessive imprecision may indicate problems with the analyzer, reagents, control materials, or testing procedures, and should be evaluated.
Select control limits. Parametric methods are usually employed. For example, the control limits are often set at the mean plus or minus 2 standard deviations [9]. Other multiples of the standard deviation may be suitable based on the precision of the assay and clinical tolerance for bias and variance in test results [9]. When fewer than 40 results are used to establish a control range, it is a good idea to recalculate control limits later with a larger number of results.
Establish a QC plan that includes frequency and decision rules, based on applicable regulations, accreditation standards, performance characteristics of the assay, number of tests performed by the laboratory, medical applications of the test, and clinical impact of an erroneous result [10, 11].
See Fig. 4.2 for a sample report for evaluating control range studies and selecting control ranges.
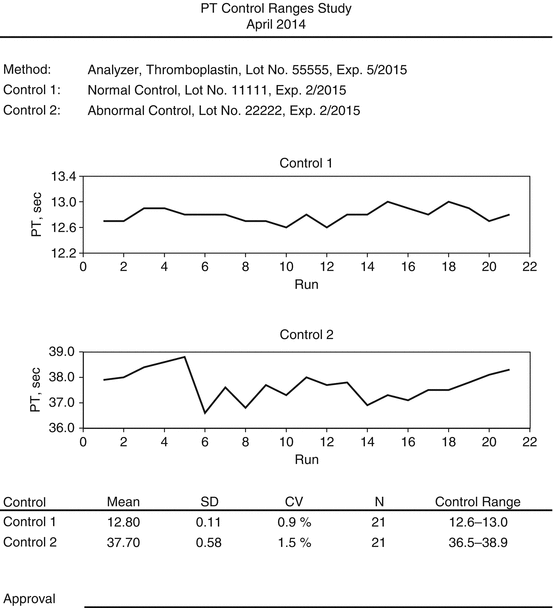
Fig. 4.2
Example of a report for evaluating quality control results and assigning control ranges
Verify that control ranges and decision rules are correctly entered into the analyzers, LIS, and QC application.
When analyzers have QC capabilities, laboratories may find it convenient to use the analyzers to alert testing personnel of out-of-range results, document corrective actions, prepare run charts, and calculate summary statistics. Many laboratories use the LIS for QC management to consolidate QC from throughout the laboratory and to implement more complex decision rules. Some laboratories use stand-alone applications for QC, either in place of or as a supplement to the LIS. It is not uncommon for QC to be managed with a combination of applications. It is vital that control ranges be entered correctly and consistently in all applications used.
4.8 Reference Intervals
Reference intervals are the principal means by which clinicians interpret test results. Valid reference intervals help assure appropriate triage, therapy, and additional diagnostic studies. Inappropriate reference intervals have been identified as a source of misguided therapy and over-utilization of laboratory tests and other medical services [12–14]. Validation of reference intervals consists of verifying that reference interval studies are appropriately conducted, reference intervals are properly selected, and reference intervals are correctly entered into the analyzers and LIS.
Establish reference intervals.
Several important steps are required to establish valid reference intervals for hemostasis tests. Here are some guidelines:
Select an equal number of female and male reference subjects. Some laboratories also obtain an equal number of subjects above and below age 45. Full statistical validity may require 120 subjects or more [8], but a practical minimum number is 20 subjects [9]. Using 40 or more subjects provides a higher level of confidence in the reference intervals. Laboratories that are unable to obtain a satisfactory number of reference subjects may find it valuable to obtain reference specimens from another laboratory, although a dose of caution is in order for tests such as the PTT that may be unreliable with frozen specimens unless they are prepared and handled meticulously.
The reference population is presumed to be those individuals with “normal” hemostasis. Because of relatively high prevalence of acquired defects, including prescription and non-prescription medications that affect components of the hemostatic system, use of exclusion criteria with potential reference subjects is critical. Exclusion criteria should include a history of bleeding or clotting disorders, systemic inflammatory conditions, pregnancy, hormonal contraceptives (oral, implant, or patch), and acute illness. Medications should be closely scrutinized for potential effects or, alternatively, exclusion criteria may include the use of any medication. Vigorous exercise in the preceding 18–24 h is also grounds for exclusion [9].
Review a histogram of the reference values (i.e., test results from the reference subjects). Be cautious about classifying values as outliers, as discussed above.
Calculate the mean and standard deviation of the reference values, and calculate the 2.5th and 97.5th percentiles. Compare these statistics with historical values, published reference intervals, and information from the manufacturer. Significant discrepancies from comparable methods and populations should provoke an evaluation of the reference subjects, specimen collection and handling procedures, and assay.
Select reference intervals. Either parametric or non-parametric methods may be used, depending on the distribution of test results from the reference subjects.
See Fig. 4.3 for a sample report for evaluating reference intervals.
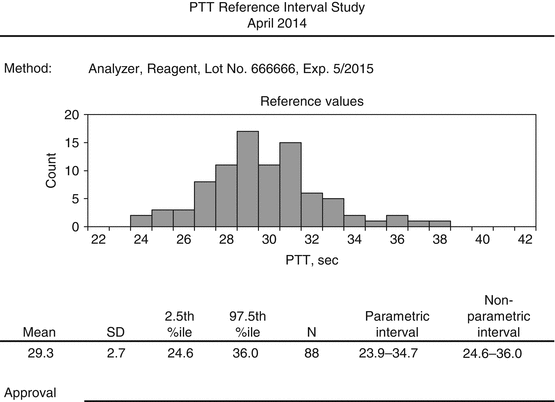
Fig. 4.3
Example of a report for establishing reference intervals
An approach for establishing reference intervals that may be overlooked is that of transference. Transference involves adopting or “transferring” reference intervals from another laboratory’s or manufacturer’s reference interval study when the analytical systems and test subject populations are sufficiently comparable [8]. Transference is particularly valuable for small laboratories that have difficulty finding an adequate number of reference subjects or mobilizing resources for an extensive study. Transference enables a laboratory to perform a limited validation study to confirm the suitability of the candidate reference intervals.
An excellent discussion of reference intervals may be found in CLSI document EP28-A3C [8].
Verify that reference intervals are correct in analyzers and LIS.
Some laboratories find it useful to have the analyzer display reference intervals, when the analyzer has this capability. The analyzer may then be used to flag abnormal results and display reference intervals on analyzer-generated reports. The LIS provides reference intervals on reports and may transmit reference intervals to other interfaced information systems. If interfaced information systems maintain their own reference interval tables, then these tables also need to be verified. It is critical that reference intervals be entered correctly and consistently in the analyzers, LIS, and other information systems, as applicable.
4.9 Performance Characteristics
Knowing the performance characteristics of an assay is good laboratory practice and, in some countries, required by regulation. Performance characteristics include analytical accuracy and precision, interferences, analytical sensitivity and measurement range, and methodological limitations or issues such as carryover.
Verify accuracy.
Accuracy is vital for test results to meet clinical requirements. Detailed procedures have been developed for accuracy verification [15–18], but for most purposes the combination of calibration verification and analytical measurement range verification will provide laboratories with sufficient evidence of accuracy.
Determine precision.
Information about precision helps laboratories assess whether differences in replicate results on a specimen indicate problems with the assay. Information about precision helps clinicians assess whether differences in test results on a given patient indicate a change in the patient’s status. Detailed methods are available for determination of precision [17–19], but for most purposes, laboratories can gain adequate information about precision from manufacturer’s information and quality control statistics.
Determine interferences.
Determining interferences with an assay is important to avoid spurious results, particularly when the interferences are not detected by the assay system and a result is produced. For most purposes, laboratories can adequately determine interferences from the medical literature and manufacturer’s information.
Verify the analytical measurement range.
Analytical measurement range verification is required to establish the range over which analyses are acceptably accurate. For some assays, including the prothrombin time (PT), International Normalized Ratio (INR), partial thromboplastin time (PTT), activated clotting time (ACT), and thrombin time (TT), the concept of analytical measurement range is not applicable because there is no standard of “trueness.” However, for many other coagulation tests, standards do exist and the analytical measurement range needs to be verified [5].
Here are some guidelines for analytical measurement range verification:
Obtain standards of a suitable matrix with target values or assayed values that cover the range of values over which testing is desired.
Test each standard in duplicate and calculate the average of each set of duplicates. A higher number of replicates is useful for imprecise assays.
Calculate the absolute and relative (percent) deviations of the averages from the target values.
Compare the deviations with defined tolerance limits. Tolerance limits may be defined by the manufacturer, regulations, or published data. In their absence, tolerance limits may be defined by the judgment of the laboratory director.
The analytical measurement range is verified at and between those levels at which the deviations are within the tolerance limits.
It is generally considered that if an assay has a theoretical measurement range beyond that for which standards are available, the working analytical measurement range should be limited to that covered by the standards.
Determine reagent stability.
All reagents degrade over time, potentially leading at some point to incorrect test results. In many cases, laboratories may safely use manufacturer’s information or published studies to determine reagent stability. When information does not exist or is not credible, it is incumbent on the laboratory to determine the period of reagent stability.
Here are some guidelines for one approach:
Prepare fresh reagent and place on the analyzer.
Stay updated, free articles. Join our Telegram channel

Full access? Get Clinical Tree


