Figure 10.1 A,B. Postoperative wound dehiscence and necrosis after a triple arthrodesis with a circular external fixation device in a patient with a history of diabetes mellitus. C,D. Clinical appearance of the wound at the lateral aspect of the foot upon frame removal 10 weeks after the reconstruction. E. NPWT was applied after an aggressive débridement at the time of frame removal. F,G. Clinical picture of the wound 2 and 4 weeks post-NPWT application. H–J. Final postoperative clinical and radiographic pictures 7 weeks post-NPWT application.
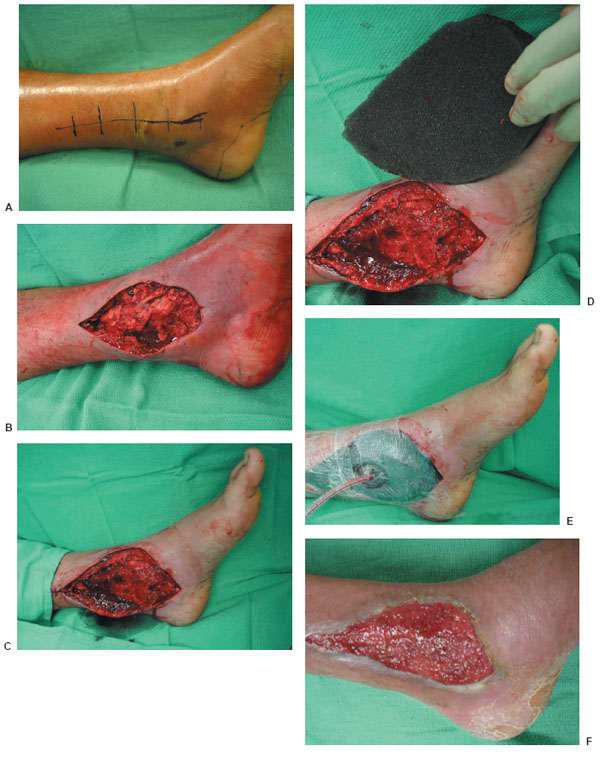
Figure 10.2 A preoperative picture of a septic ankle in a patient with diabetes mellitus (A) requiring extensive surgical débridement (B). The wound was left open with local moist to dry wound care for about 5 days. C–E. A revisional surgical débridement was performed with the application of the NPWT.
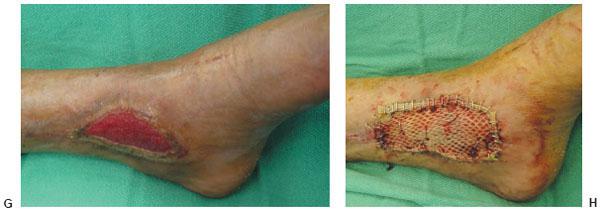
Figure 10.2 F,G. Clinical appearance of the wound 3 and 8 weeks post-NPWT application. H. Please note the significant decrease of the wound size and the excellent wound bed preparation for the final application of the split-thickness skin graft.
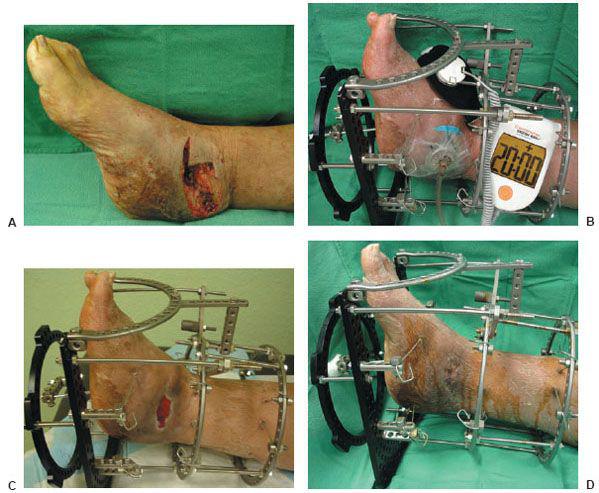
Figure 10.3 A. A preoperative clinical picture of an unstable Charcot foot and ankle and chronic ulceration that was initially excised. A talectomy with a tibial-calcaneal arthrodesis was achieved with the use of a multiplane circular external fixation device. B. Please note that NPWT was applied to the clean wound directly after the major reconstruction in addition to the external electrical bone stimulator. C. Clinical picture of the wound 4 weeks post NPWT application. The wound was eventually closed with further postoperative manual compression of the external fixator at the arthrodesis site. D. Please note the final wound appearance 10 weeks after the arthrodesis procedure.
The first foam is a black hydrophobic polyurethane foam (GranuFoam™) with open pore structures measuring between 400 and 600 micrometers that potentially promotes granulation tissue while increasing excessive fluid removal. Modifications such as the GranuFoam heel dressing is contoured to fit the heel and allow the therapeutic regulated accurate care (TRAC) pad™ bridge to be placed on the dorsal aspect of the foot for better comfort and faster dressing changes. The TRAC Pad™ is designed to monitor and maintain target pressure at the wound site via accurate pressure sensory devices impregnated within the pad. Also, the GranuFoam Silver® dressing has microbonded metallic silver impregnated throughout the foam, which is continuously delivered to the wound with negative pressure. The GranuFoam Silver® eliminates the need for adjunct silver dressings and provides a protective bacterial and fungal barrier to prevent infection within the wound (24,25,35).
The second type of open cell foam is a versatile, microporous white colored foam (Versa White Foam) made of polyvinyl alcohol. This foam is inherently denser, hydrophilic, and premoistened with sterile water prior to packaging. Its high tensile strength and nonadherent qualities makes the Versa White Foam useful in undermining areas and exposed vital areas where neurovascular structures, tendons, bones, and joints are localized (25,35).
Initially, the open cell foam is trimmed and fitted according to the dimensions of the wound and placed in direct contact with the wound bed. An adhesive drape is then applied over the sponge, extending about 3 to 5 cm beyond the margins to create an airtight seal. The adhesive drape may be applied in one sheet or in overlapping strips. Smaller strips are easier to handle and can be adjusted to the underlying contour of the wound. Multiple wounds may share a single VAC device by Y connectors or by through-the-bridging technique. The Y connectors will allow two separate wounds to share one common vacuum tube, whereas the bridging technique connects two wounds with a piece of foam overlying normal skin directly between the wounds. The normal skin is covered with adhesive drape prior to bridging to protect the skin from the vacuum forces and prevent cross-wound contamination. The tubing is placed directly into the foam and connected to the VAC unit. The effluent collecting canister should be in the VAC unit prior to vacuum tube placement to have wound debris stored and collected. The tube is then sealed to prevent leakage. The TRAC Pad™ connector has replaced the tubing for easier VAC dressing changes and to maintain target pressure at the wound site (25,35).
The soft tissue reconstructive ladder or elevator from the least complex to most complex steps begins with healing by secondary intention, primary wound closure, skin grafting, local random flaps, local muscle flaps, pedicled composite flaps, composite vascularized osteocutaneous flaps, and free tissue transfers (29). NPWT can be a useful adjunct in many of these settings. A healthy vascularized wound bed will improve an incorporated graft or flap regardless of the closure strategy used. It is the responsibility of the surgeon to decide which step on the reconstructive elevator is most appropriate. An efficient wound bed preparation is the key to the successful use of NPWT. A necrotic wound bed will not granulate and serial Débridements may be necessary prior to VAC Therapy (33,34).
In addition, the modified Papineau technique with VAC Therapy has been described to address bone and soft tissue deficits with osteomyelitis after extensive and precise bone resections. The Papineau technique involves open cancellous bone grafting on a granulated wound base with osseous defects created after resecting chronic osteomyelitis or tibial nonunions. It is closed with reconstructive skin coverage or by secondary healing intention. The first stage requires complete resection of infected tissue and bone. The second stage involves open cancellous bone grafting within the osseous and soft tissue defect with VAC foam application at 48- to 96-hour intervals until healthy granulation tissue formulation in the wound bed is obtained. Autogenous bone graft and bone allograft may be packed within the osseous defect and covered with Adaptic gauze to prevent adhesion of the wound VAC foam. The final stage requires split thickness skin grafting for definitive wound closure. Other modifications include external fixation in combination with the Papineau technique (Fig. 10.4) (36).
POSTOPERATIVE MANAGEMENT
For the first 48 hours, 125 mm Hg of continuous negative pressure is applied. Thereafter, the device is programmed to intermittent pressure cycles with 5 minutes of applied negative pressure followed by a 2-minute rest period. The dressings are changed every 48 hours. Patients may require pain medication during dressing changes; however, most dressing care is well tolerated and can be managed without difficulty at the bedside. Outpatients treated with NPWT are given a portable mini-VAC Therapy device. Weekly or biweekly wound inspections allow clinicians to document the formation of granulation tissue and address any complications that might arise. Patients are mostly managed by a home health agency, skilled nurses in nursing homes, or wound care specialist in a wound care clinic (17,24,37).
AVOIDING COMPLICATIONS
Air leakage at the vacuum suction tube surface or within interdigital areas can be avoided with compound benzoin tincture or skip prep applied directly to the periwound environment, keeping the adhesive drape from detaching. Tegaderm and Ioban may be used to reinforce the adhesive drape around the tube.
Fragile or macerated skin may be protected by applying adhesive drapes over the periwound environment prior to VAC foam application. This will limit skin irritation and stagnant fluid buildup. Persistent maceration and direct vacuum tube pressure are known to cause further skin breakdown. Also, applying adhesive drapes over hydrocolloid dressings will protect underlying skin from macerating (25,35).
Granulation tissue “in-growths” into the foam can be avoided by changing sponges more frequently or using the VersaWhite Foam, which limits adherence with its polyvinyl alcohol property. Excessive or prolonged discomfort caused by the VAC Therapy system can be alleviated by decreasing pressure settings in 25 mm Hg increments. Patients are able to tolerate VAC Therapy with a reduced rate of negative pressure (25,38).
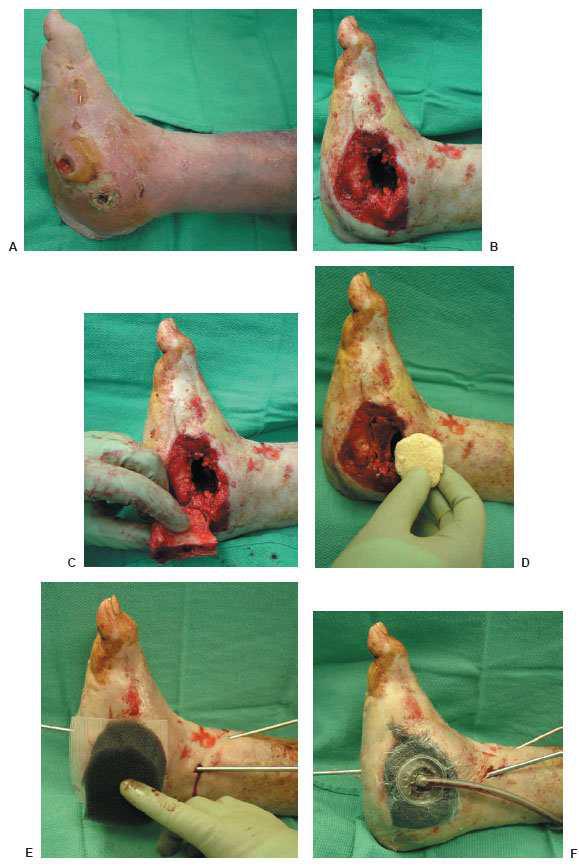
Figure 10.4 A. A preoperative clinical picture of an infected Charcot foot and ankle fracture-dislocation with multiple wounds and talus osteomyelitis. The patient underwent a talectomy with an insertion of antibiotic beads for a period of 7 weeks. B–D. The patient was eventually brought back to the operating room for a tibiocalcaneal arthrodesis with an autogenous and allogenic bone graft. At the same time, NPWT was applied directly to the wound (F) before the use of the multiplane circular external fixator (G).
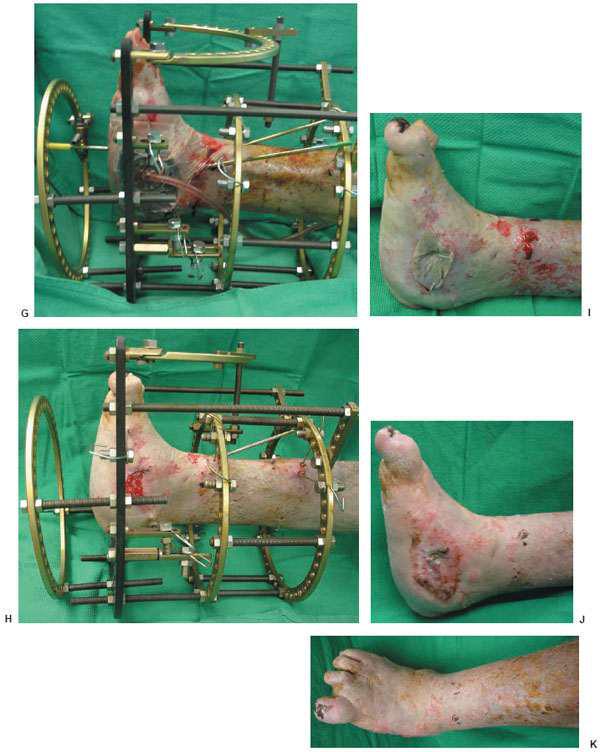
Figure 10.4 Clinical appearance of the wound 14 weeks postoperatively (H) and before the external fixator removal and application of the split thickness skin graft (I). J,K. Final postoperative outcome at 19 weeks.
Finally, overzealous adhesive draping or tight dressings should be avoided to prevent skin tissue necrosis, especially at the digits. Pedal pulses or capillary filling time should be routinely evaluated for ischemic changes. Sensory loss or cyanosis should require an immediate dressing change or discontinuation of the VAC system for further evaluation (25).
CONCLUSION
This chapter describes the authors’ techniques of NPWT in complicated diabetic foot wounds. Surgical experience and knowledge of the most common indications of this magnificent wound care modality are necessary for successful patient outcome.
REFERENCES
- Centers for Disease Control and Prevention. Diabetes at a glance 2007. Available at: http://www.cdc.gov/nccdphp/publications/aag/ddt.htm.
- Hopf HW, Humphrey L, Puzziferri N, et al. Adjuncts to preparing wounds for closure: hyperbaric oxygen, growth factors, skin substitutes, negative pressure wound therapy (vacuum-assisted closure). Foot Ankle Clin 2001;6(4):661–682.
- Morykwas MJ, Argenta LC, Shelton-Brown EI, et al. Vacuum-assisted closure: a new method for wound control and treatment: animal studies and basic foundation. Ann Plast Surg 1997;38(6):553–562.
- Saxena V, Hwang CW, Huang S, et al. Vacuum-assisted closure: microdeformations of wounds and cell proliferation. Plast Reconstr Surg 2004;114(5): 1086–1096.
- Olenius M, Dalsgaard C, Wickman M. Mitotic activity in the expanded human skin. Plast Reconstr Surg 1993;91:213–216.
- Swartz M, Tschumperlin DJ, Kamm R, et al. Mechanical stress is communicated between different cell types to elicit matrix remodeling. Proc Natl Acad Sci U S A 2001;98(11):6180–6185.
- Vogt P. The foam wound interface: present and future. Presented at: ETRS TNP Focus Group Meeting; London, 2003.
- Ilizarov GA. The tension-stress effect on the genesis and growth of tissues. Part I. The influence of stability and fixation on soft-tissue preservation. Clin Orthop Relat Res 1989;(238):249–281.
- Robson MC, Stenberg BD, Heggers JP. Wound healing alterations caused by infection. Clin Plast Surg 1990;17:485–492.
- Robson MC, Heggers JP. Delayed wound closure based on bacterial counts. J Surg Oncol 1970;2:379–383.
- Krizek TJ, Robson MC. The evolution of quantitative bacteriology in wound management. Am J Surg 1975;130:579–584.
- Robson MC, Heggers JP. Bacterial quantification of open wounds. Mil Med 1969;134:19–24.
- Weed T, Ratliff C, Drake DB. Quantifying bacterial bioburden during negative pressure wound therapy: does the wound VAC enhance bacterial clearance? Ann Plast Surg 2004;52(3):276–280.
- Chester DL, Waters R. Adverse alteration of wound flora with topical negative-pressure therapy: a case report. Br J Plast Surg 2002;55(6):510–511.
- Wysocki AB, Staiano-Coico L, Grinnell F. Wound fluid from chronic leg ulcers contains elevated levels of metalloproteinases MMP-2 and MMP-9. J Invest Dermatol 1993;101:64–63.
- DeFranzo AJ, Argenta LC, Marks MW, et al. The use of vacuum-assisted closure therapy for the treatment of lower-extremity wounds with exposed bone. Plast Reconstr Surg 2001;108(5):1184–1191.
- Clare MP, Fitzgibbons TC, McMullen ST, et al. Experience with the vacuum assisted closure negative pressure technique in the treatment of non-healing diabetic and dysvascular wounds. Foot Ankle Int 2002;23(10):896–901.
- McCallon SK, Knight CA, Valiulus JP, et al. Vacuum assisted closure versus saline-moistened gauze in the healing of postoperative diabetic foot wounds. Ostomy Wound Manage 2000;46:28–32.
- Edington MT, Brown KR, Seabrook BR, et al. A prospective randomized evaluation of negative-pressure wound dressing for diabetic foot wounds. Ann Vasc Surg 2003;17(6):645–649.
- Joseph E, Hamori CA, Bergman S, et al. A prospective randomized trial of vacuum-assisted closure versus standard therapy of chronic nonhealing wounds. Wounds 2000;12(3):60–67.
- Ford CN, Reinhard ER, Yeh D, et al. Interim analysis of a prospective, randomized trial of vacuum-assisted closure versus the healthpoint system in the management of pressure ulcers. Ann Plast Surg 2002;49:55–61.
- Argenta LC, Morykwas MJ. Vacuum-assisted closure: a new method for wound control and treatment: clinical experience. Ann Plast Surg 1997;38(6):563–577.
- Gwan-Nulla DN, Casal RS. Toxic shock syndrome associated with the use of the vacuum-assisted closure device. Ann Plast Surg 2001;47(5):552–554.
- Andros G, Armstrong DG, Attinger CE, et al. Consensus statement on negative pressure wound therapy (VAC therapy) for the management of diabetic foot wounds. Ostomy Wound Manage 2006;(Suppl):1–32.
- Blitz NM. Vacuum assisted closure in lower extremity reconstruction. In: Dockery G, Crawford ME, eds. Lower extremity soft tissue & cutaneous plastic surgery. Philadelphia: Saunders, 2006:343–357.
- Frykberg RG, Zgonis T, Armstrong DG, et al. Diabetic foot disorders. A clinical practice guideline (2006 Revision). J Foot Ankle Surg 2006;45(5 Suppl):S1–66.
- Roukis TS, Stapleton JJ, Zgonis T. Addressing psychosocial aspects of care for patients with diabetes undergoing limb salvage surgery. Clin Podiatr Med Surg 2007;24(3):601–610.
- Frykberg RG, Wittmayer B, Zgonis T. Surgical management of diabetic foot infections and osteomyelitis. Clin Podiatr Med Surg 2007;24(3):469–482.
- Zgonis T, Stapleton JJ, Roukis TS. Advanced plastic surgery techniques for soft tissue coverage of the diabetic foot. Clin Podiatr Med Surg 2007;24(3): 547–568.
- Sumpio BE, Aruny J, Blume PA. The multidisciplinary approach to limb salvage. Acta Chir Belg 2004;104(6):647–653.
- Cubison TC, Pape SA, Jeffrey SL. Dermal preservation using the Versajet hydro-surgery system for Débridement of paediatric burn. Burns 2007;32(6):714–720.
- Klein MB, Hunter S, Heimbach III. The Versajet water dissector: a new tool for tangential excision. J of Burn Care Rehabil 2005;26(6):483–487.
- Attinger CE, Bulan EJ. Débridement: the key initial first step in wound healing. Foot Ankle Clin 2001;6:627–660.
- Attinger CE, Bulan E, Blume PA. Surgical Débridement. The key to successful wound healing and reconstruction. Clin Podiatr Med Surg 2000;17:599–630.
- VAC Therapy Clinical Guidelines. Available at: http://www.kci1.com/35.asp.
- Archdeacon MT, Messerschmitt P. Modern papineau technique with vacuum-assisted closure. J Orthop Trauma 2006;20(2):134–137.
- Mendonca DA, Cosker T, Makwana NR. Vacuum-assisted closure to aid wound healing in foot and ankle surgery. Foot Ankle Int 2005;26(9):761–766.
- Morykwas MJ, Faler BJ, Pearce DJ, et al. Effects of varying levels of subatmos-pheric pressure on the rate of granulation tissue formation in experimental wounds in swine. Ann Plast Surg 2001;47(5):547–551.
INTRODUCTION
The goal of soft tissue coverage is to restore form and function. However, because of its anatomic complexity, soft tissue coverage of the foot often falls short of Sir Harold Gillies’ adage to “ replace like with like” (1,2). Regardless of etiology, foot wounds in patients with diabetes are difficult to close in a timely fashion and more difficult to maintain closed once they do heal (1–6). This is especially true of a plantar foot wound that represents a frequent location in the patient with diabetes (1,2). Following a detailed analysis of the patient’s medical comorbidities, nutrition state, wound chronicity, presence of contamination or frank infection, and ambulation capabilities, soft tissue wound closure options can be entertained (1,7).
Soft tissue wound coverage employs various forms of conservative and surgical techniques aimed at creating rapid, durable, and functional closure using the simplest and least invasive modalities (4–9). Ideally, soft tissue coverage of the foot would involve primary repair without tension and involve use of neighboring sensate native tissue that are capable of withstanding the shear and tangential forces sustained during gait (1–3). Most diabetic foot wounds are small in size and amenable to proper débridement and local wound care measures followed by correction of the underlying skeletal deformity (i.e., revision of a previous partial foot amputation, resection of an osseous prominence, release of an equinus contracture, etc.). However, larger wounds, especially those associated with exposure of underlying soft tissue and osseous structures, usually require more elaborate soft tissue wound coverage techniques. The so-called “reconstructive elevator” provides a concise list of the options available to perform wound closure. These include, from least to most invasive: (a) local wound care modalities and dressings intended to maintain a moist and aseptic environment that promotes autolysis with subsequent healing via secondary intent occasionally enhanced with various wound healing agents such as biologically active tissues; (b) delayed primary closure with or without continuous tension devices or tissue expansion; (c) split- or full-thickness skin grafting; (d) adjacent tissue rearrangement or random-pattern local flaps; (e) distant (i.e., pedicled) composite flaps; and (f) free tissue transfer with microvascular anastomosis (7–9). This process should not be viewed as a linear treatment approach such as climbing a “ladder” (7), as each patient and his or her particular wound is not amenable to all potential options “climbed” in succession (8,9). To this end, skin grafting is regarded as the “work horse” of wound closure because it is simple to perform, reliable, minimally invasive, and cost-effective with the ability to be repeated as necessary to afford full soft tissue wound coverage.
From a historical perspective, the first use of free skin grafting dates back to the ancient Egyptians, as evidenced by the Ebers papyrus of 1500 BCE to cover traumatic wounds. The Hindu Tilemaker caste of 500 to 1000 BCE used skin grafts to replace noses that were amputated as punishment for theft and adultery (10,11). Since that time, the physiology and technique of skin grafting has evolved, and the process of skin graft “take” is well established (12–16). Even with the significant impact that biologically active tissue (17), negative pressure therapy (18), and plastic surgery flap techniques (19,20) have made on treating diabetes related ulcerations and traumatic wounds, skin grafting remains as the simplest and most commonly performed soft tissue wound coverage option within the “reconstructive elevator” (8,9).
PHYSIOLOGY OF SKIN GRAFT HEALING
Skin graft healing proceeds through a series of phases unique to transplantation of skin (12–16). The initial phase is termed the phase of serum imbibition or “plasmatic circulation” and is an ischemic phase that occurs during the first 24 hours following graft application (14). During this stage, fibrin glue anchors the graft to the recipient bed, allowing the graft to passively absorb plasmatic nutrients into the empty vascular channels. The graft subsequently becomes edematous and can gain up to 40% its weight. This creates a moist, nutrition-rich environment that maintains the patency of the graft vessels until host revascularization can occur (15). The fibrin glue is then replaced by robust granulation tissue that permanently attaches the skin graft to its underlying recipient bed. With secure apposition of the skin graft to the recipient bed, revascularization can proceed through the formation of anastomosis between the skin graft vascular channels and those within the host tissues. This represents the second phase of skin graft take, the phase of revascularization. This phase consists of a combination of neovascularization and “inosculation” and becomes apparent 48 to 72 hours after grafting (13–15). This is followed by vascular proliferation and sprouting of budding vessels with full circulation (i.e., arterial, venous, and lymphatic) being restored to the skin graft between the fourth and seventh post-transplant day (16). The final phase of skin graft take is the phase of organization and involves epidermal proliferation and hyperplasia that are evident between the fourth and eighth post-transplant days (16). Gradual return of “normal” tissue color, texture, and contour occurs over the next several weeks to months, as does the return of tactile sensation (16).
HOST AND WOUND SITE PREPARATION
Review of the phases of skin graft incorporation reveals several important factors that must be addressed to assure full take and progression through the phases described above. First, the patient must be primed for healing, and all underlying medical comorbidities must be optimized prior to skin grafting (7,18,20,21). It is critical to view the patient as a complete individual and not simply a “wound on a foot.” In this regard, a multidisciplinary approach is essential; therefore, consultation with internal medicine, endocrinology, infectious disease, vascular or endovascular surgery, plastic surgery, nephrology, nutritional services, physical and occupational therapy, social work, and spiritual services are routinely obtained (22). The role of each consulted service should be clearly stated so that duplicate services are not obtained and the resultant unnecessary expense and confusion created are avoided.
Second, the “personality” and chronicity of the wound must be determined (23,24). An acute wound usually results from a single traumatic event, while a chronic wound usually forms after repeated insults over time prior to healing and maturation of the injured tissue (23,24). Specific to diabetic foot wounds, an acute injury is most commonly associated with highly concentrated periods of ambulation in poorly constructed or ill-fitting shoe gear, chemical, or thermal injury (i.e., “medicated corn pads” and heating blankets, respectively), or self-inflicted trauma (i.e., “bathroom surgery” on toenails and callus tissue) (1–8). These wounds are early in the initial phases of healing and are frequently associated with cardinal signs of an acute infectious process (i.e., calor, dolor, rubor, drainage, malodor, etc.) (21,23–26). Conversely, a chronic wound is usually the result of either neglect, poor host factors (i.e., tobacco abuse, malnutrition, obesity, renal disease, immunosuppression therapy, etc.), or patient noncompliance (21,23–26). These wounds have “stalled” within the wound healing phases for any of several potential reasons, but are usually contaminated with subacute levels of bacterial burden, surrounded by a dense hyperkera-totic rim, and possess nonviable fibrotic tissue throughout its substance (23–28). Although there are important differences between the two, the initial approach for both wound types is the same, namely, extensive débridement of all involved nonviable tissue with careful preservation or reconstruction of vital soft tissue and osseous structures (24–31). The initial débridement should be performed under loupe magnification and full lighting to appropriately visualize the involved tissues (24,29–31). This index débridement should be aggressive and completely excise all nonviable tissue, contused muscles, frayed tendons devoid of paratenon, and bone fragments with disrupted periosteal coverage, regardless of the volume of tissue removed, until all involved tissues possess brisk and diffuse bleeding throughout (24,29–31). Deep cultures are then obtained from several locations and labeled as the immediate post-débridement cultures for culture-driven parenteral antibiosis over an appropriate period of time, as indicated by the involvement of underlying soft tissue and osseous components (24). The use of a power irrigation system or “high-pressure pulsatile lavage” is commonly employed based on the general principles that the elastic recoil of the wound contents between pulses will effectively dislodge bacteria (32). Although high-pressure (i.e., 70–100 psi) pulsatile lavage has been shown to be more effective than hand-held bulb-syringe lavage (32), several studies have demonstrated increased edema within already traumatized soft tissues, thrusting bacteria deeper within the wound interstices, and extensive aerosoliza-tion (33,34). In this regard, it is helpful to place the foot, ankle, and lower limb inside of an x-ray cassette cover during actual irrigation to avoid inadvertently spraying operating room personnel and to limit aerosolizing the irrigation fluid (24,35). The additional cost is negligible and since the x-ray cassette bag collects the fluid, it can simply be placed inside the operating room biohazard bags and discarded appropriately. However, a recent study has shown that pulsatile lavage has a limited effect on reduction of Staphylococcus aureus in contaminated wounds (32). Because this is the most common organism isolated from diabetic foot wounds (18,21,25,26), one should rely on pulsatile lavage simply to rinse and hydrate already well-débride diabetic foot wounds, instead of expecting a therapeutic effect in the presence of persistent bacterial contamination or frank infection. In this regard, a novel FDA-approved device for wound débridement that affords the ability to perform wound débridement, hydration, and irrigation with a single instrument was designed (36,37). The Versajet Hydrosurgery System (Smith & Nephew, Inc., Largo, FL) produces a high-velocity stream of sterile saline that crosses through a variable length hand piece and into an evacuation container. This process creates a localized vacuum effect (i.e., Venturi effect) that captures the tissue within the handpiece and affords precise tissue ablation with concomitant debris aspiration, wound irrigation, and tissue hydra-tion (36–38). The speed of débridement is altered through varying the intensity of the saline traveling through the hand-piece and the rate at that the handpiece is swept across the wound (36–38). The depth of penetration is altered according to the orientation of the handpiece either directly vertical or oblique to the wound, as well as contact pressure applied by the surgeon (37,38).
Third, once properly débride, the recipient site must contain a granular base or capillary bed capable of vascular in-growth (11,16,24,29–31). It should be understood that a thorough vascular assessment is essential and should include palpation of the femoral, popliteal, dorsalis pedis, posterior tibial, and perforating peroneal arteries as well as appropriate noninvasive vascular modalities (i.e., ankle-brachial index, Doppler waveform analysis, toe pressures, transcutaneous oxygen tension, etc.) (18,39). The venous system should be evaluated as well and any associated venous insufficiency and/or edema is either controlled with pharmacologic and/or external compression therapy or corrected with appropriate level venous ligation by a vascular surgeon (18). Local wound care modalities including biologically active tissue (17) or negative pressure therapy (18) can speed the development and enhance the quality of granulation tissue.
Fourth, all bleeding should be meticulously controlled to limit the potential for hematoma or seroma formation between the skin graft and underlying recipient bed that would prohibit fibrin anchorage and subsequent vascular in-growth (13–16,24,29–31). In this regard, it is helpful to utilize autologous platelet-rich plasma (PRP) concentrate (Accelerate, Exactech, Inc., Gainesville, FL) or autologous bone marrow aspirate (BMA) harvested from the lateral calcaneus or proximal tibia applied to the recipient wound bed prior to and immediately following application of the skin graft (40–42). In addition, the autologous platelet-poor plasma can be applied to the graft donor or “harvest” site to aid in adhering the surgical dressing and pain reduction (41,42). Since fibrin anchorage occurs in the initial phase of skin graft take (10–12), the application of PRP or BMA concentrate on the recipient site results in immediate adherence and therefore, when combined with a proper uniform compression or “bolster” dressing, limits shearing forces that can disrupt the developing vascular buds from growing into the skin graft (40–42). The application of additional PRP or BMA concentrate on top of the skin graft aids in filling the vascular channels and provides an enhanced wound-healing environment allowing the graft to imbibe the growth factor rich components of the PRP. Although several elaborate bolster dressings have been described in the literature (10,11,43–46), if the wound recipient site does not possess variable depth and irregularity, the author prefers to use a non-adherent silicone-impregnated dressing (Mepitel, Molnlycke Health care, Inc., Norcross, GA) that is stapled about the perimeter of the split-thickness skin graft (STSG) (41,42,47). Saline-soaked sterile cotton balls or cotton-cast paddings are then soaked in saline and applied over the skin graft site followed by folding of the silicone-impregnated dressing edges that are stapled to the saline-soaked padding underneath (41,42,47). This represents a simple, cost-effective bolster dressing that is both easier to apply and remove when compared with traditional multiple suture type dressings (47). However, if the wound is not of uniform depth or is highly irregular, the use of topical negative pressure wound therapy (Vacuum-Assisted Closure Advance Therapy System, VAC, Kinetic Concepts International, Inc., San Antonio, TX) has been shown to serve as an effective bolster with the added effect of improved exudate removal and prevention of shearing forces about the graft application site (48,49). However, because of the significant expense of this device, its routine use as a bolster dressing is appropriate only in specialized circumstances.
TYPES OF SKIN GRAFTS
Skin grafts can be harvested as either split-thickness skin grafts (STSGs), full-thickness skin grafts (FTSGs), or as pinch grafts (PGs) that are actually a variation of FTSGs (10–12,50). STSGs consist of the epidermis and a portion of the dermis (10–12,50). Depending on the needs of the graft, they can be harvested as thin (i.e., 0.005- to 0.012-in.), medium (i.e., 0.013- to 0.018-in.), or thick (i.e., 0.019- to 0.030-in.) grafts. These thicknesses vary only in the amount of dermis that is included (10–12). FTSGs consist of the entire thickness of the epidermis and dermis (10–12,50), whereas PGs consist of irregular segments of the epidermis and dermis harvested as a small cone of tissue (51).
The donor site for STSG harvest has traditionally not included the foot (10–12) or lower leg as viable options (10–12). Instead, the upper thigh (i.e., anterior, medial, or lateral portions), upper arm (i.e., lateral or medial aspects), and volar surface of the forearm have traditionally been considered the “ideal” sites since they are located in a broad area of tissue, allow the surgeon direct access during the procedure, and can usually be hidden under clothing (10–12). On occasion the author has utilized the medial arch (Fig. 11.1A), along the non-weight-bearing border of the foot (52), as well as, the posterior-lateral (Fig. 11.1B) and posterior-medial (Fig. 11.1C) proximal calf (41,42) as donor sites for harvesting STSGs of varying dimensions. Relatively large STSGs of up to 5 × 3 cm can be harvested from the foot with little difficulty, although nearly the same volume of tissue that can be harvested from the anterior-lateral thigh is possible from the calf. Some benefits of harvesting the STSG from the ipsilateral lower limb include: (a) enclosure within the same dressing as the recipient site; (b) ease of exposure during the surgery; (c) less pain compared to the thigh or buttock region; (d) ability to be performed under local anesthesia if necessary; and (e) conspicuous location allows the harvest site to be easily hidden from view within conventional sock and shoe gear (10–12,41,42).
FTSGs consist of the entire thickness of the epidermis and dermis (10–12). The donor site for FTSGs has traditionally included the lateral and medial arm, volar surface of the forearm, and inguinal fold area as the most likely sources for larger defects (11,50), although the foot has occasionally been mentioned (11,50). In the foot, the most common harvest sites include the redundant soft tissue folds about the lateral hindfoot (11,50) and from the dorsal intermetatarsal spaces where direct, tension-free closure is afforded. However, the close proximity to the cutaneous nerves is of concern, and great care should be taken to identify, protect, and retract these structures during harvest (11,50).
PGs consist of irregular segments of the epidermis and dermis harvested as a small cone of tissue (51). PGs have been described from almost every region of the body but the locations described for FTSG’s above are still the most commonly described (51). In the foot, they are most commonly harvested from the medial arch (53,54) or lateral hindfoot (55).
Advantages of STSGs over FTSGs include: (a) better chance of survival under conditions of vascular compromise since they contain less tissue requiring revascularization; (b) more likely to be successfully incorporated onto the recipient bed; (c) can cover large defects including those not amenable to a flap or would otherwise heal slowly through secondary intent; and (d) are easier to obtain (10–12). Disadvantages of STSGs compared to FTSGs include: (a) presence of a granulating and universally painful donor site wound requiring postoperative care; (b) greater graft contraction; (c) special equipment required for larger grafts; and (d) poor cosmesis of the incorporated STSG (i.e., “tire patch” appearance) and donor site since the resultant scar is quite noticeable and should be hidden from plain site whenever possible (10–12). In this regard, a study of 20 plastic surgeons and 50 members of the public revealed that the most important factor affecting the choice of skin graft donor site location was the lack of visible scarring (56).
Regardless of what type of skin grafting is utilized, once harvested, the skin graft should be applied to the recipient site as expeditiously as possible and any unused portions should be wrapped in a moist gauze sponge soaked with sterile saline impregnated with antibiotic followed by placement in a sterile specimen jar. The specimen jar is then labeled with the patient’s identification and date of harvest followed by refrigeration. The “scavenged” skin graft can be safely reapplied for up to 21 days in the clinical setting if any graft failure occurs as long as the reason for failure has been properly addressed (57).
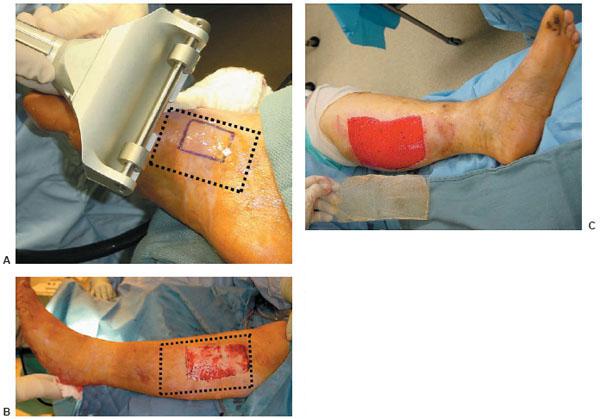
Figure 11.1 A. Intraoperative photograph demonstrating harvest of a split-thickness skin graft (STSG) from the medial arch of the foot (outlined in purple). The black hashed-line outline represents the maximum amount of skin that can be harvested. B. Intraoperative photograph demonstrating harvest of a STSG from the lateral aspect of the proximal lower leg. The bleeding surface represents the STSG harvested for this patient, while the black hashed-line outline represents the maximum amount of skin that can be harvested. C. Intraoperative photograph demonstrating harvest of a STSG from the medial aspect of the proximal lower leg. The bleeding surface represents the STSG harvested for this patient that also represents the maximum amount of skin that can be harvested. Note the significant size that can be obtained as demonstrated on the carrier held by the surgeon.
SPLIT-THICKNESS SKIN GRAFT SURGICAL TECHNIQUE
The STSG harvest is usually performed under a regional field in-filtrative anesthesia block and intravenous sedation when harvested from the foot (58) and under either spinal or general anesthesia when harvested from the calf or thigh region (41,42). The harvest site of choice is first cleansed with alcohol to remove any sticky residues from the routine sterile preparation. The size of the recipient site is measured with a sterile ruler, and the corresponding area of skin is marked on the harvest site with indelible ink. The blade guard width clip from a power dermatome (Electric Dermatome: Padgett Instruments, Integra, Plainsboro, NJ) set that most closely approximates the width of the harvest site is then selected. The sequence of events required to properly setup the power dermatome is very specific and results in severe injury to the patient or dysfunction of the device if not properly performed. First, the metallic piston in the handpiece must be positioned vertically to accept the attachment hole within the knife blade (Fig. 11.2A). Occasionally, this is difficult to perform manually and the device must be turned on and put through a few cycles to allow proper orientation. Next, the knife blade must be carefully held in both hands and bent slightly (Fig. 11.2B) to allow the flat, blunt side to rest within both catchment points adjacent to the metallic piston (Fig. 11.2C). The preselected blade width clip (Fig. 11.2D) is then placed on top of the knife blade and secured with a low-torque screw driver (Fig. 11.2E). Care should be taken not to over tighten the screws since they can easily be stripped making subsequent use difficult. If these steps have been followed properly, the interface between the blade guard width clip and knife blade will be intimate, and there will be no gap whatsoever between the knife blade and the body of the dermatome handpiece (Fig. 11.2F). The thickness of the STSG is then set by rotating the calibration gauge on the side of the dermatome handpiece and locking it in place by tightening a small nut. A thickness between 0.0012 to 0.018 in. is most commonly used (Fig. 11.2G). The thickness of the dermatome is checked by inserting a no. 15 scalpel blade between the knife blade and dermatome base (50). When the entire no. 15 blade fits, the depth is approximately 0.015 in. If only the sharpened edge fits, the depth is approximately 0.010 in. (10–12,50). The handpiece is activated and the setup is looked over one final time before actual use.
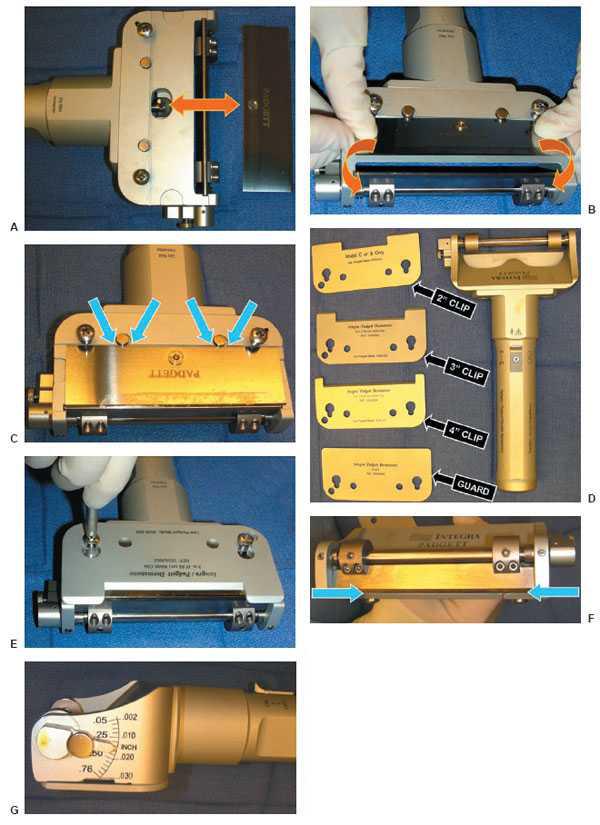
Figure 11.2 (A) The metallic piston in the handpiece (left) is shown properly positioned vertically and in the center of the piston channel ready to accept the attachment hole within the knife blade (right). The knife blade is shown being bent slightly (curved arrows) (B) to allow the flat, blunt side to rest within both catchment points adjacent to the metallic piston (straight arrows) (C). (D) Photograph demonstrating various width blade clips. (E) Photograph demonstrating proper use of the lowtorque screw driver to secure the screws. (F) Photograph demonstrating proper interface between the blade guard width clip and knife blade that reveals no gap whatsoever between the knife blade and the body of the dermatome handpiece (blue arrows). (G) The calibrating gauge is shown set at a thickness of 0.015 inch with the nut fully tightened.
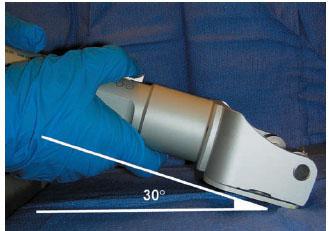
Figure 11.3 Photograph demonstrating proper 30-degree angle between the knife blade and skin surface.
When the STSG is ready to be harvested, the surgical assistant first cleanses the skin with alcohol for the reasons mentioned previously and then lubricates the harvest site with sterile saline or mineral oil. Next, a tongue depressor or moistened gauze sponge is then applied both behind and in front of the intended path that the power dermatome is to traverse. This creates a smooth, taught, flat plane over which the dermatome can pass without catching wrinkled or bunched up skin and is a critical step in the harvest process. For this reason, the most experienced member of the surgical team should perform this task. Once adequate tension has been applied to the harvest site, the handpiece is held at a 30-degree angle relative to the harvest site and turned on full speed prior to contacting the skin surface (Fig. 11.3). In a single, smooth pass with steady, controlled pressure applied to the skin surface, the handpiece is advanced until the desired segment of skin has been harvested. Once this has occurred, with the hand piece still at full speed, the surgeon’s hands are dropped to the skin surface as the distal end of the handpiece is turned away from the skin surface at as close to a 90-degree angle as possible to cleanly transect the skin graft. The key points are to turn the power on full speed prior to contacting skin surface, maintain steady pressure during actual contact, and to disengage the skin surface prior to turning the power off. Failure to follow this process will lead to irregularly shaped and variable depth STSG segments that are difficult to use as well as a noncosmetic harvest site (Fig. 11.4).
The harvested graft is then fenestrated manually with repeated passes of a surgical scalpel (i.e., “pie-crusting”) or meshed at a ratio of1:1.5 or greater, using a commercially available mesher (Fig. 11.5) (10–12,50). The recipient site is coated with a layer of PRP or BMA concentrate (Fig. 11.6A) followed by stapling of the STSG about the perimeter of the wound (Fig. 11.6B) and additional coverage with a layer of PRP or BMA concentrate (Fig. 11.6C) (40–42). A bolster dressing is then applied using one of the techniques described above to firmly secure the STSG in place (Fig. 11.7). In addition, negative pressure therapy can be employed if the STSG application site is highly irregular or covers a large surface area that is not amenable to simple bolster application. Inosculation of STSGs by vascular buds usually begins by the fifth day post-application (13,14). Therefore, the STSG recipient site is left undisturbed for 5 to 7 days time and, at that point, the bolster dressing is removed and the graft is evaluated for proper take with the staples being removed at 10 to 14 days (10–12,40–42). Applying a hydrogel to the surface of the STSG followed by a nonadherent dressing is routinely performed to maintain a moist environment for progressive healing and maturation. If negative pressure therapy has been utilized, this is usually changed in 4 days to limit maceration about the surrounding tissues and can either be reapplied or discontinued with the above mentioned process followed.
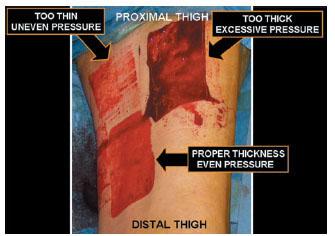
Figure 11.4 Photograph demonstrating two failed and one successful attempts at harvesting a split-thickness skin graft from the anterior and medial thigh. One graft was harvested too thick because of excessive pressure applied to the skin surface and improper set-up of the power dermatome that resulted in a near full-thickness skin graft (FTSG) (upper right). One graft was harvested too thin because of inadequate pressure applied to the skin surface as well as inadequate tension applied by the assistant that resulted in “skipping” over the intended harvest site (upper left). The final attempt involved proper and repeatedly verified equipment setup, tension applied by the assistant, and pressure applied to the skin surface (lower left).
The donor site is infiltrated in the dermal layer with 0.5% Bupivacaine with 1:200,000 epinephrine, as well as covered with the platelet-poor plasma to afford hemostasis and postoperative analgesia (41,42). A nonadherent or occlusive dressing followed by application of an absorptive gauze pad, and either a compression wrap or foam-type tape is applied to the harvest site. The outer dressing is changed in 5 days time with the deep dressing being left in place and gently trimmed as necessary over the ensuing weeks until it falls off on its own (Fig. 11.8A) (10–12,40–42). The donor site usually heals very rapidly over the next few weeks, and once fully mature in a few months’ time it is barely visible at all (Fig. 11.8B).
FULL-THICKNESS SKIN GRAFT SURGICAL TECHNIQUE
Related posts:
 Preoperative and Perioperative Management of the High-Risk Patient with Diabetes Mellitus
The Role of The Multidisciplinary Team Approach to Limb Salvage in Major Academic Healthcare Institutions
Equinus Deformity and the Diabetic Foot
Surgical Reconstruction and Stepwise Approach to Acute Charcot Neuroarthropathy
Diabetic Neuropathic Forefoot, Midfoot, and Hindfoot Osseous Trauma and Dislocations
Diabetic Neuropathic Pilon and Ankle Osseous Trauma and Dislocations
Preoperative and Perioperative Management of the High-Risk Patient with Diabetes Mellitus
The Role of The Multidisciplinary Team Approach to Limb Salvage in Major Academic Healthcare Institutions
Equinus Deformity and the Diabetic Foot
Surgical Reconstruction and Stepwise Approach to Acute Charcot Neuroarthropathy
Diabetic Neuropathic Forefoot, Midfoot, and Hindfoot Osseous Trauma and Dislocations
Diabetic Neuropathic Pilon and Ankle Osseous Trauma and Dislocations
Stay updated, free articles. Join our Telegram channel

Full access? Get Clinical Tree


