INTRODUCTION
According to the American Diabetes Association (ADA) in 2005, 1.5 million new cases of diabetes mellitus were diagnosed. The ADA also reported that the incidence of diabetes mellitus in the United States was prevalent among 20.8 million people, which accounted for 7% of the United States population. This disease has reached epidemic proportions in the United States as well as around the globe. The World Health Organization estimates that currently, there are 171 million people with diabetes mellitus, and it is projected that by the year 2030 the prevalence will escalate to 366 million people (1).
Peripheral neuropathy is a serious and significant complication of diabetes mellitus that affects >50% of patients with diabetes. The highest rates of peripheral neuropathy are among people who have had diabetes for at least 25 years, are >40 years of age, and have had poorly controlled glycemic levels as well as other cardiovascular risks, such as obesity and hypertension (1). In addition, those patients with diabetes mellitus and neuropathy are reported to have a reduced bone mass and severe osteopenia (2).
Peripheral neuropathy and peripheral vascular disease play a significant role in the development of surgical complications and can create significant limb-threatening scenarios if left untreated or misdiagnosed (3). Peripheral neuropathy alone is considered an indicator for unfavorable prognosis for lower extremity trauma. Patients with peripheral neuropathy are difficult to manage because of their loss of sensation and failure to sense infection secondary to trauma and/or soft tissue complications.
The neuropathic patient who experiences lower extremity fractures and/or dislocations presents a great challenge to the treating physician. Typically, trauma surgeons use external fixation to temporarily stabilize fractures until the soft tissue envelopes are ready for surgery (4). Open reduction internal fixation (ORIF) is then executed following the decrease in soft tissue swelling and the return of skin lines in the nonvascular compromised patient (5). This chapter discusses the use of external and/or internal fixation as a primary and definitive treatment for this difficult-to-treat patient population.
INDICATIONS/CONTRAINDICATIONS
External fixation is much less invasive to the soft tissue envelope when it is performed percutaneously. A methodical preoperative assessment of potential operative candidates will support the surgeon with suitable selection criteria. Supporting documentation reveals that medically compromised patients, such as those with diabetes mellitus, rheumatoid arthritis, extensive smoking history, vascular impairment, and morbid obesity do not fare as well with standard open surgery and are more appropriate type of patients for external fixation. One must also consider and evaluate anesthesia risks with external fixation. Two considerations need to be understood: External fixation typically requires a significantly longer operative time than typical AO techniques, and in most scenarios a second anesthesia is needed on removal of the external fixator.
Appropriate candidates for the use of external fixation in reconstructive foot and ankle surgery include and are not limited to patients who have experienced trauma (high-energy open or closed fractures resulting in significant soft tissue injury), need for temporary fixation or staged procedures, bilateral lower extremity trauma, patients with impaired upper extremities that will not allow their upper body to be supported with crutches or other walking devices and direct visualization to flaps and soft tissue envelope.
Options for open and/or closed treatment exist for the neuropathic trauma patient. The respect of the soft tissue envelope is vital while providing stable rigid fixation. Characteristically, this patient population requires extensive detail to the soft tissues. Surgical wounds related to osseous and soft tissue injuries in patients with neuropathy often heal unsuccessfully. Preoperative evaluation of these cases includes performing a history and physical with a thorough lower extremity evaluation. This evaluation should include a detailed physical assessment specifically evaluating skin integrity and quality. In the acute traumatic patient, reduction of bony displacement is mandatory to eliminate tension from the skin to minimize the danger of skin necrosis. A sensory evaluation is needed preoperatively to determine if the patient is neuropathic. Differentiating between acute and chronic trauma from Charcot neuroarthropathy is necessary. Traditionally, temporary splinting was required to prevent gross displacement until the time of surgery, which could sometimes place the soft tissues in jeopardy. If it can be determined that the patient is neuropathic upon completion of this preoperative evaluation, external fixation via smooth wire fixation may be considered as the definitive treatment option.
In addition to clinical evaluation, preoperative radiographic imaging typically warrants three views of the involved foot, ankle, lower extremity, and/or opposite side. More complex imaging may be necessary based on the physical exam. Magnetic resonance imaging (MRI) may be necessary for an evaluation associated with potential soft tissue damage and a computed tomography (CT) or 3D CT may be needed for a more detailed osseous assessment. If the radiographic testing demonstrates significant osseous displacement in this patient population, then external fixation is a viable option in treating neuropathic patients.
In treating neuropathic patients with significant trauma and/or dislocations, techniques other than external fixation may result in hazardous scenarios. The importance of limb salvage in both the idiopathic neuropathic and diabetic neuropathic population is a perfect example of why surgical reconstruction and early ambulation are needed. One study reported that 40% to 45% of all nontraumatic amputations in the United States result from diabetes (6). Once a diabetic patient loses a limb, the contralateral limb is placed at high risk. A second amputation occurred in 55% of these patients within 5 years (6). Other studies show that 30% of the patients die in the first 3 postamputation years, and 60% die within the first 5 years (7). These findings prove that amputation is not only debilitating to the patient’s quality of life, but also life-threatening in this patient population.
In contrast, absolute contraindications for definitive primary surgical reduction/treatment consist of scenarios in which patients present with active lower extremity infections, severe ischemia, or very poor glycemic control. Relative contraindications for definitive surgical reduction treatment consist of conditions in which patients are nonambulatory, noncompliant, and/or present with a very poor nutritional status, severe osteopenia, peripheral vascular disease, and multiple comorbidities, such as morbid obesity as well as renal and heart disease.
Considering the increasing number of patients with diabetes mellitus and the aging population in the United States and around the world, it is essential that foot and ankle surgeons are able to identify these scenarios and treat these patients more suitably. The importance of limb preservation is paramount, and external fixation is an essential means of minimizing patient complications in the diabetic neuropathic population.
SURGICAL TECHNIQUE FOR THE NEUROPATHIC FOREFOOT/MIDFOOT OSSEOUS TRAUMA AND DISLOCATIONS
Surgical treatment of the neuropathic forefoot/midfoot osseous trauma and dislocations may be addressed with a traditional surgical approach with some additional steps needed to ensure healing and decrease complications. The initial clinical presentation is a valuable predictor of what additional surgical steps might be required. Radiographic examination of the pathologic foot is absolutely necessary any time a neuropathic patient describes a questionable event or related symptoms. Subtle dislocations should be further examined by radiographic comparison of the contralateral foot. A CT scan may also be obtained to confirm a diagnosis and determine the severity of pathology. Undiagnosed and improperly treated forefoot and/or midfoot osseous trauma and dislocations can rapidly progress into a Charcot joint collapse. The severity of peripheral neuropathy indicates that the patient will most likely weight-bear prematurely and has an extremely high risk of developing an acute Charcot event.
It is the authors’ opinion that these patients will better benefit with a primary arthrodesis of the affected collapsed joint(s) with multiple screws, multi-ring external fixation with a foot plate for additional stabilization and joint compression, and a possible percutaneous tendo-Achilles lengthening. A primary arthrodesis may not be necessary if the presentation of the trauma is more traditional to a patient in the early stages of diabetic neuropathy and who is unable to weight-bear secondary to discomfort. It is also the authors’ opinion that the vast majority of diabetic neuropathic patients who sustain forefoot/midfoot osseous trauma and dislocations will benefit from external fixation. The deciding factor of whether a circular multi-ring or monolateral/hybrid external fixation system is used depends on the severity of the initial trauma presentation.
A wide variety of forefoot/midfoot trauma exists. Forefoot trauma may be classified and described by the Hardcastle tarsometatarsal joint injury classification (8). If the patient is able to have surgery performed within 3 to 5 days from the traumatic event, the likelihood of a percutaneous reduction and stabilization is acceptable. Beyond this time frame, it is likely that an open approach will be needed using a two to three dorsal incisional approach. The keystone of the metatarsal bases must be restored to anatomic alignment. Using bone reduction forceps, the fractured/dislocated metatarsals may be reduced and temporarily stabilized. The Lisfranc ligament must be recreated stabilizing the keystone by a 4-mm cancellous screw. Depending on what other tarsometatarsal fractures/dislocations have occurred, it will determine whether additional screw fixation will be needed. It is the authors’ preferred technique for lesser metatarsal bases to be fixated with one 4-mm cancellous screw in each metatarsal that was dislocated. The first metatarsal should be fixated with two 4-mm cancellous screws. After internal fixation has reduced and stabilized the traumatic pathology, a decision on which external fixation modality arises. Pathology described as Hardcastle B1 and C1 involve the medial column and second metatarsal only. Therefore, a mini-external fixator is the preferred choice. However, pathology described as Hardcastle A, B2, C2 involve multiple metatarsals (Figs. 25.1) and (25.2). These types of fracture dislocations are much more traumatic and unstable. A tarsometatarsal multi-ring external fixator consisting of a proximal ring, ankle ring, and a foot plate is then recommended.
The tarsometatarsal external fixator is applied in the following fashion. The chosen configuration is similar to the ankle joint stabilization frame consisting of two full rings and a foot plate connected by four threaded rods. The distance from the foot plate to the ankle joint should place the ankle ring 2 to 4 cm above the ankle joint. The proximal ring distance from the ankle joint should be 150 mm from the ankle ring. The prebuilt external fixation is placed over the foot and lower extremity. The foot plate is placed to allow plantar projection of the heel. A transosseous calcaneal wire is placed medial to lateral and tensioned to 70- to 90-kg force. Two converging transosseous tibial wires are placed on the proximal ring and ankle ring and tensioned to 110- to 130-kg force. Once the proximal fixation block is stabilized, a second converging calcaneal wire is placed. The next wire is the mid-foot wire. This wire serves two purposes. It stabilizes the mid-foot and serves as a stable block that allows the metatarsal wire rebound force for compression of the Lisfranc’s joint. The midfoot wire is a transosseous wire placed from medial to lateral coursing from the proximal medial cuneiform and exiting at the cuboid. The olive must be abutting the cortex of the medial cuneiform. The midfoot wire is then tensioned to 70kg force and secured to the foot plate. The metatarsal wire is next placed from lateral to medial serving two purposes. This wire stabilizes the forefoot and compresses the bases of the metatarsals against the cuneiforms and cuboid. The metatarsal wire is a transosseous wire placed from lateral to medial. This wire should course through the bases of at least three metatarsals with the olive abutting the lateral cortex of either the fourth or fifth metatarsal. After this wire is placed, make note of where the wire lies on the foot plate both medially and laterally. Secure the wire back toward the rearfoot by one to two foot plate holes. Loosely fixate the metatarsal wire in this position medially and laterally to the foot plate. A ten-sioner is then placed medially and laterally on the wire. Gently both tensioners are simultaneously tightened to about 20- to 30-kg force. The wire is then secured to the foot plate. The tarsometatarsal stabilization external fixator is now completed (Figs. 25.3) and (25.4).
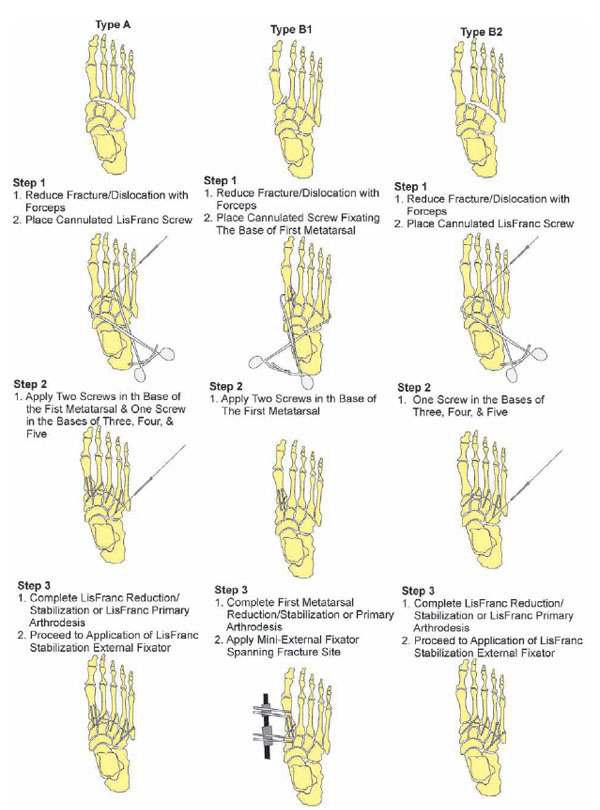
Figure 25.1 Neuropathic technique for Hardcastle A, B1, and B2.
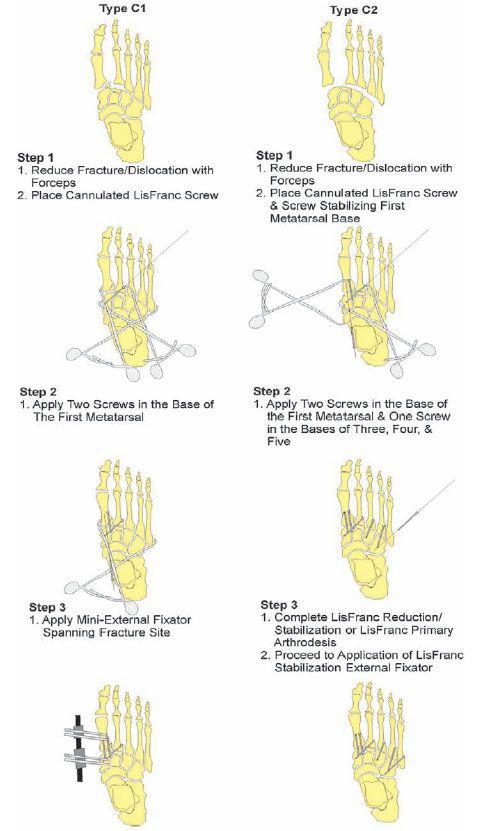
Figure 25.2 Neuropathic technique for Hardcastle C1 and C2.
Isolated midfoot and forefoot fracture/dislocations outside the Lisfranc’s joint in diabetic neuropathic patients also benefit from traditional surgical approaches with the addition of reduction and stabilization using a mini–external fixator. The mini–external fixator has the ability to aid in reduction and stabilization of the fracture pathology throughout the postoperative course. Reduction techniques may be used in fracture pathology involving bones of the medial cuneiform, navicular, and cuboid. By inserting two 3.5-mm fixator pins proximal and distal to the fracture bone, the external fixator is then adjusted by lengthening the distance between the proximal and distal fixator pins. This mechanism creates a reduction force using ligamentotaxis. Once the fracture is reduced, it needs stabilization and compression by one to two 4.0-mm cannulated screws. When dealing with a fractured metatarsal, the insertion of a Kirschner wire (K-wire) for stabilization and realignment can be performed. However, when multiple metatarsals are fractured, a mini–external fixator is added to the K-wire fixation for further stability. A size ranging from 2.5- to 3.5-mm mini–external fixator pins are positioned with two pins distal to the fracture and two pins proximal to the fracture. Distally, one pin may be placed in the base of the proximal phalanx and a second pin placed in the head/neck area of the corresponding metatarsal. Proximally, two pins are placed in the base of the metatarsal (Fig. 25.5).
SURGICAL TECHNIQUE FOR THE NEUROPATHIC HINDFOOT OSSEOUS TRAUMA AND DISLOCATIONS
It is the authors’ opinion that diabetic patients with dense peripheral neuropathy and severely comminuted intra-articular calcaneal fractures will better benefit with a primary arthrodesis of the subtalar joint with the use of multi-ring external fixation and a foot plate for additional stabilization and joint compression. If the presentation of the trauma is more traditional and a CT scan shows an extra-articular calcaneal fracture in a patient with early stages of diabetic neuropathy, then a primary arthrodesis may not be necessary. It is also the authors’ opinion that the vast majority of diabetic neuropathic patients who sustain open or closed hindfoot osseous trauma and dislocations will benefit from external fixation. A wide variety of hindfoot trauma exists according to CT scan classifications. If the diabetic patient with dense peripheral neuropathy is able to have surgery performed within 3 to 5 days from the traumatic event, the likelihood of a percutaneous or mini-open reduction and stabilization with an external fixator is acceptable. Beyond this time frame, it is likely that an open approach will be needed for the calcaneal fracture repair or primary subtalar joint arthrodesis.
The surgical procedure of either the calcaneal fracture repair or primary subtalar joint arthrodesis begins by placing a large transfixing Steinmann pin through the calcaneus and simultaneous distraction of the subtalar and ankle joint. Fluoroscopic imaging is paramount at this point and an intraoperative decision of a percutaneous versus mini–open incisional approach is made. It is recommended that the distraction is allowed for at least 10 minutes before the surgical procedure or even perform the entire procedure under the desired distraction technique described in the preceding. For the primary subtalar joint arthrodesis, a 3- to 4-cm skin incision is made directly over the subtalar joint and blunt dissection is performed to the level of the lateral wall of the calcaneus. Care is then taken to avoid injury at the peroneal tendons and sural nerve. It is the authors’ technique to reflect the lateral calcaneal wall and bluntly lift the subtalar joint into anatomic alignment. At that time, if the articular joint cartilage is severely damaged, the joint is resected with a sagittal saw or aggressive curettage technique. Corticocancellous allogenic bone grafting is also recommended for the primary arthrodesis. The subtalar joint can then be temporarily stabilized with a large Steinmann pin and the skin is closed with a 3-0 nylon suture. The tourniquet, which is highly recommended during the procedure, is then released before the external fixation application.
The hindfoot external fixator is applied in the following fashion. The chosen configuration is similar to the neuropathic forefoot stabilization frame consisting of two full rings and a foot plate connected by four threaded rods. The distance from the foot plate to the ankle joint should place the ankle ring 2 to 4 cm above the ankle joint. The proximal ring distance from the ankle joint should be 150 mm from the ankle ring. The prebuilt external fixation is placed over the foot and ankle. The foot plate is placed to allow plantar projection of the heel. Two transosseous calcaneal olive wires are placed from lateral to medial and tensioned from the medial side to 70- to 90-kg force. This allows fixation and stabilization of the lateral wall of the calcaneus. Two converging transosseous tibial wires are placed upon the proximal ring and ankle ring and tensioned to 110- to 130-kg force. Once the proximal fixation block is stabilized, a third converging calcaneal wire is placed from medial to lateral and tensioned to 70- to 90-kg force.
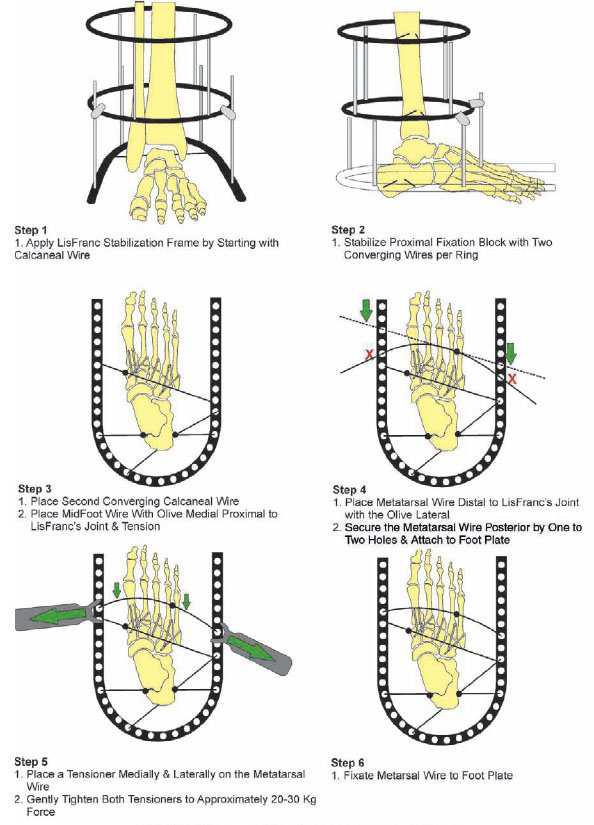
Figure 25.3 Neuropathic forefoot stabilization frame technique.
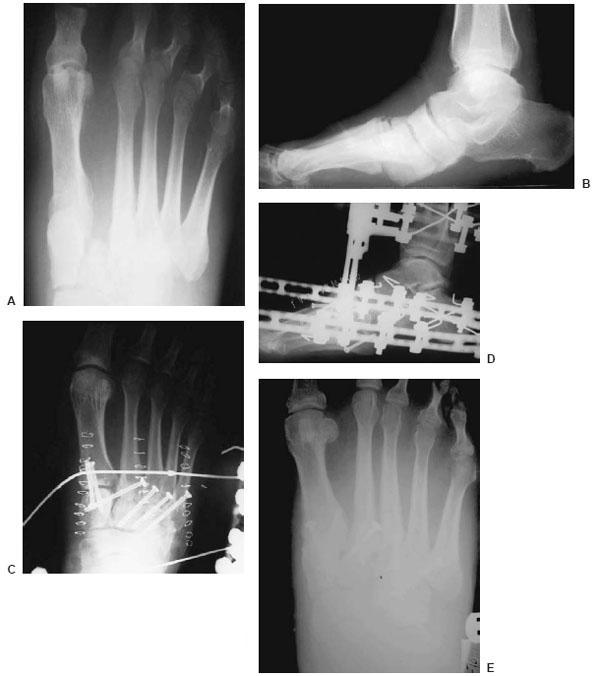
Figure 25.4 Initial anteroposterior (AP) and lateral views (A,B) showing the subtle dislocation at the Lisfranc’s joint, followed by a percutaneous ORIF and circular multi-ring external fixation (C,D). Final postoperative picture after external fixation removal (E).
At that point, if an extra-articular calcaneal fracture is being repaired an extra midfoot wire is placed from medial to lateral and tensioned to 70- to 90-kg force. The midfoot wire is a transosseous wire coursing from the proximal medial cuneiform and exiting at the cuboid. The olive must be abutting the cortex of the medial cuneiform (Fig. 25.6A–J). If a primary arthrodesis is performed, a talar wire is then placed from medial to lateral side and manually tensioned at both sides to cause compression and stabilization across the subtalar joint. A second talar wire is also recommended for extra stability. The midfoot wire is then followed from medial to lateral coursing from the proximal medial cuneiform and exiting at the cuboid. The olive must be abutting the cortex of the medial cuneiform and tensioned from lateral to medial side around 70- to 90-kg force (Fig. 25.7A–I).
It is paramount to complete all the parts of the external fixation by rechecking the levels of stability and rigidity, by counting the accessory parts, and by reviewing the intraoperative technique. For example, an extra bottom foot plate ring is added for the first 2 weeks for patient compliance and before dynamization and weight-bearing status. Final radiographic imaging is recommended at the end of the procedure.
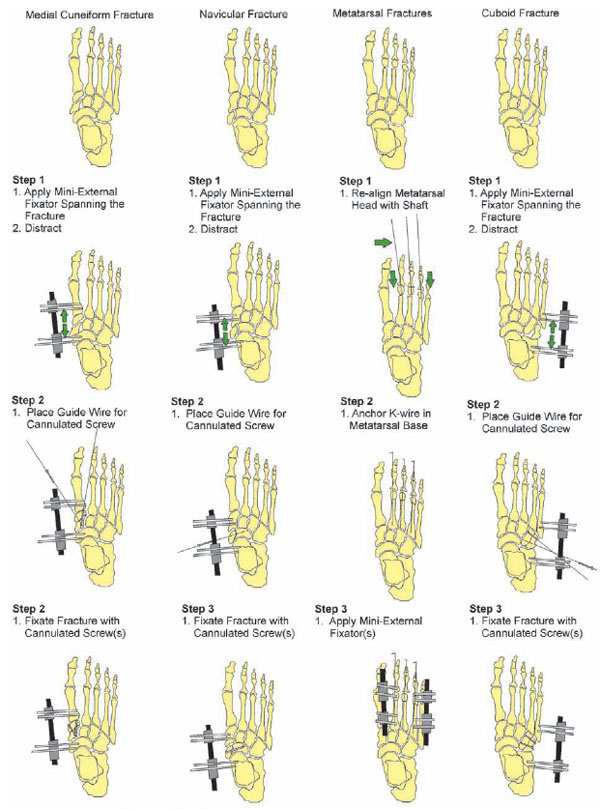
Figure 25.5 Neuropathic technique for midfoot and forefoot pathology.
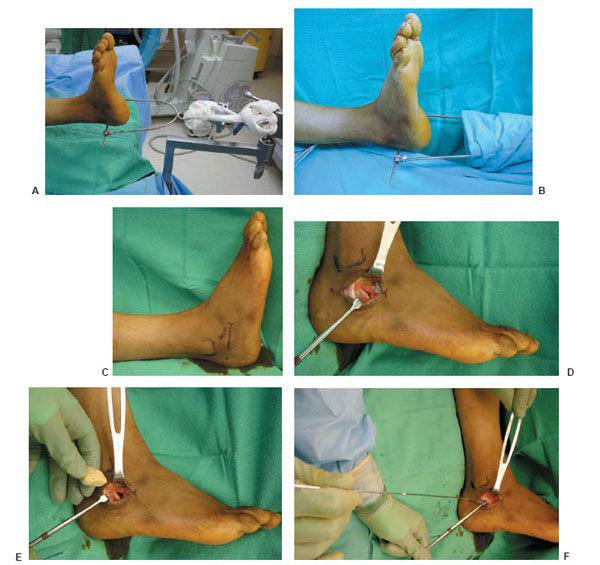
Figure 25.6 Extra-articular calcaneal fracture repair. Distraction technique (A,B) followed by 3- to 4-cm skin incision directly over the subtalar joint (C,D), and application of corticocancellous allogenic bone grafting (E). Two transosseous calcaneal olive wires are placed from lateral to medial and tensioned from the medial side to 70- to 90-kg force (F,G). (continued)
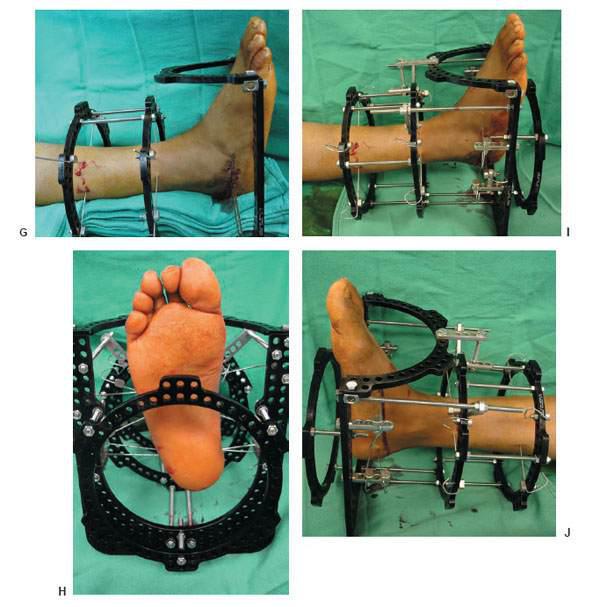
Figure 25.6 (Continued) A midfoot wire is placed from medial to lateral and tensioned to 70- to 90-kg force and an additional bottom ring is also applied to the foot plate for the initial 2 to 3 weeks for “weight-sharing” status (H–J).
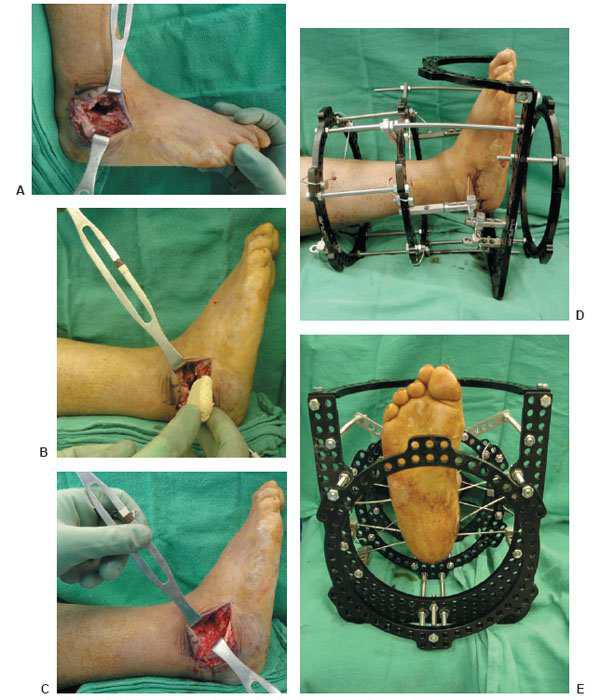
Figure 25.7 Intra-articular calcaneal fracture repair with primary subtalar joint arthrodesis. A 3- to 4-cm incision over the subtalar joint followed by the resection of the articular surface (A) and application of corticocancellous allogenic bone grafting (B,C). Please note the position of the talar wire for the subtalar joint arthrodesis and application of the circular external fixator (D,E). (continued)
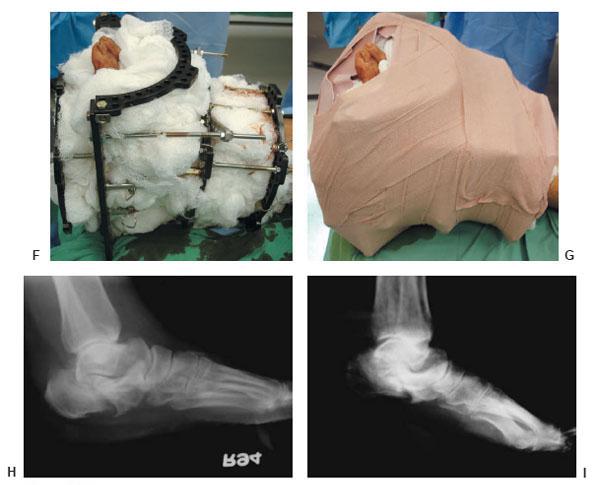
Figure 25.7 (Continued) Our preferred method of postoperative dressings are shown (F,G). Preoperative (H) and final postoperative (I) radiographs showing the primary subtalar joint arthrodesis procedure.
Lastly, ORIF with primary subtalar joint arthrodesis might also be considered in younger individuals in the early stages of diabetes mellitus (Fig. 25.8A–F). The postoperative course may be a minimum of 10 to 12 weeks of cast immobilization and/or the use of external electrical bone stimulation.
POSTOPERATIVE MANAGEMENT
The estimated time for bony consolidation is approximately double the time normally estimated for a healthy patient. Prolonged stabilization is essential to prevent neuropathic fractures from progressing into an acute Charcot event.
The patient is kept in the hospital for 3 to 7 days postoperatively for glucose control, pain management, appropriate intravenous (IV) antibiotics, and to ensure that the patient is medically stable and able to rehabilitate before discharge. The patient receives 10 to 14 days of prophylactic low molecular weight heparin or other thrombolytic therapy, which is started 12 hours postoperatively and 7 to 10 days of oral antibiotics in accordance with the medical and infectious disease teams. The patient is seen weekly until the sutures and/or staples are removed at 3 to 4 weeks and then once every 2 weeks for the remaining months. Postoperative radiographs are obtained at 2 to 4 weeks and then once a month until healing is complete. Patient and family care education, home health services, and close and constant monitoring are absolutely imperative.
The pin or wire sites are covered with gauze that is soaked with povidine-iodine (Betadine) and the external fixator is kept dry throughout the postoperative course. Patients are instructed not to take showers and are educated on pin or wire site care that is to be done weekly if necessary. Patient compliance is strongly emphasized and strict pin or wire site care must be maintained. Stability is also of the utmost importance. The wires and pins must be checked at each visit to guarantee that the tension has not been lost. Retensioning can be achieved using the manual tensioning technique.
LISFRANC/FOREFOOT
The patient is kept non-weight-bearing for 10 to 14 days. The patient is then encouraged to be full weight-bearing as tolerated with assistance. A patient with diabetic neuropathy generally has consolidation at 8 to 14 weeks. The frame may be dynamized by loosening the tension from the wires. The patient is full weight-bearing for 2 weeks. If no problems occur, the frame may be removed. The patient then progresses into a walking device for 4 to 6 weeks. After complete consolidation has occurred the patient requires custom molded inserts and/or ankle foot orthoses for extra support and to prevent future breakdown or collapse.
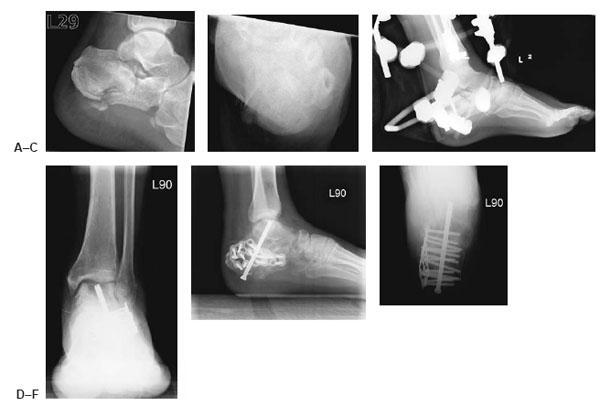
Figure 25.8 Preoperative radiographs (A,B) of an intra-articular calcaneal fracture, followed by a hybrid external fixator for distraction and stabilization (C) and a primary subtalar joint arthrodesis in this younger patient with diabetes mellitus (D–F).
REARFOOT/MIDFOOT
The patient is kept non–weight-bearing for 10 to 14 days and then after this point the patient is encouraged to be full weight-bearing as tolerated with assistance. In a normal patient, bony consolidation normally takes 6 to 8 weeks. A patient with diabetic neuropathy generally has consolidation at 12 to 16 weeks. The patient is then encouraged to walk full weight-bearing for 2 weeks. If no problems occur the frame may be removed. The patient then progresses into a walking device for 4 to 6 weeks. After complete consolidation has occurred, the patient requires custom molded inserts and/or ankle foot orthoses for extra support and to prevent future breakdown or collapse.
CONCLUSION
The use of circular external fixation demands a great amount of surgical experience and training. The principles and techniques applied by circular external fixation are paramount to the management of complex neuropathic lower extremity trauma and dislocations. However, extreme caution needs to be taken throughout the patient care. Postoperative complications are avoided by vast knowledge and training on external fixation and careful patient selection.
ACKNOWLEDGMENT
The authors would like to thank Dennis McBroom for his excellent contributions with the graphic designs.
REFERENCES
- Donahoe SM, Stewart GC, McCabe CH, et al. Diabetes and mortality following acute coronary syndromes. JAMA 2007; 298(7):765–775.
- Levin ME, Boisseau VC, Avioli LV. Effect of diabetes mellitus on bone mass in juvenile and adult onset diabetes. N Eng J Med 1976;294:241–215.
- Jones KB, Maiers-Yelden KA, Marsh JL, et al. Ankle fractures in patients with diabetes mellitus. J Bone Joint Surg 2005;87(4):489–495.
- Seibert FJ, Fankhauser F, Elliott B, et al. External fixation in trauma of the foot and ankle. Clin Podiatr Med Surg 2003;20(1):159–180.
- Thordarson DB. Ankle fractures in diabetics. Techn Foot Ankle Surg 2004;3(3):192–197.
- Banks AS, McGlamry ED. Charcot foot. J Am Podiatr Med Assoc 1989; 79(5): 213–235.
- The Podiatry Institute. Reconstructive Surgery of the Foot and Leg. Update 1988. Tucker, GA: Podiatry Institute Publishing Co.; 1988.
- Hardcastle PH, Reschauer R, Kutscha-Lissberg E, et al. Injuries to the tar-sometatarsal joint. Incidence, classification and treatment. J Bone Joint Surg 1982;64(3):349–356.

INTRODUCTION
The surgical treatment of the neuropathic pilon and ankle osseous trauma and dislocations may be accomplished with a traditional surgical approach with some additional steps needed to ensure healing and decrease complications. The initial clinical presentation is a valuable predictor of what additional surgical steps might be required. Radiographic examination of the pathologic ankle and distal tibia is absolutely necessary any time a neuropathic patient describes a questionable event or any related symptoms. Subtle dislocations should be further examined by radiographic comparison of the contralateral ankle and distal tibia. A computed tomography (CT) scan should also be obtained to confirm a diagnosis and determine the severity of pathology. Undiagnosed and improperly treated ankle and distal tibia osseous trauma and dislocations can rapidly progress to a Charcot joint. If the fixation is inadequate or the fixation is being minimally protected, the severity of peripheral neuropathy has an extremely high risk of developing a Charcot joint at the affected or the adjacent fractured site(s).
SURGICAL TECHNIQUE OF NEUROPATHIC DISTAL TIBIAL EXTRA-ARTICULAR FRACTURES
The complexity and level of the distal tibial fracture pattern are the determining factors for surgical planning. Distal tibial fractures can be described as intra-articular and extra-articular. Muller et al. have described the AO/ASIF distal tibial fracture classification, which is divided into categories A, B, and C (1). AO/ASIF type A fractures are defined as fractures occurring above and not involving the distal tibial articular surface. The distal tibial fractures not involving the articular surface are the focus of this section. If the mechanism of injury is secondary to a crush injury, hyperbaric oxygen therapy may also be considered.
Surgical correction may be performed at the closest time possible from the traumatic event. Extended surgical treatment timing reduces chances of anatomic alignment. To execute a proper reduction and stabilization of the distal tibia, the appropriate external fixator construct must be built preoperatively. A multi-ringed Ilizarov type external fixator is the authors’ preferred choice. Long tibia and fibula views consisting of anterior-posterior, medial oblique, and lateral views should be assessed routinely when evaluating this pathology. If there is any secondary fracture line that may appear to extend distal into the ankle mortise, a CT scan should be ordered and assessed because it will affect the external fixator ring construct and surgical reduction. Also, if a multisegmental and/or comminuted fracture is suspected, a CT scan should be ordered and thoroughly reviewed.
The external fixator construct should always consist of a minimum of two ring fixation blocks above and below where the fracture lies on the tibia. These blocks are called the proximal fixation block and the distal fixation block. Each fixation block is comprised of two full rings connected individually by four threaded rods. Two different ring constructs exist for distal tibial fractures. The proximal fixation block remains consistent by connecting two rings with four fully threaded rods with a distance of 150 mm between the two. However, the distal fixation block may vary depending whether or not two rings can fit on the distal tibia remaining above the ankle joint and below the distal aspect of the tibial fracture. If two rings will not fit, the distal fixation block will be modified and consist of a foot plate and an ankle ring. Once the distal and proximal fixation blocks have been constructed, the two blocks are then connected using four fully threaded rods. The distance between the two blocks should span just above and below the distal tibial fracture (Fig. 26.1). It is highly recommended that all transosseous wires be olive wires for additional stability.
During intraoperative anesthesia, the contralateral limb malleolar position is examined. Most of the time, the surgeon will observe an external rotation of the fractured limb and a varus ankle. However, this is not always the case, and examination of the fractured limb with the normal limb is necessary to better understand the rotational and angulated deformity. In the event of an open distal tibial fracture, the wound should be cleansed and débrided appropriately depending on the open nature of the wound. If indeed an open fracture is being treated, operating time should be performed within the “golden period” of 6-hour time window in conjunction with intravenous (IV) antibiotics correlating with the contamination level and nature of the wound. The surgical team should regown and drape following open fracture protocol before continuing with the external fixation application and fracture reduction. Intraoperative soft tissue and bone cultures are also imperative throughout the procedure.
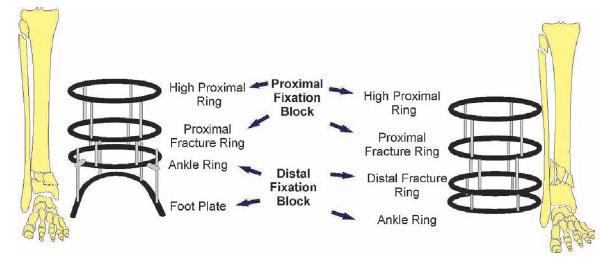
Figure 26.1 Neuropathic distal tibial extra-articular fracture external fixator construct.
Tibial fracture reduction techniques are next performed systematically. The preconstructed four-ringed external fixator or three ringed and a foot plate is placed over the leg. Under fluoroscopy, the foot and ankle are manually distracted and rotated, allowing reduction of the tibial fracture. Manual side-to-side compression may be applied at the level of the fracture to aid in reduction. Manual distraction of the foot and ankle should correct varus/valgus, procurvatum/recurvatum, and axial shortening. Clinically, the patella, anterior tibial crest, and the second ray should line up. The lateral fluoroscopic view should show the proximal and distal tibia lined up parallel without anterior or posterior translation (Fig. 26.2). The anteroposterior (AP) fluoroscopic views should show the ankle joint perpendicular to long axis of the proximal and distal tibia. Once reduction is confirmed, the external fixator is attached to the proximal tibia with a transosseous wire to the high proximal ring of the proximal fixation block. This wire is tensioned to 110- to 130-kg force and secured. Maintaining the triplane reduction, a distal transosseous wire is placed on the most distal ring of the distal fixation block. This may be the foot plate or ankle ring depending on what kind of fracture presented. This wire is tensioned between 70- to 90-kg force and secured. At this point, the fracture should be “out to length” and there should be no center of rotational angulation. If a slight varus/valgus, procurvatum/recurvatum, and shortening/over lengthening exists, the threaded rods connecting the proximal and distal fixation block can be adjusted.
Next, focus is aimed at stabilizing and compressing the fracture site. This is performed by a dual olive tensioning technique. The leading edge of the fracture is examined. If there is anatomic alignment, this step can be cut short by simply placing a transosseous olive wire from the proximal fracture ring and a transosseous wire from the top ring of the distal fixation block. With these olives opposing each other, a tapping technique should then be performed until they abut the cortex; then, tension and secure. If the leading edge of the fracture has a “step-off,” a transosseous olive wire is used to reduce the fracture. Correlating with the step off, a proximal transosseous olive wire is placed from the proximal fracture ring. The olive must be abutting either the lateral or medial cortex.
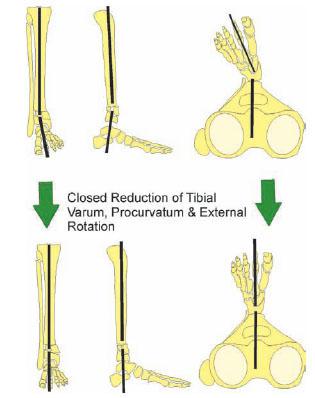
Figure 26.2 Neuropathic distal tibial extra-articular fracture closed reduction.
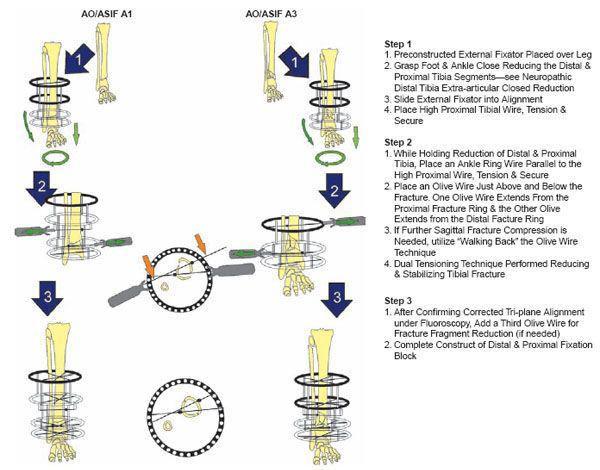
Figure 26.3 Neuropathic distal tibial extra-articular fracture technique for AO/ASIF A1 and A3.
If the distal tibia is laterally deviated as depicted in Figure 26.3 of the AO/ASIF A1 treatment pathway, the proximal olive wire should be against the medial proximal tibial cortex. The distal olive should be against the lateral distal cortex of the distal tibia. These olive wires may be strategically loosely secured to the ring one to two holes backward or forward depending on their orientation. This movement in the ring holes is to create a sagittal plane compression moment. This is called “walking back” the wire technique. Once these olive wires are in place, a tensioner is placed over the two wires opposite the olive. After a tensioner is over the distal olive wire and the proximal olive wire, the tensioner is gently tightened, pulling the distal and proximal tibia together. The end of the wire opposite to the olive is tightly fixated to the ring. The tensioner is loosened and re-tightened between 110- to 130-kg force. The olive should not move upon the second tensioning. If a large “butterfly” fragment is displaced, a third transosseous olive wire can be placed and tensioned as per the previously mentioned technique. Once the tibial fracture has been reduced and stabilized, the proximal and distal fixation block should be completed. Respecting the lower extremity anatomic “safe zones,” three converging transosseous wires or two transosseous wires and a half pin should be placed per ring. If a foot plate was utilized, it is fixated by a second converging transosseous olive wire through the calcaneus and two converging transosseous olive wires on the forefoot/midfoot region (Figs. 26.3 and 26.4).
The surgical technique of neuropathic distal tibial extra-articular fractures is depicted in diagrams. The surgical technique diagrams are not implying that all AO/ASIF A1, A2, and A3 can be treated as depicted. However, one should keep in mind the methods and apply as deemed appropriate.
SURGICAL TECHNIQUE OF NEUROPATHIC DISTAL TIBIAL PERIARTICULAR FRACTURES
The complexity of the articular disturbance inherent to the distal tibial periarticular fracture makes anatomic fracture reduction extremely challenging. Not only is the pilon fracture a severe intra-articular pathology, but it also produces severe soft tissue pathology. The distal tibial periarticular fracture zone of injury is notorious for dictating when and what kind of surgery can be performed. Depending on the severity of the intra-articular fracture pattern, realistic surgical outcomes must be thoroughly discussed with the patient. The neuropathic patient is projected to have a much poorer surgical outcome than the non-neuropathic patient. The goal of surgery is restoration of the distal tibia anatomic alignment. A more traditional pilon surgical approach involves initial stabilization and distraction with a monolateral external fixator. A second surgery is then performed approximately 2–3 weeks after the traumatic event. This second surgery involves an open reduction and internal fixation (ORIF) combined with plating of the medial tibia. The neuropathic limb is at risk with this procedure. Open reduction and internal fixation of a neuropathic pilon fracture increases chances of infection and wound dehiscence. A modification of this technique is required to minimize postoperative complications. This technique revolves around immediate closed reduction, percutaneous fixation, and a stable strategic application of a multi-ring external fixator. As with most complex fracture patterns, no one technique exists; however, a combination of techniques with underlying principles remains.
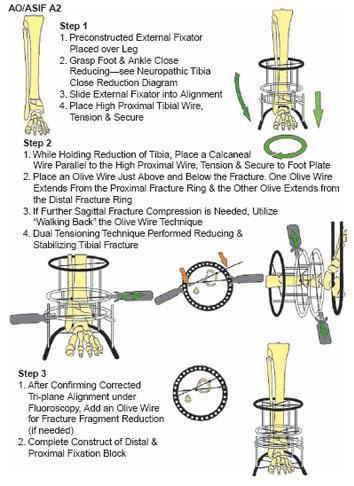
Figure 26.4 Neuropathic distal tibial extra-articular fracture technique for AO/ASIF A2.
A high-energy pilon at the authors’ institutions is treated similar to a crush injury. Surgery is performed as soon as possible to the traumatic event. Surgical planning is correlated with radiographs and CT scans. Hyperbaric oxygen therapy is implemented when necessary. If surgery is delayed, hyperbaric oxygen may begin preoperatively and continue postoperatively. If an open distal tibial periarticular fracture is observed, it is a surgical emergency and is treated using an open fracture protocol.
Ruedi-Allgower classification of pilon fractures and the AO/ASIF distal tibial fracture classification can be used to generally describe radiographic pathologic anatomy of pilon fractures (1,2). The goals of distal tibial periarticular fracture surgery are to restore anatomic distal tibia alignment to set the stage for a functional ankle joint. If a distal fibular fracture and/or syndesmotic rupture and diastasis injury coexist, they must also be anatomically aligned. The tibia is the major load bearer and the fibula plays a minor role. Historically, distal tibial periarticular fracture surgery methods focused on plating the fibula regardless of the fracture pattern and location. If the fibula is brought to length and plated, certain postoperative measures should be taken before weight-bearing to prevent a varus ankle mortise by removing the distal plate screws before weight-bearing. If a fibula fracture is about 4 cm above the ankle mortise and there is no syndesmotic diastasis injury, it usually does not need fixation. However, if the fibular fracture occurs with a concomitant syndesmotic diastasis injury, a syndesmotic screw and/or plate should applied. A fibular fracture at the level of the ankle joint should be fixated using plating and screws in most cases. The premise is that a correctly aligned articular surface of the distal tibia, medial malleolus, and lateral malleolus is the only outcome that will restore the architecture for a functional ankle joint.
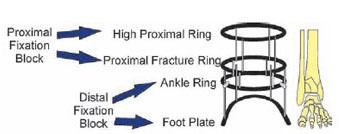
Figure 26.5 Neuropathic distal tibial peri-articular external fixator construct and terminology.
The authors’ preferred choice is to use a multi-ringed circular type external fixator consisting of a foot plate and three circular rings. The foot plate and each of the three rings are connected by four threaded rods. Avoid using long threaded rods connecting multiple rings because they will limit postoperative adjustments. The frame construct should be planned preoperatively from true anatomic AP, calcaneal axial, and lateral long view radiographs from the foot to proximal tibia. The frame construct should consist of two fixation blocks called the proximal and distal fixation block. The four rings are designated as foot plate, ankle ring, proximal fracture ring, and high proximal ring (Fig. 26.5). The proximal fracture ring and the high proximal ring should be connected by four threaded rods with a distance spanning the tibia of at least 150 mm for an optimally stable block (3). The two fixation blocks are then connected by four threaded rods. The distance from the ankle ring and the proximal fracture ring is dictated by how high the pilon fracture lines extend into the proximal metaphyseal portion of the tibia. This distance may range from 60 to 110 mm. A common treatment pathway exists for similar type pilon pathological anatomy (Fig. 26.6). Once the patient is under anesthesia, distraction of the foot and ankle is performed allowing ligamentotaxis to reduce the pilon. The distraction maneuver is performed to bring the fibula and distal tibial peri-articular fracture out to length and attempt to acutely reduce frontal, sagittal, and transverse plane rotation associated with the traumatic event.
AO/ASIF B1, B2, and Ruedi-Allgower I type pilon injuries are described as the least destructive to the articular surface with minimal fracture displacement (2,3). Primary percutaneous fixation can be performed. The fracture orientation and plane determines the screw(s) orientation. CT scan correlation is very helpful. Using 4.0-mm cannulated partially threaded screws, the fractures can be compressed and stabilized. It is important to examine the fracture pattern preoperatively to be sure the cancellous portion of the screw will pass the fracture site maximizing screw lag technique. Once the distal tibial periarticular fracture has been fixated, the fibula may be addressed. A fibular fracture below or at the level of the ankle joint with >2 mm of displacement should be fixated. A combination of a plate and screws may be used combined with a percutaneous technique. The tibia and fibula syndesmosis should always be stressed. If a syndesmotic ligament rupture has occurred, it must be reduced and stabilized. The syndesmotic screw insertion should be held until the tibial articular surface has been restored and fixated. The syndesmosis is addressed by one to two 4.0-mm cannulated fully threaded cancellous screws applied to the lateral aspect of the fibula through the lateral aspect of the tibia, and anchoring in the medial cortex of the tibia. The screw should stop just before exiting the medial aspect of the tibial cortex. A transosseous olive wire may be used as an alternative syndesmosis reduction and stabilization technique. The wire is placed just above the ankle joint going through the fibula and tibia in the frontal plane with the olive wire abutting the lateral cortex of the fibula. The tensioner is placed over the wire opposite the olive and gently tightened under live fluoroscopy visualizing reduction of the tibia and fibula diastasis. Fibular fractures above the level of the ankle joint by 4 cm that do not have a concomitant syndesmotic rupture do not need plate and screw fixation. Intraoperative view should confirm correct placement of the olive wire(s) and the fibular should be stressed to confirm reduction and stability.

Figure 26.6 Neuropathic distal tibial periarticular treatment algorithm.
A prebuilt multi-ring external fixator is placed on the leg. This frame is applied to serve as a force neutralizer and joint stabilizer. The first wire is placed across the calcaneus allowing 1- to 1.5-cm plantar fat pad projection plantarly. The frame is then grasped and pulled distal from the patient, serving to distract the ankle joint and fracture fragments. While distracting, a tibial wire is placed parallel to the calcaneal wire to the high proximal ring. After checking for anterior and posterior spacing of the tibia and calf, the rest of the frame wires can be completed. Each of the three circular rings should be fixated to the tibia with three transosseous olives or two transosseous wires and a half pin. All tibial wires should be converging consistent with the lower extremity safe zones and tensioned to about 110-to 130-kg force. The foot plate is fixated by two converging transosseous olive wires through the calcaneus and forefoot. The foot plate wires are tensioned to 70- to 90-kg force (Fig. 26.7).
AO/ASIF C2 and Ruedi-Allgower type II are described as multifragmental intra-articular minimally displaced distal tibial fractures (1,2). These fractures can retract into an anatomic realignment with traction and closed reduction techniques if performed as soon as possible to the traumatic event. However, there are times when these types of fractures do not respond to traction and a percutaneous manipulation combined with opposing olive wire reduction technique must be used.
Initially, the foot and ankle are distracted while an assistant stabilizes the knee. While distracting, the surgeon is waiting for a “deep click” that can be felt and sometimes heard. Distraction may continue for a continuous 5–10 minutes and fluoroscopic views will confirm that the joint has been reduced. Sometimes anatomic and other times percutaneous manipulation is needed to further align the articular surface. After the closed reduction, surgery may begin. Fluoroscopy determines the appropriate next steps. If ankle joint alignment has been restored, percutaneous screws may be placed to hold the reduction and compress and stabilize the fractures. This technique was previously described in the treatment of AO/ASIF B1, B2, and Ruedi-Allgower type I.
In the event that the AO/ASIF C2 and Ruedi-Allgower type II do not respond to percutaneous manipulation, a more aggressive reduction technique must be employed. The prebuilt three ring and foot plate external fixator is placed over the leg. A calcaneal wire is place from medial to lateral and anchored to the foot plate allowing 1 to 1.5 cm of plantar fat pad projection plantarly. The external fixator is then grasped while an assistant stabilizes the knee and pulled away from the patient pulling the calcaneus in aggressive traction. If this maneuver does not reduce the joint, a percutaneous introduction of a periosteal elevator may used to free and reduce fragments. This is a maneuver aimed at pushing plantarly the articular fragment of the joint that has become lodged in the metaphyseal portion of the tibia. Sometimes, multiple strategically placed tibial stab incisions anterior lateral and anterior medial are necessary to locate and reduce fracture fragments. Once the fragment has been reduced, large reduction forceps are used to reduce the anterior and posterior widened tibia. The proximal fixation block must be stabilized by placing two to three transosseous olive wires anchored and tensioned to the high proximal ring and the proximal fracture ring. After the proximal fixation block has been stabilized, percutaneous 4-mm cannulated partially threaded screws are then placed from anterior to posterior or posterior to anterior correlating with the fracture pattern anatomy of the CT scan. The sagittal plane of the pilon has been stabilized. The frontal plane is the next focus. Large medial and lateral pilon fracture fragments meet in the articular surface forming an “articular gap.” This articular gap must be reduced. One transosseous olive wire is placed from medial to lateral tibia just above the ankle joint, not coursing through the fibula with the olive abutting the medial tibial cortex. A second transosseous olive wire is placed from lateral to medial tibia 2 to 5 cm above the ankle joint, also avoiding the fibula abutting the lateral tibial cortex. A tensioner is placed on the wire opposite to the olive. Simultaneously, both tensioners are tightened under live fluoroscopy visualizing bone reduction. Once the articular gap reduction has been confirmed, the transosseous olive wires are fixated to the ankle ring. The end of the wire opposite to the olive is tightly fixated to the ankle ring. The tensioner is loosened and retightened between 110 to 130 kg force. The olive should not move upon the second tensioning. Next, the distal fixation block is to be completed. The foot plate is fixated by a second converging transosseous olive wire through the calcaneus and two converging transosseous olive wires at the forefoot/midfoot region. The foot plate wires are then tensioned between 70 to 90 kg force (Fig. 26.8).
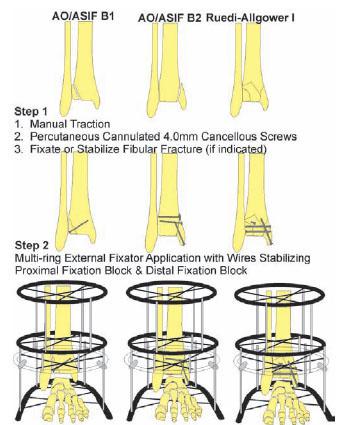
Figure 26.7 Neuropathic distal tibial periarticular technique for AO/ASIF B1, B2, and Ruedi-Allgower type I.
AO/ASIF B3, C3, and Ruedi-Allgower type III are described as the most destructive of the distal tibial periarticular fractures because of the severely comminuted intra-articular displaced distal tibial fractures (1,2). These injuries generally have a poor functional outcome. The goals remain restoring the ankle mortise, correcting the varus or valgus distal tibia, and fixating the fibula appropriately. By holding to the original goals of pilon surgery, a plantigrade tibia will be the outcome capable of a later joint destructive procedure such as an arthrodesis. If a primary arthrodesis is decided upon, the definitive surgery should be performed no earlier than 21 days after the traumatic event. The details of a primary arthrodesis are outside of the scope of this chapter.
AO/ASIF B3, C3, and Ruedi-Allgower type III are initially manually distracted and reduction of the tibia and fibula is attempted. The fibula fracture is examined, and as mentioned, may need stabilization and fixation. This stage of pilon fracture can be highly variable. The surgical example has a high fibula fracture and a syndesmotic injury. The fibula is brought out to length and stabilized using a combination of plate screws or an intramedullary wire coursing from the distal fibula to proximal fibula. The preconstructed external fixator consisting of three rings and a foot plate is placed over the leg. A calcaneal wire is placed from medial to lateral and anchored to the foot plate allowing 1 to 1.5 cm of plantar fat pad projection plantarly. The external fixator is then grasped while an assistant stabilizes the knee and pulled away from the patient pulling the calcaneus in aggressive traction. Multiple fluoroscopic views should be taken to ensure the gross alignment in the frontal, sagittal, and transverse plane and correction to a rectus position. Once this is confirmed, the proximal fixation block is stabilized using previously mentioned techniques. A percutaneous introduction of a periosteal elevator or blunt instrument may be used to free and reduce fragments of the articular surface lodged proximally in the metaphyseal bone. The comminuted metaphyseal portion of the tibia should be structurally and biologically augmented using a combination of cancellous bone chips and an orthobiologic rich in growth factors. The surgical technique case example shows a syndesmotic ankle injury. The distal tibia must be reduced and stabilized in the frontal plane. A transosseous olive wire is placed from the lateral fibula parallel to the ankle joint and at the level of the syndesmosis with the olive against the lateral cortex of fibula. A second transosseous olive wire is placed just above the most proximal medial distal tibial periarticular fracture line. This wire is also parallel to the ankle joint, with the olive abutting the medial cortex of tibia. The distal olive wire is temporarily fixated to the ankle ring and the proximal olive wire is also temporarily fixated to the proximal fracture ring. These wires may extend from their ring by fixation posts. A tensioner is placed on the distal wire opposite the olive. A second tensioner is placed on the proximal wire on the side opposite the olive. The tensioners are gently tightened at the same time, pulling the respective olive wires toward one another under fluoroscopy. Once there has been adequate reduction of the distal tibia in the frontal plane, the end of the wire opposite to the olive is tightly fixated to the ankle ring. The tensioner is loosened and retightened between 110 to 130 kg force. The olive should not move upon the second tensioning. If a medial malleolar type fracture exists in an area of heavily comminuted bone, a transosseous olive wire can be directed in the frontal plane from distal medial tibia to proximal lateral tibia. A washer can be placed in combination with the olive wire to increase reduction surface area against a comminuted medial malleolar fracture component. This wire should exit the lateral tibia above the distal tibial periarticular fracture. The wire is anchored to the proximal fracture ring and gently tensioned under fluoroscopy, watching medial malleolar fracture reduction. Once reduced, the wire is attached to the foot plate and attached to the proximal fracture ring extending from a post without any added tensioning. The foot plate is fixated by a second converging transosseous olive wire through the calcaneus and two converging transosseous olive wires through the forefoot/midfoot region. The foot plate wires are tensioned between 70 to 90 kg force (Fig. 26.9).
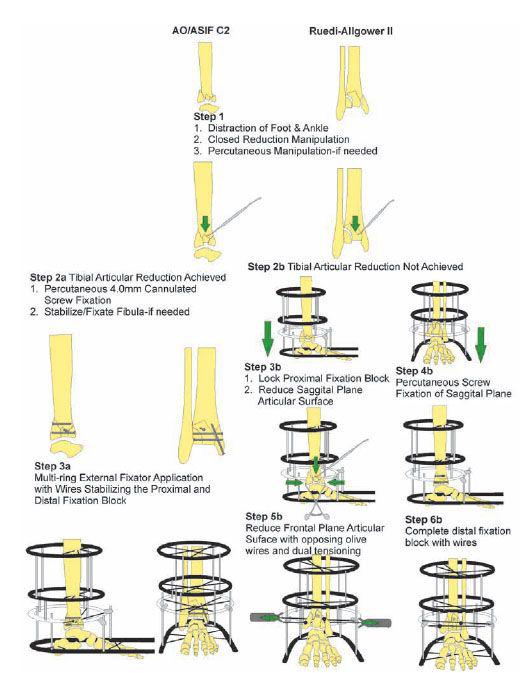
Figure 26.8 Neuropathic distal tibial periarticular technique for AO/ASIF C2 and Ruedi-Allgower II.
A final important point should be stressed. After the reduction olive wires have been placed and reduction has been attempted, it is not uncommon that fracture reduction does not become aligned as much as one would hope. Many times, a rotational component may be revealed and counter productive wires are noted. These wires may be moved or replaced while correcting the rotational fracture component.
SURGICAL TECHNIQUE OF NEUROPATHIC ANKLE FRACTURES
Surgical repair and successful outcome of the neuropathic ankle fracture lies solely on the patient’s healing potential. Each and every ankle fracture has a different presentation that must be recognized and treated appropriately. As with any ankle fracture, the goal of surgery is restoration of the anatomic joint alignment. The neuropathic ankle fracture has a much higher complication rate. Complications include but are not limited to infection, nonunion, malunion, dehiscence, osteomyelitis, hardware failure, and development of a Charcot foot/ankle. The surgical techniques that follow are aimed at the anatomic reduction and stabilization of the neuropathic ankle fracture by minimizing postoperative complications. Dense peripheral neuropathy alone makes the postoperative outcome more challenging and one may expect early patient weight-bearing because of their inability to sense pain and feel their lower extremities.
In the situation of the neuropathic ankle, soft tissue viability and surgical wound coverage are of equal importance, as are the fracture pattern and pathoanatomy. Open reduction and internal fixation provide the best fracture fixation; however, the neuropathic limb demands additional fixation and stability consisting of circular external fixation stabilization. Not all neuropathic ankle fractures need this approach, but many of the patients’ risks of noncompliance, surgery-induced Charcot neuroarthropathy, multiple comorbidities, dense peripheral neuropathy, and peripheral vascular disease are heavily considered candidates for additional fixation with external fixation. Primary ankle arthrodesis may also be considered in severely comminuted intra-articular tibial plafond and ankle fractures.
Treatment of the neuropathic ankle fracture begins immediately upon presentation to the physician. Dislocation of the ankle joint needs relocation immediately with application of a mildly compressive type of dressing and temporary splinting. This alone can prevent avoidable fracture blisters and skin necrosis. The sooner the surgery can be performed to the traumatic event, the better the outcome will be. The soft tissue envelope must be addressed and protected immediately. Stabilizing the fracture will in return stabilize the soft tissues if a minimally invasive technique is used properly. If massive edema exists, mild compression and immobilization must continue until the skin lines return to normal. This may take 7 to 21 days for the zone of injury to clearly define itself. Radiographs will dictate the size of the external fixator chosen. The authors’ choice is a foot plate with two circular rings. The foot plate and rings are attached using three levels of four threaded rods (Fig. 26.10). The construct is designed for joint and fracture stability. Fracture reduction will be dependent on a percutaneous open reduction and internal fixation. Several methods have been described to use external fixation and transosseous wires for ankle fracture stabilization as well as permanent fixation. It is the authors’ opinion that this method may be avoided. Better longer-term outcomes are obtained when an element of internal fixation is simultaneously used.
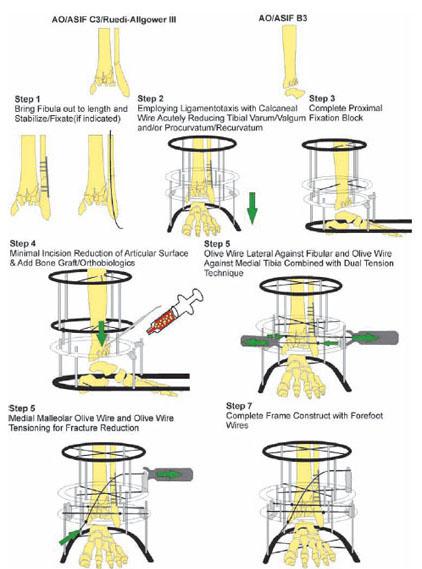
Figure 26.9 Neuropathic distal tibial peri-articular technique for AO/ASIF B3, C3, and Ruedi-Allgower III.
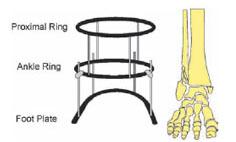
Figure 26.10 Neuropathic ankle fracture technique external fixator construct.
Fibular fractures are the first to be addressed. Under fluoroscopy, a gentle reduction of the ankle can be visualized. If a medial malleolar fracture is present with the medial gutter preventing distraction of the fibula, it must be percutaneously moved from inside the gutter by using a periosteal elevator with the belly against the medial malleolar articular surface. The level of the fibular fracture and bone quality dictate reduction techniques and hardware to be used. A short spiral distal fibular fracture at the level of the ankle joint lacking comminution can be addressed more traditionally. While manually distracting the ankle and under fluoroscopy, bone reduction forceps are placed laterally perpendicular to the fracture with the fibular out to length and proper sagittal plane alignment piercing the skin to the bone. A small stab incision is made that is no bigger than the head of the screw to be used. A small hemostat is used to free up deep tissue to bone. A cannulated interfragment screw is placed from proximal anterior to distal posterior perpendicular to the fracture. Once the screw is tightened and if a good bicortical purchase is achieved, the bone reduction forceps can be removed. A one third semitubular plate is next chosen to allow two screws below the fracture and two to three screws above the fracture. Depending on the degree of comminution or osteoporosis, a locking plate option should be considered. The plate must be bent to the anatomy of the fibula. A longitudinal full-thickness incision no bigger than 1 cm is made just at the distal lateral aspect of the fibula. A periosteal elevator is then used to create a layer for the plate beneath the deep tissue and ideally beneath the periosteum. The plate is gently slid from distal to proximal against the fibula. The plate is checked for alignment under fluoroscopy for length and appropriate number of screw holes proximal and distal to the fracture. The first screw will be cortical and located just above the fibular fracture. A longitudinal full-thickness incision is made just over the hole in the plate no more than the size of this cortical screw to be placed. A small hemostat is introduced into the incision to free up any soft tissue surrounding the plate hole to allow the screw head to obtain a direct contact to the plate. The next screws to be placed are just below the fracture. The previous incision that the plate was introduced through will allow adequate exposure while inserting the cancellous screws. If the fibula remains at length and reduced at this point, the rest of the available screws may be placed. Before placing the last proximal cortical screw in the plate, the syndesmosis must be stressed. Gently pulling on the distal fibula under fluoroscopy with a bone hook, the ankle fracture is checked for a diastasis injury. If indeed a diastasis injury exists, a fully threaded cortical screw is placed using the minimal incision technique in the most proximal hole of the fibular plate.
The next focus is the medial malleolar fracture. An incision no bigger than 1 cm is made at the distal aspect of the medical malleolar fracture. Blunt dissection is carried down to the periosteum. A bone hook is then placed grasping the distal tip of the malleolus. The bone hook is then pulled proximal, attempting temporary fracture reduction. If a rotational component or soft tissue entrapment appears to inhibit reduction, the following technique may be employed. A small stab incision is made at the medial gutter of the ankle joint. Blunt dissection is carried down to the joint. A small periosteal elevator is then introduced through the incision. A sweep of the fracture site is performed. The bone hook at the tip of the medial malleolus is pulled proximal while rotating the periosteal elevator against the fracture fragment. Once the fracture has been reduced, it is then fixated using two parallel cannulated 4-mm partially threaded screws. If a posterior malleolar fracture involves 30% of the distal tibial articular surface, a percutaneous anterior to posterior or posterior to anterior cannulated 4-mm partially threaded screw may be placed. Depending on the stability of fixation, patient condition/physiologic status, a decision to apply an external fixator should be considered (Fig. 26.11).
A severely comminuted fibular fracture at the level of the ankle joint can pose a challenging task of obtaining stable fixation and reduction. A percutaneous approach may be used in the following manner. A 1-cm incision is made longitudinally at the distal aspect of the fibula. Blunt dissection is carried down to the level of bone. A periosteal elevator is then used to create a layer for the plate beneath the deep tissue and the periosteum. A plate is chosen and contoured in the previously mentioned fashion. The plate length is chosen, not modeled after the presently shortened fibula, but instead to an “ideal” fibula out to length. The plate is then slid through the incision so that two to three screw holes are proximal to the comminuted portion of the fibula. The plate is placed lateral to the fibula and a lateral fluoroscopic view is taken to make sure that the plate is directly over the fibula. At that time, the distal portion of the fibula can remain in a malaligned position which will be addressed later in the procedure. Once views confirm appropriate plate position in the sagittal plane, a cortical screw is placed in the most proximal plate hole. Simultaneous manual distraction of the ankle and distraction of the distal fibula using bone reduction forceps is performed. Once the first screw is placed, a second cortical screw is placed just below the most proximal screw. While the second screw is tightened, the plate will reduce the fibula from its valgus position, buttressing the comminuted portion and distal fibula. The distal fibula may need manipulation with the bone forceps to recreate the lateral gutter. One to two cancellous screws are placed in the distal portion of the fibula. Fluoroscopic views should be taken to confirm fibular length as well as sagittal and frontal plane alignment. Bone graft should be placed in the comminuted fibula through the distal incision. The syndesmosis should be stressed and treated appropriately. If the medial malleolus is noncomminuted, it should be reduced and fixated as previously mentioned. However, if a comminuted medial malleolus is encountered, an olive wire reduction technique may be performed. This technique is performed after the ankle joint external fixator is applied. The distal tip of the medial malleolus is pierced by a transosseous olive wire without crossing the fracture site. It is then manipulated by rotating the fragment with the olive wire assisted by a periosteal elevator. Once alignment of the medial gutter is obtained, the olive wire is advanced from distal medial to proximal lateral. The goal is for the olive wire to abut the distal medial malleolar fragment and the end of the wire to exit the proximal lateral tibial cortex. Once the olive exits the lateral tibial cortex, it is then loosely fixated to the ring it is closest to whether it is the ankle or more proximal ring. A tensioner is placed over the wire opposite to the olive. Gently under fluoroscopy, the wire is tensioned reducing the fragment and providing compression across the fracture site. The olive wire is then secured to the foot plate and circular ring. A second olive wire may be applied in a similar way as well.
Severely comminuted and unstable neuropathic ankle fractures benefit from a multi-ringed external fixator. The external fixator may function to further stabilize the ankle or add to fracture reduction and stabilization. The chosen configuration is two full rings and a foot plate connected by four threaded rods. The distance from the foot plate to the ankle joint should place the ankle ring 2 to 4 cm above the ankle joint. The proximal ring distance from the ankle joint should be 150 mm from the ankle ring. The external fixator is applied after percutaneous fracture reduction and stabilization is performed. The prebuilt external fixation is placed over the foot and ankle. The foot plate is placed to allow plantar projection of the heel. A transosseous calcaneal wire is placed medial to lateral and tensioned between 70 to 90 kg force. While grasping the foot plate, manual traction distally is performed. This is done to attempt ankle joint arthrodiastasis and aid in ligamentotaxis fracture reduction. A transosseous tibial wire is placed, avoiding the fibula parallel to the calcaneal wire and tensioned to about 110 kg force. Once foot and ankle alignment is confirmed in the frame, a second converging transosseous tibial wire is then placed and tensioned. A second converging calcaneal wire is then placed and followed by two converging metatarsal wires that are tensioned in a similar way. Next, two converging proximal tibial wires are placed and ten-sioned to about 110 kg force. It is recommended to use all olive wires. The ankle stabilization frame is now complete (Fig. 26.12).
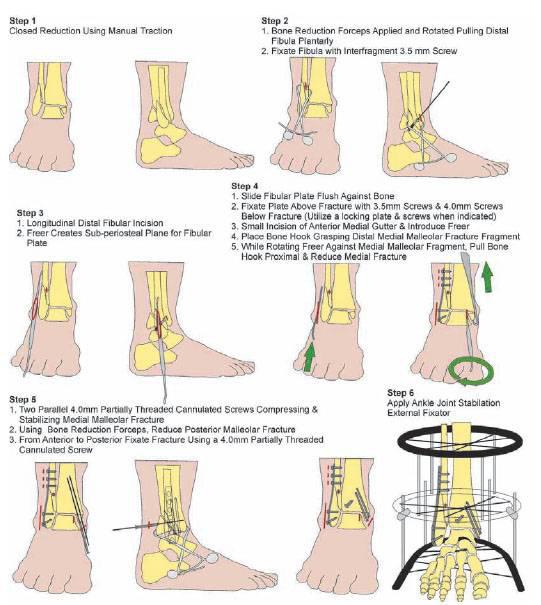
Figure 26.11 Neuropathic ankle fracture technique of noncomminuted fibula.
POSTOPERATIVE MANAGEMENT
The estimated time for bony consolidation is approximately double the time normally estimated for a healthy patient. Prolonged stabilization is essential to prevent neuropathic fractures from progressing into a Charcot deformity. The worst case scenario should always be assumed.
The patient is kept in the hospital for 3 to 7 days postoperatively for glucose control, pain management, appropriate IV antibiotics, and to ensure that the patient is medically stable and able to rehabilitate before discharge. The patient receives 10 to 14 days of prophylactic low molecular weight heparin therapy, which is started 12 hours postoperatively and 1 week of oral antibiotics in accordance with the medical and infectious disease teams. The patient is seen weekly until the sutures and/or staples are removed at 3 to 4 weeks and then once every 2 weeks for the remaining months. Postoperative radiographs are obtained at 2 to 4 weeks and then once a month until healing is complete. Close and constant monitoring is absolutely imperative.
The pin or wire sites are covered with Betadine-soaked gauze and the frame must be kept dry. Patients are instructed not to take showers and are educated on pin or wire site care that is to be done weekly. Patient compliance is strongly emphasized and strict pin or wire site care must be maintained. Stability is also of the utmost importance. The wires and pins must be checked at each visit to guarantee that the tension has not been lost. Retensioning can be achieved using the manual tensioning technique.
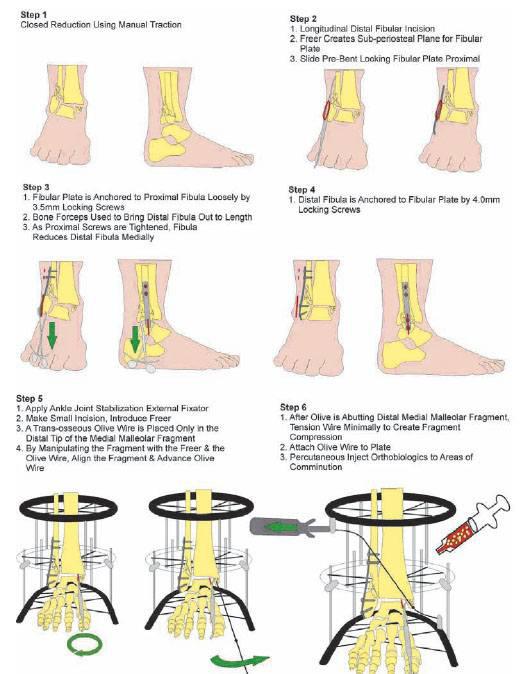
Figure 26.12 Neuropathic ankle fracture technique of comminuted fibula.
DISTAL TIBIA EXTRA-ARTICULAR FRACTURES
Related posts:
 Rehabilitation and Therapeutic Footwear for the Reconstructed and Amputee Patient
Local Random Flaps for Soft Tissue Coverage of the Diabetic Foot
Surgical Treatment of Chronic Nerve Compression in the Patient with Diabetic Neuropathy
Negative Pressure Wound Therapy for the Complicated Diabetic Foot Wounds
Surgical Reconstruction and Stepwise Approach to Chronic Charcot Neuroarthropathy
Revisional and Reconstructive Surgery for the Diabetic Foot and Ankle
Rehabilitation and Therapeutic Footwear for the Reconstructed and Amputee Patient
Local Random Flaps for Soft Tissue Coverage of the Diabetic Foot
Surgical Treatment of Chronic Nerve Compression in the Patient with Diabetic Neuropathy
Negative Pressure Wound Therapy for the Complicated Diabetic Foot Wounds
Surgical Reconstruction and Stepwise Approach to Chronic Charcot Neuroarthropathy
Revisional and Reconstructive Surgery for the Diabetic Foot and Ankle
Stay updated, free articles. Join our Telegram channel

Full access? Get Clinical Tree


