Chapter Outline
Preparation of blood films on slides 50
Manual method 50
Automated methods 51
Labelling blood films 51
Fixing blood films 51
Bone marrow films 52
Staining blood and bone marrow films 52
Preparation of solutions of Romanowsky dyes 52
Staining methods 53
May–Grünwald–Giemsa stain 53
Standardised Romanowsky stain 55
Jenner–Giemsa stain 55
Leishman stain 55
Automated staining 55
Rapid staining method 55
Stains 55
Mounting of coverslip 56
Examination of wet blood film preparations 56
Separation and concentration of blood cells 57
Making a buffy coat preparation 57
Utility of the buffy coat 57
Separation of specific cell populations 58
Bacteria and fungi detectable in blood films 58
Parasites detectable in blood, bone marrow or splenic aspirates 58
Examination of blood films for parasites 58
Preparation of blood films on slides
Blood films should be made on clean glass slides. Films made on coverglasses have negligible advantages and are unsuitable for modern laboratory practice. Films may be spread by hand or by means of an automated slide spreader, the latter being either a stand-alone instrument or a component of an automated blood cell counter.
Manual method
Blood films can be prepared from fresh blood with no anticoagulant added or from ethylenediaminetetra-acetic acid (EDTA)-anticoagulated blood. Heparinised blood should not generally be used because its staining characteristics differ from those of EDTA-anticoagulated blood. Good films can be made in the following manner using clean slides, if necessary wiped free from dust immediately before use. Slides should measure 75 × 25 mm and be approximately 1 mm thick; ideally, they should be frosted at one end to facilitate labelling, but these are more expensive.
First, make a spreader from a glass slide that has a smooth end. Using a glass cutter, break off one corner of the slide, leaving a width of about 18 mm as the spreader. A spreader can be used repeatedly unless the edge becomes chipped, but it must be thoroughly cleaned and dried between films.
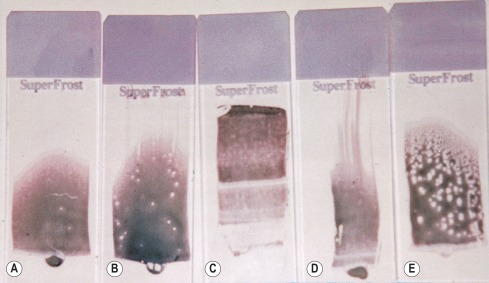
Place a small drop of blood in the centre line of a slide about 1 cm from one end. Then, without delay, place a spreader in front of the drop at an angle of about 30 degrees to the slide and move it back to make contact with the drop. The drop should spread quickly along the line of contact. With a steady movement of the hand, spread the drop of blood along the slide. The spreader must not be lifted off until the last trace of blood has been spread out; with a correctly sized drop, the film should be about 3 cm in length. It is important that the film of blood finishes at least 1 cm before the end of the slide ( Fig. 4-1 ).
The thickness of the film can be regulated by varying the pressure and speed of spreading and by changing the angle at which the spreader is held. With anaemic blood, the correct thickness is achieved by using a wider angle, and, conversely, with polycythaemic blood, the angle should be narrower.
The ideal thickness is such that on microscopy there is some overlap of red cells throughout much of the film’s length (see p. 25 ). The leucocytes should be easily recognisable throughout most of the film. With poorly made films the leucocytes will be unevenly distributed, with monocytes and other large leucocytes being pushed to the end and the sides of the film. An irregular streaky film will occur if the slide is greasy, and dust on the surface will cause patchy spots ( Fig. 4-1 ).
The films should be allowed to dry in the air. In humid conditions the films may be exposed to a current of warm air (e.g. from a hairdryer), but this should be in a microbiological safety hood.
Automated methods
The manufacturer’s instructions should be followed unless local experience has demonstrated that variation of the recommended technique achieves better results.
Labelling blood films
The film should be labelled immediately after being spread. Write in pencil either a laboratory reference number or the name of the patient and the date on the frosted end of the slide or on the film itself (writing on the thickest part, which is least suitable for microscopic examination). A label written in pencil will not be removed by staining. A paper label should be affixed to the slide later. If blood films are to be stored for future reference, apply the paper label in such a manner that it is easily read when the slides are filed.
In a computerised laboratory, bar-coded specimen identification labels are convenient and preferable. These should have the patient’s name, the date and the laboratory number as well as the bar code.
Fixing blood films
To preserve the morphology of the cells, films must be fixed as described on page 53. This must be done without delay, and the films should never be left unfixed for more than a few hours. If films are sent to the laboratory by post, it is essential that, when possible, they are thoroughly dried and fixed before dispatch.
Bone marrow films
The method for preparation of films of aspirated bone marrow is described on page 116. They should be made without delay. Films must be thoroughly dry before they are fixed or artefactual changes will occur. At least one film should be fixed for a Perls stain on the initial bone marrow aspirate of each patient, and, if necessary, films should be fixed in the appropriate fixatives for special staining ( Chapter 15 ); others should be fixed and stained with a Romanowsky stain as described later. Crushed bone marrow particles and touch preparations from trephine biopsy specimens can be stained in the same manner.
Staining blood and bone marrow films
Romanowsky stains are used universally for routine staining of blood films. The remarkable property of the Romanowsky dyes of making subtle distinctions in shades of staining, and of staining granules differentially, depends on two components: azure B (trimethylthionine) and eosin Y (tetrabromofluorescein). ,
The original Romanowsky combination was polychrome methylene blue and eosin. Several of the stains now used routinely that are based on azure B also include methylene blue, but the need for this is debatable. The presence of methylene blue in the stain is considered by some authors to enhance the staining of nucleoli and polychromatic red cells; in its absence, normal neutrophil granules tend to stain heavily and may resemble ‘toxic granules’ in conventionally stained films.
There are a number of causes of variation in staining. One of the main factors is the presence of contaminants in the commercial dyes, and a simple combination of pure azure B and eosin Y might be considered preferable to the more complex stains because this ensures consistent results from batch to batch. , , However, in practice, absolutely pure dyes are expensive, and it is sufficient to ensure that the stains contain at least 80% of the appropriate dye. Among the Romanowsky stains now in use, Jenner is the simplest and Giemsa is the most complex. Leishman stain, which occupies an intermediate position, is still widely used in the routine staining of blood films, although the results are inferior to those obtained by the combined May–Grünwald–Giemsa, Jenner–Giemsa, and azure B–eosin Y methods. Wright stain, which is widely used in North America, gives results that are similar to those obtained with Leishman stain, whereas Wright–Giemsa gives results that are similar to those obtained with May–Grünwald–Giemsa. A pH to the alkaline side of neutrality accentuates the azure component at the expense of the eosin and vice versa. A pH of 6.8 is usually recommended for general use, but to some extent this depends on personal preference. (When looking for malaria parasites, a pH of 7.2 is recommended to see Schüffner dots.) To achieve a uniform pH, 50 ml of 66 mmol/l Sörensen phosphate buffer (see p. 563 ) may be added to each litre of the water used in diluting the stains and washing the films.
The mechanism by which certain components of a cell’s structure stain with particular dyes while other components fail to do so depends on complex differences in binding of the dyes to chemical structures and interactions between the dye molecules. Azure B is bound to anionic molecules, and eosin Y is bound to cationic sites on proteins.
Thus the acidic groupings of the nucleic acids and proteins of the cell nuclei and cytoplasm of primitive cells determine their uptake of the basic dye azure B, and, conversely, the presence of basic groupings on the haemoglobin molecule results in its affinity for acidic dyes and its staining by eosin. The granules in the cytoplasm of neutrophil leucocytes are weakly stained by the azure complexes. Eosinophilic granules contain a spermine derivative with an alkaline grouping that stains strongly with the acidic component of the dye, whereas basophilic granules contain heparin, which has an affinity for the basic component of the dye. These effects depend on the molar equilibrium between the two dyes in time-dependent reactions. Deoxyribonucleic acid (DNA) binds rapidly, ribonucleic acid (RNA) more slowly, and haemoglobin more slowly still; hence the need to have the correct azure B to eosin ratio to avoid contamination of the dyes and to stain for the right time. Standardised stains and staining methods have been proposed (see p. 55 ).
The colour reactions of the Romanowsky effect are shown in Table 4-1 ; causes of variation in staining are given in Table 4-2 .
| Cellular Component | Colour |
|---|---|
| Nuclei | |
| Chromatin | Purple |
| Nucleoli | Light blue |
| Cytoplasm | |
| Erythroblast | Dark blue |
| Erythrocyte | Dark pink |
| Reticulocyte | Grey-blue |
| Lymphocyte | Blue |
| Metamyelocyte | Pink |
| Monocyte | Grey-blue |
| Myelocyte | Pink |
| Neutrophil | Pink/orange |
| Promyelocyte | Blue |
| Basophil | Blue |
| Granules | |
| Promyelocyte (primary granules) | Red or purple |
| Basophil | Purple-black |
| Eosinophil | Red-orange |
| Neutrophil | Purple |
| Toxic granules | Dark purple |
| Platelet | Purple |
| Other Inclusions | |
| Auer body | Purple |
| Cabot ring | Purple |
| Howell–Jolly body | Purple |
| Döhle body | Light blue |
| Appearances | Causes |
|---|---|
| Too blue | Incorrect preparation of stock, eosin concentration too low |
| Stock stain exposed to bright daylight | |
| Batch of stain solution overused | |
| Impure dyes | |
| Staining time too short | |
| Staining solution too acidic | |
| Film too thick | |
| Inadequate time in buffer solution | |
| Too pink | Incorrect azure B:eosin Y ratio |
| Impure dyes | |
| Buffer pH too low | |
| Excessive washing in buffer solution | |
| Pale staining | Old staining solution |
| Overused staining solution | |
| Incorrect preparation of stock | |
| Impure dyes, especially azure A and/or C | |
| High ambient temperature | |
| Neutrophil granules not stained | Insufficient azure B |
| Neutrophil granules dark blue/black (pseudotoxic) | Excess azure B |
| Other stain anomalies | Various contaminating dyes and metal salts |
| Stain deposit on film | Stain solution left in uncovered jar |
| Stain solution not filtered | |
| Blue background | Inadequate fixation or prolonged storage before fixation |
| Blood collected into heparin as anticoagulant |
Stay updated, free articles. Join our Telegram channel

Full access? Get Clinical Tree


