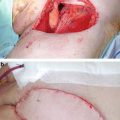
Fig. 6.1
The femoral triangle. (a) Anatomy of femoral triangle. (b) Cross-sectional anatomy of right femoral triangle
Video Endoscopic Inguinal Lymphadenectomy
Patient Preparation and Position
The risks and benefits of groin dissection, particularly the risks of lymphocele, prolonged lymphorrhea, blood clot, permanent leg swelling, neuromuscular damage, bleeding, and the potential inability to remove all inguinal lymph nodes should be discussed with all patients in detail. Given the relative novelty of this procedure, some of the risks may not be clearly anticipated.
Routine perioperative antibiotics should be administered. The patient is then positioned in a frog-leg fashion on a regular table, with the knee supported with small towels. Pay attention to the knee supports to ensure they are not obstructing port placement, especially medially. Later patients are positioned on a split-leg table (Fig. 6.2). Before prepping and draping, the boundaries of the femoral triangle are drawn. This is an inverted triangle, where the base is a line that is drawn from the anterior superior iliac spine to the pubic tubercle, tracing the course of the inguinal ligament. The lateral boundary is the sartorius muscle angling toward the apex. The medial boundary is the adductor longus muscle, again extending toward the apex. These marks both aid in the correct placement of trocars as well as in determining the extent of dissection. Prepping was via standard techniques, including preparation of the suprapubic skin so that the development of crepitus could be monitored.
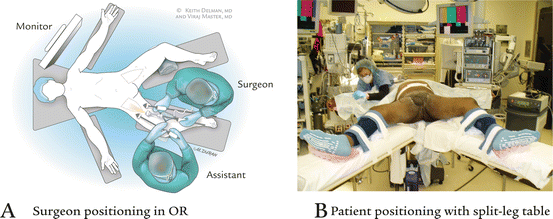

Fig. 6.2
Positioning. (a) Surgeon positioning in operating room. (b) Patient positioning with split-leg table
Room Setup
On a split-leg table, the surgical assistant should stand on the lateral side of the leg and the surgeon medially in between the patient’s legs. There is no difference in setup between left and right dissections. Monitors are placed at the shoulders on either side of the patient. Bilateral procedures can be done simultaneously by two teams [7].
Trocar Placement
The first incision is made 3 cm inferio r to the apex of the femoral triangle. A 12-mm incision is made through skin, Camper’s fascia, and, importantly, above Scarpa’s fascia. In many patients, the classic teaching of a 5-mm thickness is unreliable and, instead, the presence of a white layer is the identifying landmark for Scarpa’s fascia. At this point, a finger is used to develop the potential space ideally above Scarpa’s fascia in the plane traditionally utilized to develop flaps in an open procedure. This is carried out to the extent of at least 5 cm on either side of the initial skin incision. The initial finger dissection is a critical maneuver as it allowed one to rapidly and safely establish a working space with minimal blood loss. It is important to note that, with experience, the avascular plane is easily located and palpably different, reassuring the surgeon that he or she is in the appropriate space.
Once complete, the 12-mm Origin balloon port trocar (Origin Medsystems Inc, Menlo Park, CA, USA) is inserted and patient pressure is set at 25 mmHg for 10 min. The high pressure aids in rapidly establishing a working space. A zero-degree 10-mm laparoscope is then inserted. Next, two 10-mm Ethicon Endopath Bladeless trocars are placed, separated about a hands’ breadth from the visualizing port (Fig. 6.3).
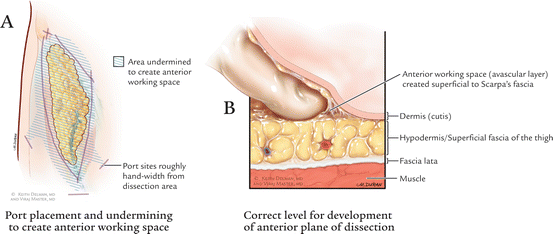

Fig. 6.3
(a) Port placement and undermining to create anterior working space. (b) Correct level for development of anterior plane of dissection
Insuring dissection in the correct plane is the single most crucial aspect of the procedure. In addition to the digital manipulation described above, endoscopic visual cues such as the anterior clear glistening layer of Scarpa’s fascia being part of the dissection aids in the identification of the correct plane of dissection. If one is too thin on the dermis, the delicate tracery of blood vessels easily appreciated through the illumination of the scope, will vanish, and potentially result in skin necrosis. Dissection is initiated using the harmonic scalpel (Ethicon Endosurgery, Cincinnati, OH, USA) or Ligasure Device (Medtronic, Minneapolis, MN, USA). The assistant operates the camera.
Anterior Working Space
Initially, every effort is made to completely develop the anterior working space to the inguinal ligament. The inguinal ligament is usually identified at the end of this dissection as being a transverse structure with white fibers. An Endo-Kittner (Ethicon Endosurgery, Cincinnati, OH, USA) is helpful in verifying identification of the extent of dissection by gently palpating against the firm inguinal ligament.
Medial and Lateral Boundaries
Identification of the adductor longus and sartorius muscles is done by identifying the fascia of the respective muscles and correlating the transillumination to the prior skin markings. Once the dissection is started and the fascia lata is incised, so as to make it easy to ‘roll’ the packet. Inadvertent dissection deep to the fascia lata is apparent when reddish muscular fibers appear. With blunt dissection, the node packet can be rolled inward bilaterally. This maneuver is continued superiorly and inferiorly as much as possible to define the posterior tail of the node packet. Small perforating vessels are observed, more frequently on the lateral (sartorius) side than the medial (adductor) side, and are controlled with the harmonic scalpel. Lymph vessels are also sealed with the harmonic scalpel (Fig. 6.4).
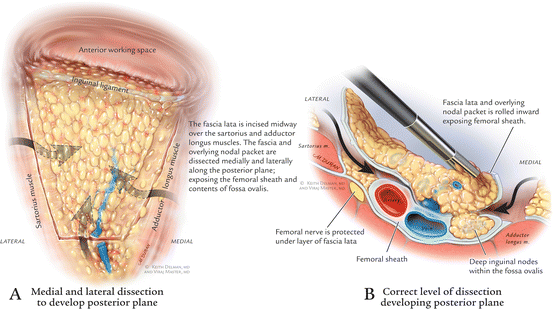

Fig. 6.4
(a) Medial and lateral dissection to develop posterior plane. (b) Correct level of dissection developing posterior plane
Posterior Packet Division and Saphenous Vein Division
Many times, the saphenous vein can be visualized at the apex of the femoral triangle. In cases where it is not visible, the entire posterior packet is dissected from where one could visualize the sartorius and adductor muscles coming together. We routinely divided the saphenous vein with an endovascular stapler (EndoGIA 35-mm stapler, 2.5-mm staples) (Fig. 6.5) and then the harmonic scalpel was used to complete the dissection at the apex of the femoral triangle. It is also technically feasible to dissect and spare this saphenous vein. The packet is then bluntly dissected off the muscles with a rolled gauze sponge. This dissection continues to the fossa ovalis (Fig. 6.6).
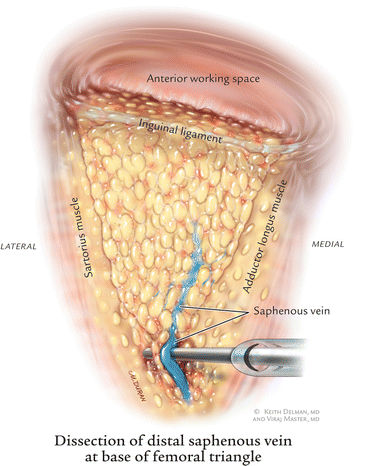
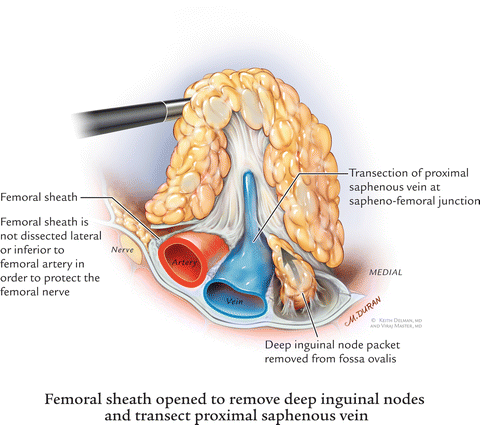

Fig. 6.5
Dissection of distal saphenous vein at the base of femoral triangle

Fig. 6.6
Femoral sheath opened to remove deep inguinal nodes and transect proximal saphenous vein
Fossa Ovalis
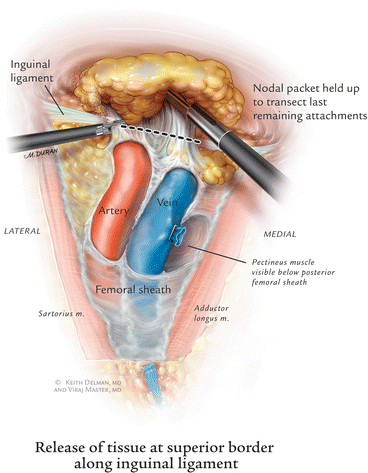
Once the fossa ovalis is encountered, the packet is dissected away at its superolateral and superomedial limits, thereby narrowing the packet and pulling it away from the inguinal ligament. At this point, every effort is made to sight characteristic palpations of the femoral artery by means of visualization and palpation with the Hunter grasper as well as blunt dissection with the Endo-Kittner. Laparoscopic ultrasound may be used when the vessels are very scarred, for example, after invasive cardiology procedures. Dissection is carried out deep to the fascia lata overlying the femoral vessels. Dissection further lateral to the femoral artery risks injury to the femoral nerve, and, given the location of the nodal tissue in the groin, is not indicated.
Saphenofemoral Vein Dissection and Transection
After the anterior surface of th e artery is cleaned off, the use of blunt dissection and small incision with the Harmonic scalpel or Ligasure is made until the inferior edge of the saphenous vein is identified as it entered into the femoral vein (i.e., the saphenofemoral junction). A right-angle dissector and Hunter grasper are used to dissect out the entire saphenofemoral junction. An endovascular stapler is used to transect at this junction. It is important to remember that this insertion is often longer than anticipated and that dissection should proceed meticulously until this is clearly visualized. During the exposure of the saphenofemoral junction, inferomedial dissection around the femoral vein will enable resection of the deep inguinal nodes [8]. This should be continued to the level of the femoral canal and until the pectineus muscle is seen to insure complete nodal retrieval (Fig. 6.7).

