Alcohol swabs
3 cm3 syringe, 10 cm3 syringe
22-gauge spinal needle (for deep lesions)
22 or 23 gauge 2½-inch needle
Glass microscope slides
1 % Xylocaine buffered with bicarbonate spot band-aid
Container filled with 95 % alcohol of formalin
Following completion of a focused breast ultrasound examination, the ultrasonic characteristics of the mass are evaluated and the decision is made to proceed with a fine-needle aspiration biopsy (fnab). The patient is positioned supine on the examining table with the ipsilateral arm raised behind head, similar to the position used for breast examination. Lesions located in the lateral portions of the breast can be made more accessible by moving the patient to a decubitus or modified decubitus position. A folded pillow placed under the patient’s shoulder may also help to displace the breast medially. Pendulous breasts may have to be manually retracted to facilitate insertion of the needle into the breast.
The skin of the breast is painted with a topical antibacterial solution. Non-sterile gel is applied to the breast. The ultrasound transducer is again placed over the area of concern. The transducer is positioned so that the needle can be introduced into the breast in a manner that maximizes the comfort of the patient and the surgeon. Simple rotation of the transducer while it is centered directly over the mass will allow the surgeon to choose which end of the transducer will serve as the reference point for the safe insertion of the needle into the breast. Insertion of a needle into the nipple–areolar complex should be avoided, as this may cause unacceptable pain to the patient. The lesion should be positioned on the monitor so that the entire path of the needle can be visualized at all times when the needle is within the breast. When this imaging has been accomplished, the hand holding the transducer will keep the transducer immobile directly over the mass. The only moving object during the procedure will be the needle approaching the mass under ultrasound guidance. A skin wheal is created with local anesthetic at a location close to the narrow base of the transducer where the needle will be inserted into the breast. Additional local anesthetic can be injected into the breast along the projected path of the needle. The local anesthetic can be visualized as it enters the breast parenchyma. A 23-gauge 2½-inch needle is attached to the syringe and introduced into the breast in alignment with the long axis of the transducer. If the needle is outside of the plane of the narrow 1.5 mm ultrasound beam, the needle will not be visualized. The needle must be kept in view at all times to avoid inadvertent puncture of surrounding vital structures, such as pleura, pectoralis muscle, or breast implants as seen in Fig. 6.1. This type of needle has sufficient length so that it can reach a targeted cyst/mass that is located within 3 cm of the skin surface. Lesions that are deeper than 3 cm will have to be approached with a longer needle. The inner diameter of either needle is large enough to collect adequate cellular material for cytological analysis. When the needle is in alignment with the ultrasound beam, the entry of the needle into the mass is easily visualized/recognized. A pre-aspiration image should be saved electronically for inclusion in the electronic medical record, or alternatively printed for inclusion in a paper chart. If the mass is a cyst filled with fluid, gentle negative pressure applied to the barrel of the syringe will empty the cyst and the mass will no longer be visible because it is no longer present Fig. 6.2. Nontraumatic bloody cyst fluid is sent for cytologic analysis.
However, if gentle pressure does not yield fluid, then an aspirate is obtained for cytology. Gentle negative pressure is then applied to the barrel of the syringe, while the needle is directed into different areas of the solid mass to facilitate collection of an adequate aspirate sample. Prior to withdrawing the needle from the mass, for documentation purposes, another image is obtained then the negative pressure on the barrel of the syringe is released and the needle is withdrawn from the breast. Gentle pressure is applied to the breast while the aspirate is prepared.
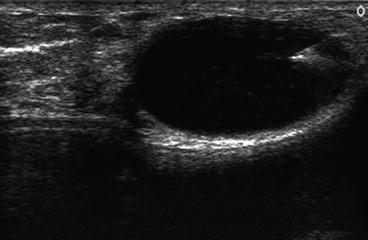
Fig. 6.1
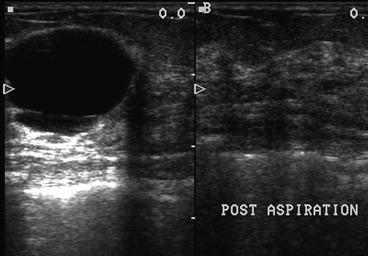
Fig. 6.2
The needle is separated from the syringe and the syringe is filled with air and reattached to the needle. The contents of the needle are then expelled on to a labeled clear glass microscope slide by advancing the plunger of the air-filled syringe while the needle is in close approximation to the slide. A second glass slide is then placed parallel in contact with the aspirate and drawn over the aspirate creating a smear. Both slides are immediately placed into a liquid preservative. The specimens are then sent to the laboratory for cytopathologic analysis. The time required to perform a fine-needle aspiration is usually less than 5 min.
Fine-needle aspiration biopsy can also be used to evaluate clinically suspicious axillary lymph nodes. Pathologic axillary nodes have a characteristic ultrasound appearance with a loss of normal architecture. Fine-needle aspiration of axillary lymph nodes is an office-based procedure that is performed under local anesthesia. Great care must be used in planning a fine-needle aspiration of an axillary mass, exercising care to avoid injury to the surrounding neurovascular structures. The principles for ultrasound guidance are identical to those described for fine-needle aspiration of breast masses.
Core Needle Biopsy
The use of percutaneous needle biopsy has been described for more than 100 years. The first core needle biopsy devices were hand operated and designed for single patient use. The device, rarely used in the twenty-first century, is composed of an inner and outer cannula. A sharp needle tip 2–3 mm in length is at the tip of the inner cannula to facilitate passage through dense breast tissue. The inner notch has a length of 15–20 mm and a diameter of approximately 1.5 mm. This notch serves as a sampling trough, which holds a core of tissue that is separated from the breast mass when the hollow outer cannula is manually advanced over the inner cannula. When the core needle is withdrawn from the breast, the outer cannula is retracted allowing manual retrieval of the cylindrical core of tissue in the sampling trough. The device can then be reinserted into the breast to obtain additional cores of tissue. The size of the core needle biopsy device ranges from 14- to 18-gauge. A 14-gauge core needle yields a cylindrical core of tissue approximately 1.5 mm in diameter. Precise pathological diagnosis can be obtained along with hormone receptor status and DNA analysis. Ultrasound core needle biopsy is applicable to palpable and nonpalpable breast masses.
The inherent variability in the density of breast tissue can create obstacles to the use of a hand-driven core needle biopsy device. Manual advancement of the core needle may be difficult and sometimes impossible, especially when encountering very dense breast tissue, leading to significant pain and patient discomfort. These barriers led to the development of automated devices. A single-use automated spring-loaded device was introduced in the early 1980s that, within a split second, deployed an inner sampling trough into the breast tissue followed immediately by the advancement of an outer cutting cannula, significantly reducing the patient discomfort associated with manual advancement. The efficiency of these devices was first demonstrated in stereotactic core needle breast biopsies. Core needle biopsy devices currently in use include completely disposable units that are spring activated, as well as reusable handheld units that utilize a disposable core needle biopsy holder device.
Core needle breast biopsy is an office-based procedure performed under local anesthesia. The supplies necessary to perform an ultrasound-guided core needle biopsy are listed in Table 6.2. Core needle devices were initially used to biopsy palpable breast masses. The use of ultrasound guidance has converted this “blind procedure” into an extremely accurate diagnostic procedure, as shown in Fig. 6.1, where the hyperechoic ultrasound signature of a biopsy needle can be seen passing through a solid breast mass.
Table 6.2
Supplies for ultrasound-guided biopsy
Alcohol or Betadine swab |
Automated or vacuum-assisted biopsy device |
Sterile aperture drape |
5 cm3 syringe |
27-gauge needle |
18-gauge needle |
#11 scalpel blade |
1 % Xylocaine buffered with local anesthetic |
Specimen container and formalin |
Hemostat |
Sterile gloves |
Sterile gel |
Sterile gauze |
Tape |
Mayo stand |
Positioning of the patient and ultrasound-guided targeting techniques are identical to those described for fine-needle aspiration and biopsy.
However, when using an automated core needle biopsy device, one important concept must be kept in mind at all times: when the core needle biopsy device is activated, the inner core needle will instantly advance 15–22 mm from the prebiopsy position into the postbiopsy position as the biopsy needle passes into or through the targeted lesion. This advancement is known as the “throw” of the device. This throw varies with different devices depending on the manufacturer’s specifications. Targeting of the lesion must therefore consider the structures immediately adjacent to the lesion. In addition, the targeting angle of the device must be kept in mind when considering the approach to the abnormality. The targeting angle is dependent upon the depth of the lesion, as well as the distance of the skin incision from the ultrasound transducer. If the incision is placed in close approximation to the transducer when a deep lesion is targeted, then the targeting angle will be very steep, placing vital structures deep to the lesion at risk for inadvertent puncture due to the throw of the device. This can lead to serious complications if the contiguous structure is the pleural interface, a breast implant, or a large blood vessel. Therefore, the operator must be aware of the throw of the device that is being used. A targeting angle that places the biopsy device parallel or nearly parallel to the long axis of the ultrasound transducer will not only avoid inadvertent puncture of structures deep to the lesion, it will also maximize the hyperechoic signature of the biopsy device during the procedure.
Another option for biopsy of a mass densities in the axilla or for masses that are in close proximity to the pectoralis muscle, or to a mammary implant is to prefire the needle biopsy device so that the sampling trough of the needle is inserted directly into the mass. After verifying the position of the trough, the outer cutting cannula is activated, resulting in a core needle tissue biopsy that does not result in a “throw” of the cutting device past the target. This technique can be useful when performing a biopsy of a solid density in a patient with “nearby” breast implants.
The transducer must be positioned to maximize the view of the targeted lesion. The projected path of the biopsy needle will follow the long axis of the transducer. The orientation of the transducer will determine if the course of the biopsy needle moves from right to left or left to right across the monitor screen. The transducer can be rotated to the position that best visualizes the target and optimizes the location of the 2–3 mm incision that is made to facilitate entry of the biopsy device into the breast. Considerations regarding the cosmesis of the biopsy scar and a future cancer operation should also be kept in mind when selecting the location for the incision.
Stay updated, free articles. Join our Telegram channel

Full access? Get Clinical Tree


