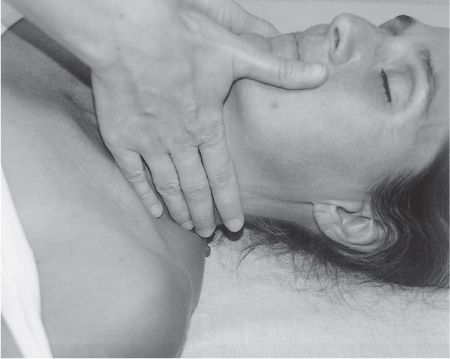
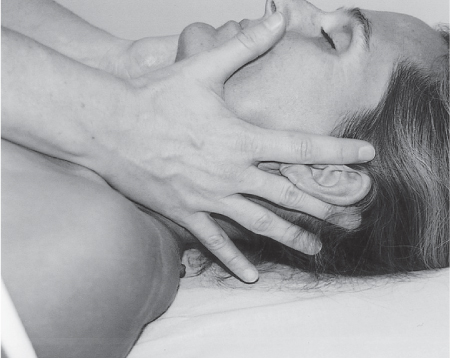
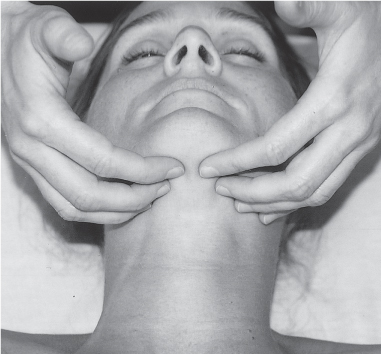
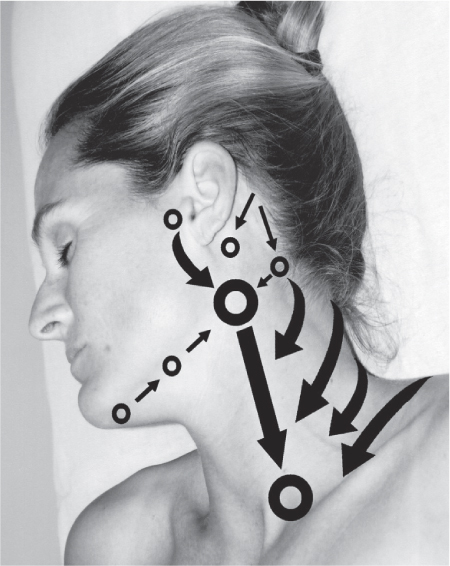
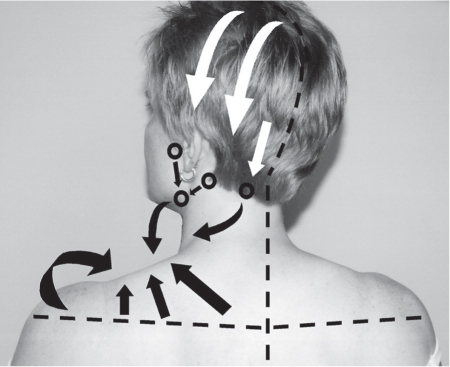
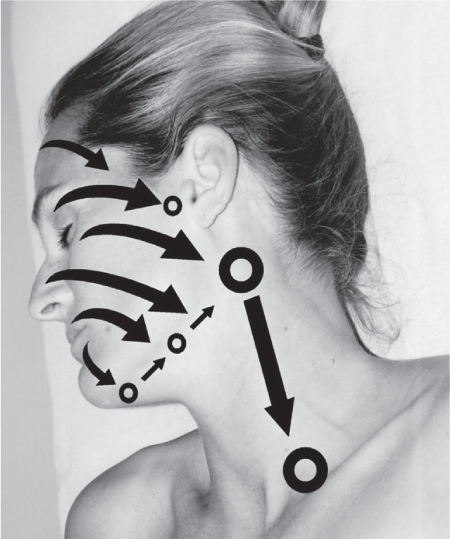
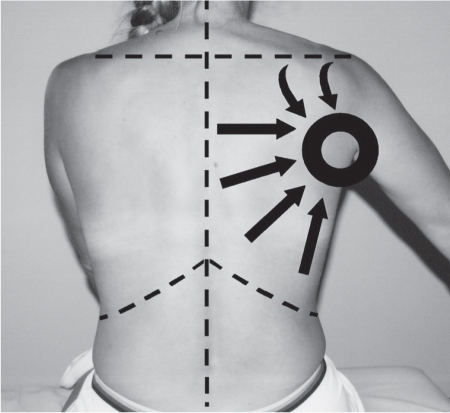
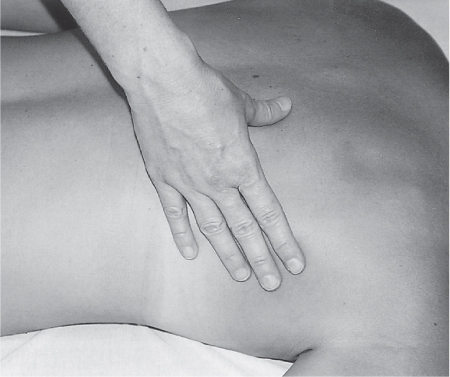
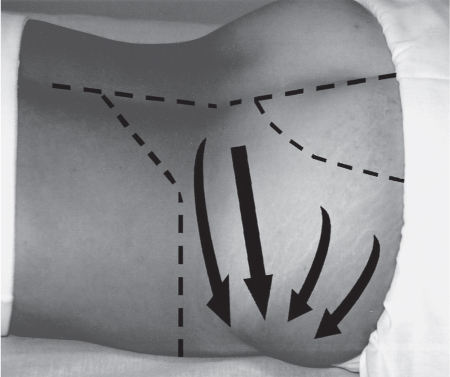
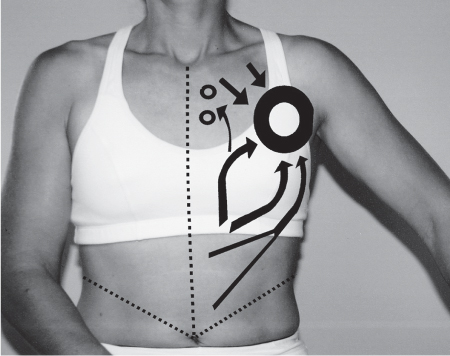
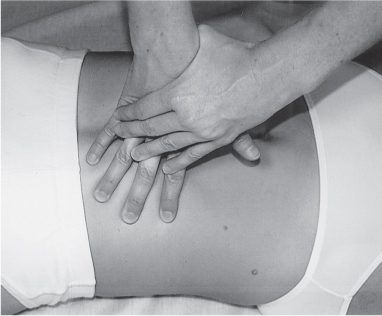
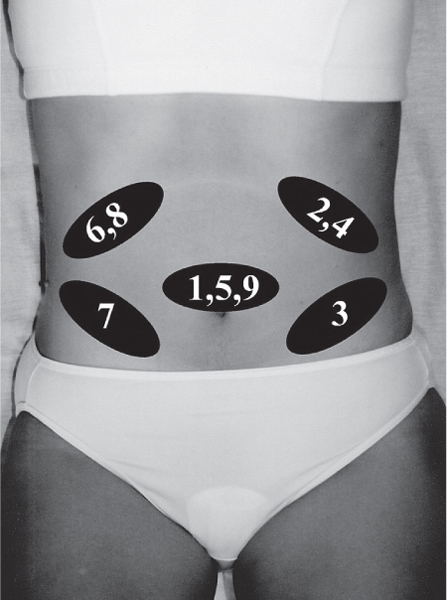
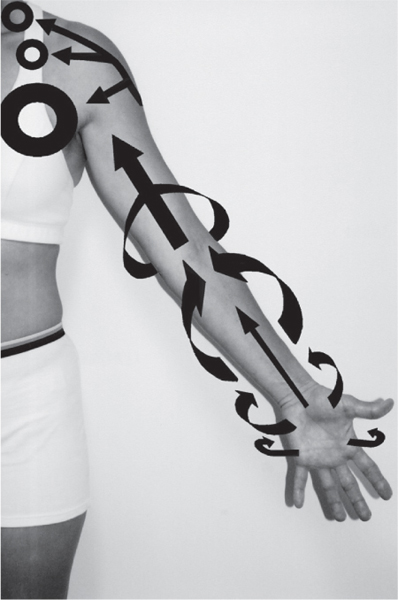
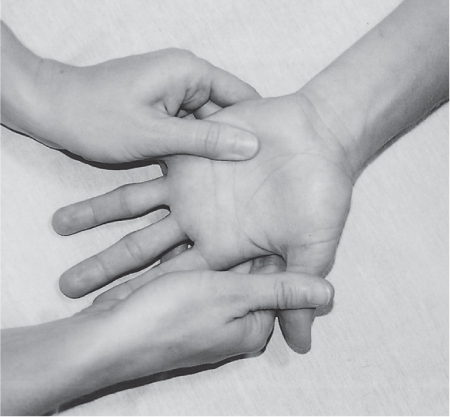
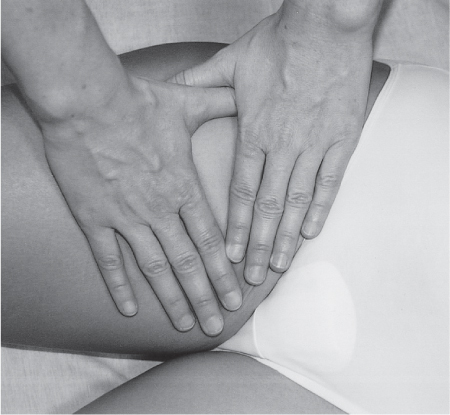
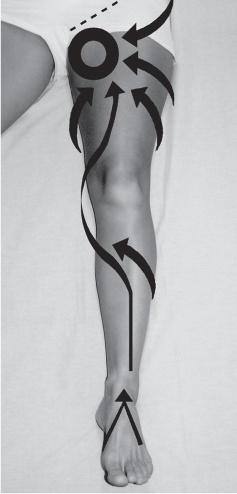
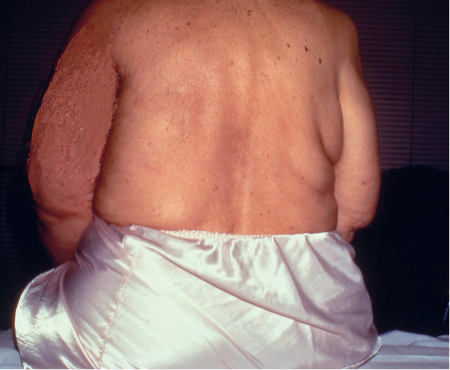
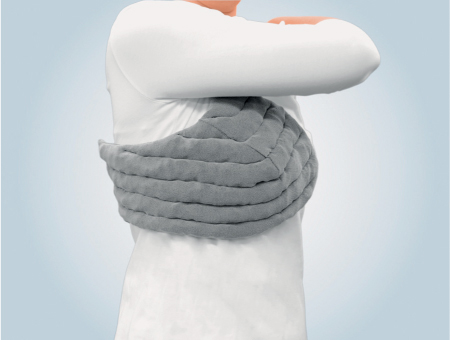
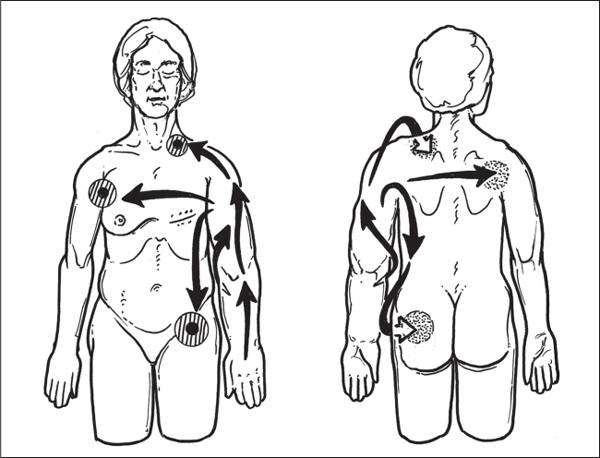
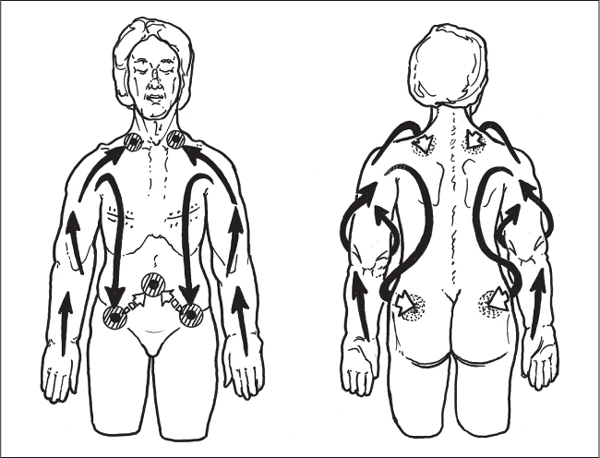
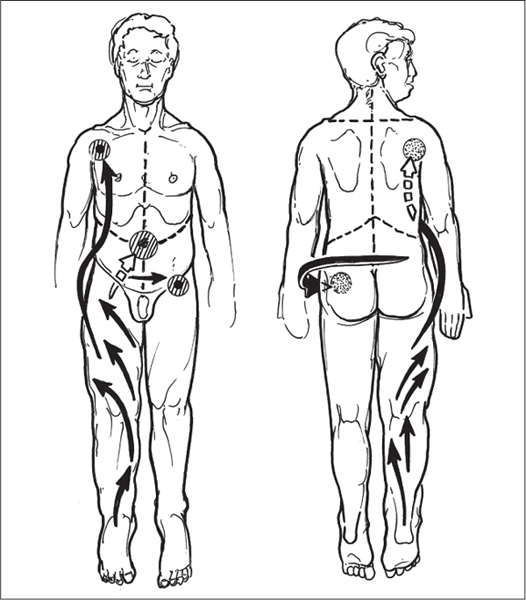
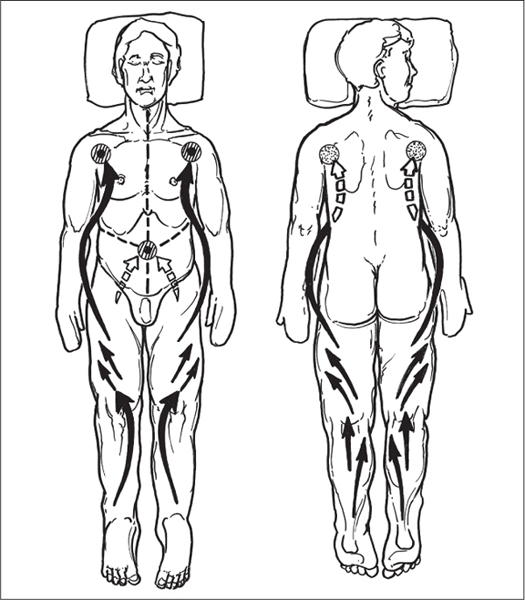
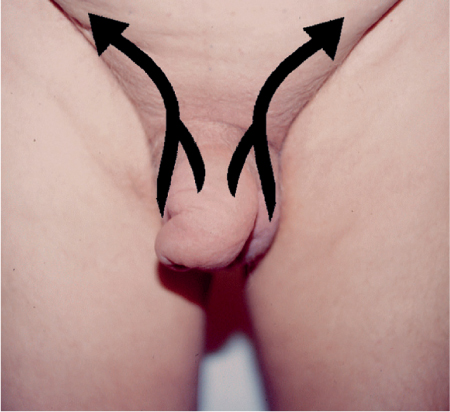
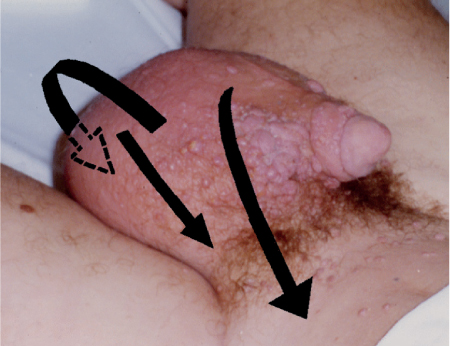
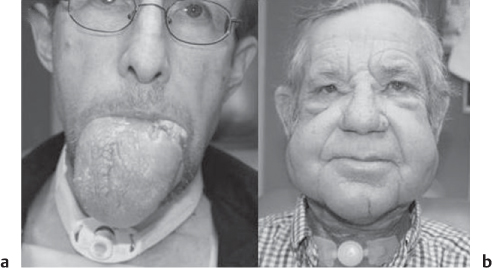
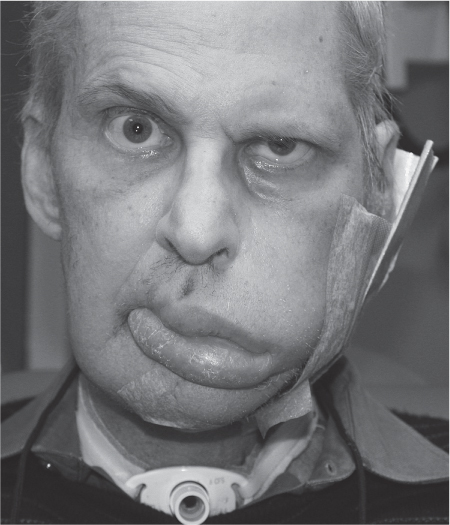
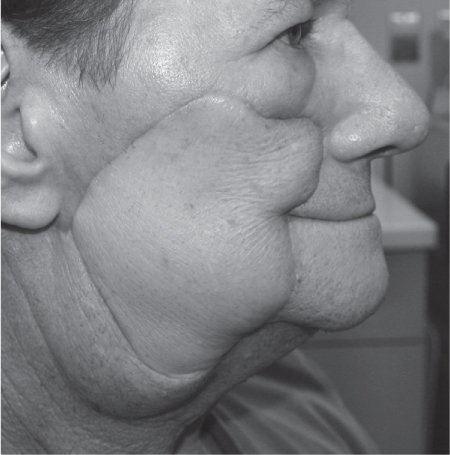
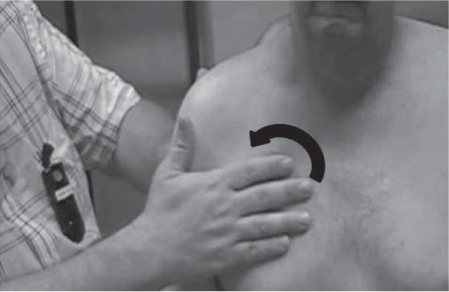
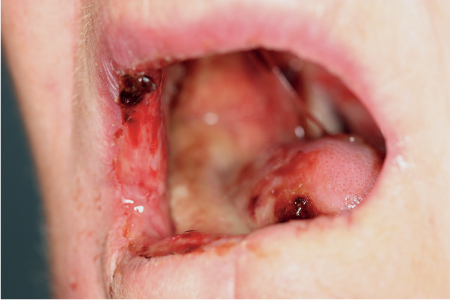
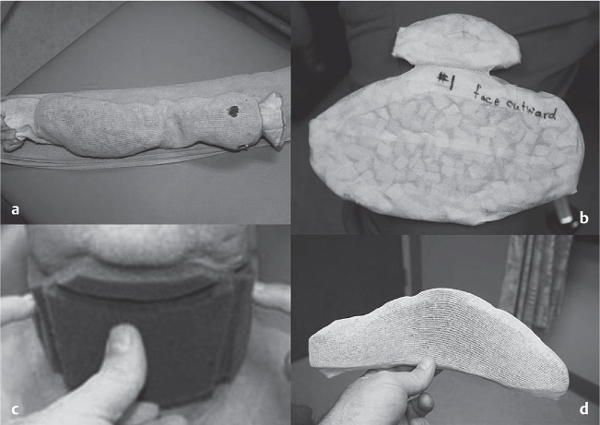
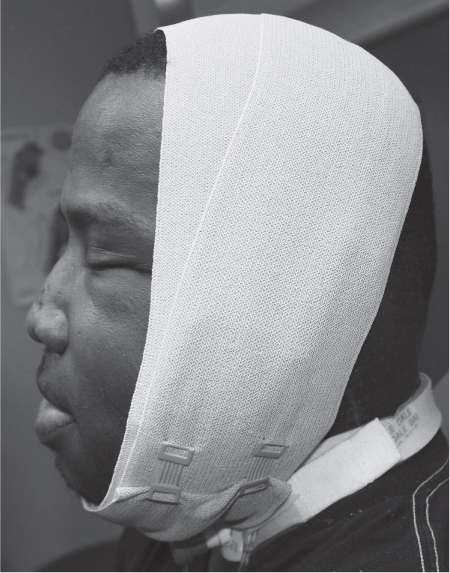
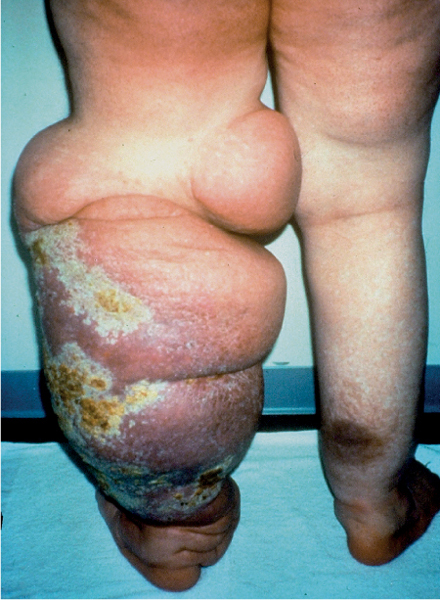
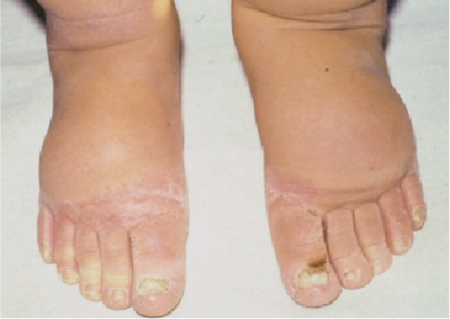
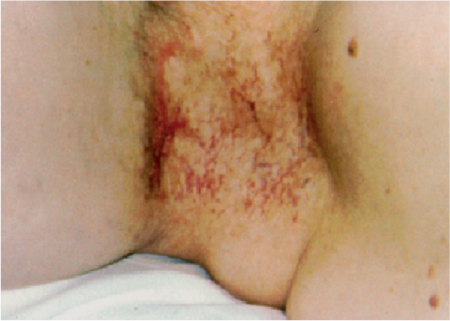
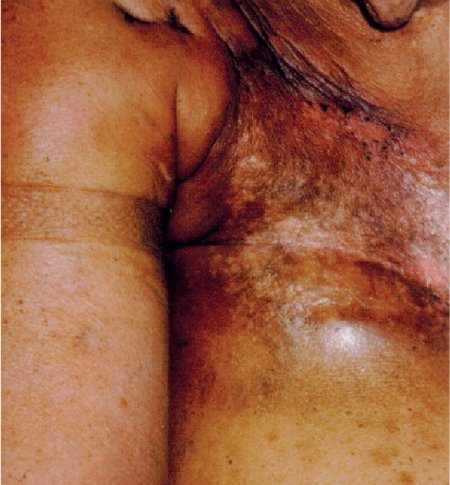
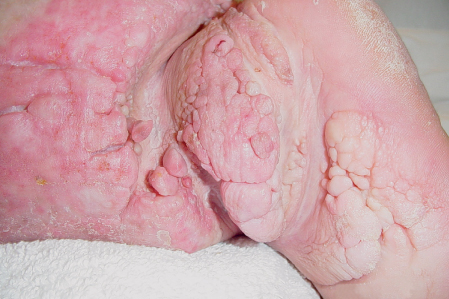
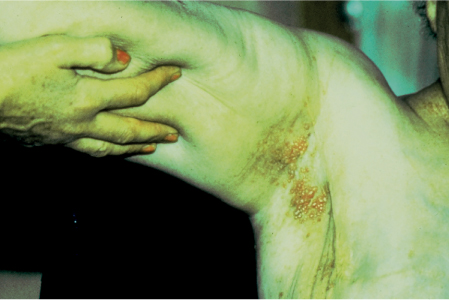
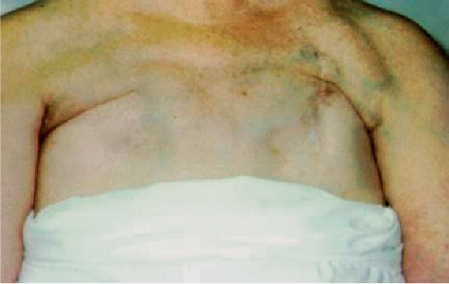
5 Treatment Application of Basic MLD Techniques on Different Parts of the Body Treatment Strategies for Common Complications of Lymphedema CDT Treatment Protocol Variations: Primary and Secondary Lymphedema Adapting CDT to the Palliative Patient Lipedema Treatment: Understanding the Diagnosis and Patient Profile Application of Compression Bandages Bandaging Procedures Using Foam Padding Bandaging in Presence of Wounds Measurements for Compression Garments Compression Bandaging Alternatives: Guidelines to Choosing the Right Home Care Systems Treatment Considerations in Managing the Morbidly Obese Patient The techniques outlined in this chapter should not be substituted for the thorough instructions provided in comprehensive lymphedema management courses offered by qualified training centers. As with many manual techniques, the skills required to deliver adequate intervention using all components of complete decongestive therapy cannot be learned from reading a book, watching videos, or attending weekend classes. A high level of competency and skill is needed to master all components of CDT and to provide patients with a proper degree of intervention. The quality of training will have a great impact on the level of care the patients receive or do not receive. CDT and its components have been practiced safely and effectively in Europe for many decades and became the standard of treatment for lymphedema in the 1970s, when the national health insurance system in Germany started to reimburse for lymphedema treatment. To ensure proper teaching standards, training centers in Germany have to comply with strict guidelines specified by professional organizations in the training and certification of lymphedema instructors as well as therapists. Certain organizations in the United States have acknowledged the need for certification programs in lymphedema management to ensure a base of knowledge considered fundamental in the treatment of lymphedema and related conditions. The four basic techniques of Dr. Vodder’s manual lymph drainage (MLD)—stationary circle, pump, scoop, and rotary—their effects on the lymphatic system, and the contraindications for manual lymph drainage are discussed in Chapter 4. Additional techniques incorporated into MLD sequences are soft and rhythmic strokes known as effleurage. This method is adopted from more traditional massage techniques and is used to stimulate local sympathetic activity and to promote directional flow of lymph. The techniques and sequences outlined in the following sections are applied in conditions where edema is present, but the lymph nodes are not removed or treated with irradiation. Examples include post-traumatic and postoperative swelling, lower extremity edema caused by pregnancy, swellings caused by partial or complete loss of mobility (pareses, paralysis), reflex sympathetic dystrophy (when swelling is present), migraine headache (swelling is present in the perivascular areas of intracranial blood vessels), cyclic idiopathic edema, and rheumatoid arthritis. Selected indications are cited in the appropriate sections. Basic treatment sequences may also be used to accomplish a general increase in lymph circulation or to achieve a common soothing effect by decreasing sympathetic activity. In the treatment of lymphedema, these techniques are used to improve lymph production and lymph angiomotoricity, as well as to promote the lymphatic return from the drainage areas described in Chapter 4 (Intensive Phase) to the venous system. In the lymphedematous extremity and/or body part, the treatment sequences are modified accordingly, as outlined later in this chapter. Common denominators to all techniques and sequences are the following: • The hand positions of all basic strokes are adapted to the anatomy and physiology of the lymphatic system. • Central pretreatment: the areas closest to the venous angles and regional groups of lymph nodes are stimulated first. This allows for drainage of the peripheral areas. At extremities, the stimulation begins proximal and is continued toward distal, in accordance with the direction of the lymph drainage. • Stroke intensity: the applied pressure in individual strokes should be enough to utilize full elasticity of the skin and subcutaneous tissues, and to promote lymph formation and lymph angiomotoricity. Too much pressure may cause unwanted vasodilation and lymphangiospasm. • Stroke sequence: each technique consists of a working and resting phase, during which the manual pressure increases and decreases gradually. The goal in the working phase is to promote lymph formation, lymph angiomotoricity, and directional flow by stretching the anchoring filaments and smooth musculature located in the wall of lymph angions. The suction effect created in the resting phase results in a refilling of lymph collectors with lymph fluid from more distal areas. • Stroke duration: the relatively high viscosity of lymph fluid requires the working phase to last ~1 second. To ensure adequate reaction of the lymph collectors to the manual stimuli, the strokes should be repeated 5 to 7 times in one area. • Working direction of the strokes: the direction of the strokes depends on the anatomical actualities and generally follows the physiological patterns of lymphatic drainage. If surgery, radiation, or trauma results in an interruption of regular drainage pathways, it will become necessary to redirect the lymph flow around the blocked areas and toward regions with sufficient lymph flow patterns. Selected indications: pretreatment for other drainage areas*; postsurgical (oral, dental, plastic surgery, etc.) and post-traumatic swellings (whiplash injury, others); migraine headache; partial treatment for primary head and neck lymphedema; general increase in lymph circulation, or to achieve a common soothing effect by decreasing sympathetic activity. * An abbreviated sequence is used if the lateral neck serves as a pretreatment for other drainage areas. This shorter sequence consists of the first three techniques used in the complete sequence (see following page). Patient in supine position, therapist on the patient’s side: 1. Effleurage, 2 or 3 times from the sternum to the acromion 2. Manipulation of the inferior cervical lymph nodes Stationary circles in the supraclavicular fossa (horizontal plane) 3. Manipulation of the deep lateral cervical lymph nodes (Fig. 5.1) Stationary circles from the earlobe to the supraclavicular fossa in two hand placements, if necessary (sagittal plane) 4. Manipulation of the parotid and retroauricular lymph nodes (Fig. 5.2) Stationary circles with fingers in front of and behind the ear, followed by reworking the deep lateral cervical lymph nodes as in step 3 (both placements in sagittal plane) Patient in supine position, therapist at the head-end of the patient: 5. Manipulation of submandibular lymph nodes (Fig. 5.3) Stationary circles with distal phalanges (2–5) from the tip of the chin in the direction of the angle of the jaw (superior cervical lymph nodes). Two hand placements if necessary (phalanges in horizontal plane). This technique is followed by reworking the deep lateral cervical lymph nodes as in step 3. Patient in supine position, therapist on the patient’s side: 6. Manipulation of the shoulder collectors Stationary circles in 2 hand placements, which should cover the area located cranial to the anterior and posterior upper horizontal watershed. First hand placement on the acromion, second hand placement on the medial shoulder (both placements in horizontal plane). 7. Effleurage (as in step 1) Review Fig. 5.4 for drainage areas on the lateral neck. 1. Effleurage, 2 or 3 times from the sternum to the acromion 2. Manipulation of the inferior cervical lymph nodes Stationary circles in the supraclavicular fossa (horizontal plane) 3. Manipulation of the deep lateral cervical lymph nodes (Fig. 5.1) Stationary circles from the earlobe to the supraclavicular fossa in 2 hand placements, if necessary (sagittal plane) Selected indications: postsurgical (oral, dental, plastic surgery, etc.) and post-traumatic swellings (whiplash injury, others); migraine headache; partial treatment for primary head and neck lymphedema; general increase in lymph circulation, or to achieve a common soothing effect by decreasing sympathetic activity (Fig. 5.5) Pretreatment: lateral neck Patient in prone position, therapist at the head-end of the patient: 1. Effleurage, 2 or 3 three times starting at the back of the head and following the descending trapezius muscle to the acromion 2. Manipulation of the deep lateral cervical lymph nodes Stationary circles starting at the angle of the jaw in the direction of the supraclavicular fossa (sagittal plane). Two hand placements if necessary. 3. Manipulation of the occipital and parietal region Alternating stationary circles in several tracks, starting on the posterior head toward the parietal area (frontal plane). Working phase in the direction of the occipital and retroauricular lymph nodes. 4. Manipulation of the parotid and retroauricular lymph nodes Stationary circles with fingers in front of and behind the ear, followed by reworking the deep lateral cervical lymph nodes as in step 2 (both placements in sagittal plane) 5. Manipulation of the shoulder collectors Alternating pump techniques on both shoulders, starting at the acromion, following the upper trapezius muscle in the direction of the supraclavicular fossa Both hands in horizontal plane 6. Manipulation of the inferior cervical lymph nodes Bimanual thumb circles in the supraclavicular fossa (horizontal plane) Patient in prone position, therapist on the patient’s side: 7. Manipulation of the paravertebral lymph nodes and vessels Stationary circles paravertebrally with the finger pads (working deep) 8. Effleurage (as in step 1) Selected indications: postsurgical (oral, dental, plastic surgery, etc.) and post-traumatic swellings (whiplash injury, etc.); migraine headache; partial treatment for primary head and neck lymphedema; general increase in lymph circulation, or to achieve a common soothing effect by decreasing sympathetic activity (Fig. 5.6) Pretreatment: lateral neck (posterior neck if necessary) Patient in supine position, therapist at the head-end of the patient: 1. Effleurage, 2 or 3 times along lower jaw, upper jaw, the cheek, and the forehead in the direction of the angle of the jaw (following the pathway of the collectors) 2. Manipulation of the submental and submandibular lymph nodes (Fig. 5.3) Stationary circles with distal phalanges (2–5) from the tip of the chin in the direction of the angle of the jaw (superior cervical lymph nodes). Two hand placements if necessary (phalanges in horizontal plane). This technique is followed by stationary circles along the deep lateral cervical lymph nodes (sagittal plane). 3. Manipulation of the lower and upper jaw Alternating stationary circles working toward the submandibular lymph nodes. This technique is followed by stationary circles in the direction of the angle of the jaw and the supraclavicular fossa as described in step 2. 4. Manipulation of the lymph vessels in the area of the bridge of the nose and cheek Alternating stationary circles starting at the bridge of the nose, to include the lower eyelid, toward the cheeks. This technique is followed by the technique described in step 2, with the purpose of manipulating the lymph fluid toward the supraclavicular fossa. 5. Manipulation of the upper eyelid and eyebrows Alternating stationary circles (one or more fingers) in the direction of the preauricular lymph nodes (option: eyebrow roll) 6. Manipulation of the forehead and temporal area Stationary circles starting at the middle of the forehead, traveling to the temple with the working phase directed toward the preauricular lymph nodes 7. Manipulation of the parotid and retroauricular lymph nodes Stationary circles with fingers in front of and behind the ear, followed by stationary circles along the deep lateral cervical lymph nodes (sagittal plane) 8. Effleurage (as in step 1) The treatment area is outlined by the lower horizontal watershed (caudal limitation), the upper horizontal watershed (cranial limitation), and the sagittal watershed (medial limitation) (Fig. 5.7). Selected indications: Pretreatment for unilateral secondary upper extremity lymphedema (this sequence is applied on the healthy quadrant); postsurgical and post-traumatic swellings; general increase in lymph circulation, or to achieve a common soothing effect by decreasing sympathetic activity Pretreatment: lateral neck (abbreviated; see lateral neck sequence, steps 1–3) Patient in prone position, therapist contralateral to the healthy quadrant: 1. Manipulation of the axillary lymph nodes Stationary circles bimanually with flat hands between the latissimus dorsi and pectoral muscles (sagittal plane), with the working direction toward the apex of the axilla (subclavian trunk) 2. Effleurage, 2 or 3 times in several pathways, starting at the posterior sagittal watershed in the direction of the axillary lymph nodes (following the pathway of the collectors) 3. Manipulation of the lateral thorax Stationary circles alternating and dynamic from the horizontal watershed toward the axillary lymph nodes (sagittal plane). This sequence follows the thoracic portion of the inguinal axillary (IA) anastomosis. 4. Manipulation of the posterior thorax (Fig. 5.8) Rotary techniques in several tracks starting at the sagittal watershed in the direction of the axillary lymph nodes (following the pathway of the collectors). This technique should cover the entire treatment area as outlined previously (Fig. 5.7). 5. Manipulation of the posterior and lateral thorax Combination of alternating rotary techniques (upper and lower hands) starting at the sagittal watershed (lower hand is parallel to and just above the lower horizontal watershed). The rotary techniques travel alternating toward the lateral direction until the thoracic portion of the IA anastomosis is reached. Dynamic stationary circles follow this technique as outlined in step 3. 6. Manipulation of the posterior axillo-axillary (PAA) anastomosis Bimanual stationary circles, with the working phase directed toward the axillary lymph nodes. The hands are aligned parallel with the sagittal watershed (frontal plane). 7. Manipulation of the paravertebral lymph nodes and vessels (if necessary) Stationary circles paravertebrally with the finger pads (working deep) 8. Manipulation of intercostal lymph vessels Stationary circles, with the finger pads working from lateral placements to medial placements, using wavelike movements, with pressure working deep (perforating precollectors) 9. Effleurage (as in step 1) The treatment area is outlined by the lower horizontal watershed (cranial limitation), the horizontal gluteal fold (caudal limitation), and the sagittal watershed (medial limitation) (Fig. 5.9). Selected indications: Pretreatment for unilateral secondary and primary lower extremity lymphedema (this sequence is applied on the healthy quadrant); phlebolymphostatic edema; lipedema and lipolymphedema; postsurgical and post-traumatic swellings; general increase in lymph circulation, or to achieve a common soothing effect by decreasing sympathetic activity Pretreatment: lateral neck (abbreviated; see lateral neck sequence, steps 1–3), abdomen, inguinal lymph nodes Patient in prone position, therapist contralateral to the healthy quadrant: 1. Effleurage, 2 or 3 times in several pathways, starting at the posterior sagittal watershed toward the inguinal lymph nodes (remaining in the lumbar quadrant) 2. Manipulation of the lumbar area Alternating rotary techniques from the sagittal watershed toward the hip (ASIS). The upper hand is parallel to and just below the lower horizontal watershed; the lower hand follows the collectors of the posterior interinguinal (PII) anastomosis. 3. Manipulation of the PII anastomosis Bimanual stationary circles simultaneously on the PII anastomosis, with working direction toward the inguinal lymph nodes. Both hands are parallel to the sagittal watershed (frontal plane). 4. Manipulation of the paravertebral lymph nodes and vessels (if necessary) Stationary circles paravertebrally with the finger pads (working deep) 5. Effleurage (as in step 1) The treatment area is outlined by the lower horizontal watershed (caudal limitation), the upper horizontal watershed (cranial limitation), and the sagittal watershed (medial limitation) (Fig. 5.10). Selected indications: Pretreatment for unilateral secondary and primary upper extremity lymphedema (this sequence is applied on the healthy quadrant); postsurgical and post-traumatic swellings; general increase in lymph circulation, or to achieve a common soothing effect by decreasing sympathetic activity Pretreatment: lateral neck (abbreviated; see lateral neck sequence, steps 1–3) Patient in supine position, therapist contralateral to the healthy quadrant: 1. Manipulation of the axillary lymph nodes Bimanual stationary circles, with flat hands between the latissimus dorsi and pectoral muscles (sagittal plane), with the working direction toward the apex of the axilla (subclavian trunk) 2. Effleurage, 2 or 3 times in several pathways (following the collectors), starting at the anterior sagittal watershed in the direction of the axillary lymph nodes (not over the nipple) 3. Manipulation of the lymph vessels in the healthy mammary gland This technique is performed with a combination of alternating and dynamic pump and rotary techniques. The lower hand starts with dynamic pump techniques in three placements in the direction of the axillary lymph nodes: the first placement is on the mammary fold, the second placement in the glandular tissue, and the third placement below the nipple. The upper hand uses rotary techniques starting at the anterior sagittal watershed, following a line below the upper horizontal watershed in 3 hand placements toward the axillary lymph nodes. 4. Manipulation of the lateral thorax Dynamic and alternating stationary circles from the lower horizontal watershed toward the axillary lymph nodes (sagittal plane). This sequence follows the thoracic portion of the IA anastomosis. 5. Manipulation of the anterior and lateral thorax Combination of alternating rotary techniques (upper and lower hands) starting at the anterior sagittal watershed (lower hand is parallel to and just above the lower horizontal watershed). The rotary techniques travel alternating in the lateral direction until the thoracic portion of the IA anastomosis is reached. The technique is then followed by dynamic stationary circles, which follow the IA anastomosis toward the axillary lymph nodes (as outlined in step 4). 6. Manipulation of the anterior axillo-axillary (AAA) anastomosis Bimanual stationary circles, with the working phase directed toward the axillary lymph nodes. The hands are aligned parallel with the anterior sagittal watershed (frontal plane). 7. Manipulation of the parasternal lymph nodes and vessels (if necessary) Stationary circles parasternally with finger pads (working deep) 8. Manipulation of intercostal lymph vessels (Fig. 5.11) Stationary circles with 3 or 4 finger pads working from lateral placements to medial placements, using wavelike movements with pressure working deep (perforating precollectors) 9. Effleurage (as in step 2) Refer to the list of local contraindications for the abdominal area in Chapter 4, Contraindications for Manual Lymph Drainage. Abdominal techniques should not be applied if they cause pain or discomfort, or directly following meals. Patients should empty their bladder before treatment starts. Abdominal sequences can be separated into superficial and deep techniques. The skillful manipulation of the intra-abdominal areas, especially when combined with diaphragmatic breathing, results in increased lymph transport within the thoracic duct and larger lymphatic trunks. A decongestive effect on organ structures located within the abdominal and pelvic cavities, as well as on lymphatic drainage areas located more distally (the lower extremities), is additionally realized when performing abdominal techniques. Selected indications: part of the treatment sequence for lower extremity lymphedema (primary and secondary) as well as lymphedema involving the external genitalia; chronic venous insufficiency stages II and III (phlebo-lymphostatic edema); lipedema and lipolymphedema; part of the treatment sequence for primary lymphedema of the genitalia; part of the treatment sequence for upper extremity lymphedema (particularly with removal or irradiation of both axillary lymph node groups); part of the treatment for cyclic idiopathic edema; general increase in lymph circulation Pretreatment: lateral neck (abbreviated; see lateral neck sequence, steps 1–3) Patient in supine position, with the legs and the head elevated and the arms resting on the patient’s side; therapist on patient’s right side (next to pelvis): 1. Effleurage Two or three times starting at the pubic bone, following the rectus abdominis muscle to the xiphoid process, then along the thoracic cage and the iliac crest back to the pubic bone Two or three times following the ascending, transverse, and descending part of the colon 2. Manipulation of the colon Descending colon: The right hand is placed on the descending colon, with the fingertips on the thoracic cage and the fingers pointing up toward the midclavicular point. This is a two-handed technique; the bottom hand (right hand) is in contact with the skin and remains passive; pressure is applied with the left hand, which rests on top of the right hand. Working phase: Moderate (but soft) pressure is applied down into the abdomen (deep), then along and in the direction of the descending colon (caudal), ending in a partial supination directed toward the cisterna chyli. The hand relaxes in the resting phase, and the tissue elasticity carries the hand back to the starting position. This sequence is repeated 2 or 3 times. Ascending colon: The therapist is on the patient’s right side (next to the thorax, facing the direction of the patient’s feet). The right hand is placed on the ascending colon, with the fingertips near the inguinal ligament and the fingers pointing downward toward the pubic bone. The right hand, which is in contact with the skin, remains passive; pressure is applied with the left hand, which rests on top of the right hand. Working phase: Moderate (but soft) pressure is applied down into the abdomen (deep), then along and in the direction of the ascending colon (cranial), ending in a partial supination directed toward the cisterna chyli. The hand relaxes in the resting phase, and the tissue elasticity carries the hand back to the beginning position. This sequence is repeated 2 or 3 times. 3. Effleurage (as in step 1) With this technique, the caudal part of the thoracic duct, the cisterna chyli, the larger lymphatic trunks, the pelvic and lumbar lymph nodes, and the organ structures with their lymphatic system are stimulated. Deep abdominal sequences are applied on 5 different hand placements on the abdominal area and are combined with the patient’s diaphragmatic breathing (Fig. 5.12). To avoid hyperventilation, the therapist performs only one sequence per placement. Ideally, the placements on the thoracic cage and in the center of the abdomen are repeated during the full sequence, resulting in a total of 9 manipulations (depending on the patient’s reaction). During each manipulation, the therapist’s hand follows the patient’s exhalation into the abdominal area and offers moderate (but soft) resistance to the initial subsequent inhalation phase. The therapist then releases the resistance and stays in skin contact until the end of the inhalation phase. The hand is moved to the next placement on the abdomen during the pause between inhalation and the next exhalation phase. To avoid discomfort, the hand, which is in contact with the patient’s skin, remains soft and passive. Pressure is applied with the top hand, which rests on top of the working hand. Pretreatment: lateral neck (abbreviated; see lateral neck sequence, steps 1–3) 1. Center of the abdomen, over the umbilicus (this placement should be avoided if a pulsating aorta is felt with the soft and passive hand) 2. Below and parallel with the thoracic cage on the contralateral side 3. Above and parallel with the inguinal ligament on the contralateral side 4. Repeat step 2 5. Repeat step 1 6. Below and parallel with the thoracic cage on the ipsilateral side 7. Above and parallel with the inguinal ligament on the ipsilateral side 8. Repeat step 6 9. Repeat step 1 Selected indications: postsurgical and post-traumatic swellings (including edema caused by immobility due to partial or complete paralysis); reflex sympathetic dystrophy; rheumatoid arthritis; lipedema; general increase in lymph circulation, or to achieve a common soothing effect by decreasing sympathetic activity Pretreatment: lateral neck (abbreviated; see lateral neck sequence, steps 1–3 and 6 shoulder collectors) Patient in supine position; therapist on the patient’s side ipsilateral to the involved quadrant (in sequence 1–3, the therapist stands next to the patient’s head): 1. Manipulation of the axillary lymph nodes Stationary circles on the axillary lymph nodes in 2 hand placements; the hand closer to the patient’s head is working, the other hand holds the arm in proper elevated position 2. Effleurage, 2 or 3 times covering the entire arm 3. Manipulation of the medial aspect of the upper arm Stationary circles with the hand closer to the patient’s head, beginning on the medial epicondyle. Several hand placements are applied to cover the medial upper arm, with the working phase direction toward the axillary lymph nodes. The other hand holds the patient’s arm in a comfortable and elevated position. 4. Manipulation of the tissues covering the anterior and posterior portion of the deltoid muscle Stationary circles bimanually and alternating on the anterior and posterior portion of the deltoid muscle; the working phase is directed toward the axillary lymph nodes Note: In the treatment of upper extremity lymphedema, the working phase of this sequence is directed toward the AAA and PAA anastomoses (Fig. 5.13) 5. Manipulation of the lateral aspect of the upper arm Pump technique, with the hand closer to the patient’s head on the lateral upper arm in several placements from the lateral epicondyle toward the acromion. The other hand holds the patient’s arm in a comfortable and elevated position. Combination of pump technique and stationary circle (alternating hands) on the lateral aspect of the upper arm, beginning at the lateral epicondyle in several hand placements toward the olecranon 6. Manipulation of the antecubital fossa Thumb circles (one hand or alternating) covering the antecubital fossa from ~5 cm below to ~5 cm above. Several pathways are applied to cover the antecubital fossa from distal to proximal. This area can also be treated using stationary circles with the palmar surfaces of the fingers. 7. Manipulation of the forearm Scoop techniques with one hand on the anterior and posterior aspect of the forearm between the wrist and the elbow. To manipulate both aspects with the same hand, the patient’s forearm is rotated in pronation and supination, respectively. The other hand holds the patient’s arm at the wrist in a comfortable and elevated position. Combination of pump technique and stationary circles between the wrist and the elbow to cover the patient’s anterior and posterior aspects of the forearm. The patient’s forearm is rotated in pronation and supination, respectively, to cover both surfaces. 8. Manipulation of the dorsum of the hand and wrist Thumb circles (one thumb or alternating) over dorsum of the hand and posterior wrist, starting on the metacarpophalangeal (MP) joints, ending at the styloid processes 9. Manipulation of the palmar aspect of the hand and the anterior wrist (Fig. 5.14) Thumb circles (one thumb or alternating) in the palm, following the ulnar and radial bundle from the center of the palm toward the ulnar and radial edges of the hand (following the path of the collectors) 10. Manipulation of the fingers Combination of thumb/finger circles on each individual finger from the distal to the proximal ends 11. Rework Appropriate techniques are used (depending on the patient’s condition) covering specific parts of the limb or the entire extremity to increase lymph angiomotoricity 12. Final effleurage (as in 2) Selected indications: postsurgical (joint replacement, etc.) and post-traumatic swellings (including edema caused by immobility due to partial or complete paralysis); chronic venous insufficiency stages II and III (phlebo-lymphostatic edema); lipedema; part of the treatment sequence for primary lymphedema of the genitalia; part of the treatment for cyclic idiopathic edema; general increase in lymph circulation, or to achieve a common soothing effect by decreasing sympathetic activity Pretreatment: lateral neck (abbreviated; see lateral neck sequence, steps 1–3), abdomen Patient in supine position, with the leg slightly abducted and externally rotated; therapist on the patient’s involved side: 1. Manipulation of the inguinal lymph nodes Stationary circles with both hands at the same time, with the working phase directed toward the inguinal ligament; 3 hand placements in the medial femoral triangle (Fig. 5.15) First hand placement: the upper hand lies parallel to the inguinal ligament (the fifth metacarpophalangeal joint is aligned with the patient’s ASIS), the lower hand is positioned diagonally to the upper hand (with the fingertips touching the inguinal ligament) Second hand placement: the same hand positions are applied on the medial thigh (medial aspect of the femoral triangle) Third hand placement: both hands lie parallel on the medial aspect of the thigh (sagittal plane) to address the lymph nodes located in the distal apex of the medial femoral triangle 2. Effleurage, 2 or 3 times covering the entire leg 3. Manipulation of the anterior thigh Alternating pump techniques following the rectus femoris muscle between the base of the patella and the ASIS 4. Manipulation of the anterior and lateral thigh Combinations of pump techniques and stationary circles with alternating hands, beginning at the knee to proximal. The lateral pathway follows the iliotibial tract; the anterior pathway follows the rectus femoris muscle. 5. Manipulation of the medial thigh Stationary circles alternating and dynamic at the medial thigh, beginning at the medial aspect of the knee to the groin (sagittal plane) 6. Manipulation of the knee Pump technique in several hand placements (3 or 4) covering the anterior knee Stationary circles (dynamic and simultaneously) on the medial and lateral knee, covering the knee from distal to proximal Stationary circles in several hand placements covering the popliteal fossa from distal to proximal Stationary circles (bimanual and simultaneous) below the medial aspect of knee (“bottleneck” area) 7. Manipulation of the lower leg Scoop technique alternating at the calf between the malleoli and the popliteal fossa (patient’s knee is flexed). Either hand can be used by the therapist. Pump technique on the anterior aspect of the lower leg, scoop technique on the calf (alternating and dynamic), between the malleoli and the knee 8. Manipulation on the foot Stationary circles (simultaneous and dynamic) between the malleoli and the Achilles tendon in several hand placements Thumb circles (1 thumb or alternating) covering the dorsum of the foot and the ankle. Thumb circles may start on the toes or the metatarsophalangeal (MTP) joints. 9. Rework Appropriate techniques are used (depending on the patient’s condition), covering specific parts of the limb, or the entire extremity to increase lymph angiomotoricity 10. Final effleurage (as in step 2) The treatment of the posterior leg with the patient in the prone position is recommended in those cases where the decongestion of the limb does not advance as expected (“stubborn legs”) with the treatment in supine, or if the swelling is more distally emphasized (e.g., larger swelling on the lower leg). The techniques on the posterior leg are similar to the sequences for the anterior leg (Figs. 5.16 and 5.17). Manipulation of the inguinal lymph nodes in the supine position precedes the treatment of the posterior leg (Fig. 5.15). Patient in prone position, with the leg slightly abducted; therapist on the patient’s same side: 1. Effleurage, 2 or 3 times covering the entire leg 2. Manipulation of the posterior thigh Alternating pump techniques between the popliteal fossa and the horizontal gluteal fold (frontal plane) 3. Manipulation of the medial thigh Stationary circles alternating and dynamic at the medial thigh, beginning at the medial aspect of the knee to the groin (sagittal plane) 4. Manipulation of the posterior and lateral thigh Combinations of pump techniques and stationary circles with alternating hands, beginning at the popliteal fossa to proximal. The lateral pathway follows the iliotibial tract; the posterior pathway follows the posterior thigh musculature in a frontal plane. 5. Manipulation of the knee Stationary circles or pump techniques covering the popliteal fossa from distal to proximal (3 or 4 hand placements) Stationary circles (bimanual and simultaneous) below the medial aspect of knee (“bottleneck” area) 6. Manipulation of the lower leg Alternating pump techniques in several hand placements covering the calf musculature between the heel and the popliteal fossa Combination of pump techniques and stationary circles covering the calf musculature between the heel and the popliteal fossa in several hand placements Thumb circles (1 thumb or alternating) between the malleoli and the Achilles tendon. To include joint and muscle pump functions, this technique can be combined with passive ankle movements. 7. Rework Appropriate techniques are used (depending on the patient’s condition) covering specific parts of the limb, or the entire extremity to increase lymph angiomotoricity 8. Final effleurage (as in step 1) In the treatment of lymphedema, in particular in those cases where lymph node groups are removed and/or irradiated, some of the sequences outlined above in Application of Basic MLD Techniques on Different Parts of the Body, are modified. These modifications are noted in the appropriate sections in the text. In many cases of extremity lymphedema, the ipsilateral truncal quadrant (this may include the external genitalia) is also congested. Lymphedema affecting the chest, breast, and posterior thorax, also known as truncal lymphedema, is a common problem following breast cancer surgery, but is often difficult to diagnose, especially if the patient does not also present with lymphedema of the arm, or it may be dismissed as a side effect of breast cancer surgery, which will resolve by itself over time. While truncal lymphedema is often not reported or is poorly documented, and available studies are not easy to compare, the literature suggests an incidence of up to 70% of lymphedema affecting the trunk and/or breast following breast cancer treatment. Given the fact that the breast, anterior and posterior thorax, and the upper extremity share the axillary nodes as regional lymph nodes (see Figs. 1.7, 1.8, and 1.17), it is predictable that disruption of lymphatic drainage pathways by partial or complete removal of axillary lymph nodes, with or without radiation therapy, can cause the onset of swelling in the chest wall and breast on the same side. The swelling can either be subtle or quite obvious in presentation and may be present with or without swelling in the arm. The disruption of the natural lymphatic drainage pattern is further complicated by scars on the upper trunk wall following lumpectomy, mastectomy, and reconstructive breast surgery, biopsies or drain sites. Fibrotic tissues in the chest wall or armpit following radiation treatments may further inhibit sufficient lymphatic drainage. Certain breast reconstructive procedures, such as the TRAM-flap reconstruction also disrupt lymphatic drainage in the abdominal area, which may cause the onset of additional swelling in the lower truncal (abdominal) area. Like lymphedema in the extremities, swelling affecting the breast, chest and posterior thorax is typically asymmetrical in appearance if compared with the other side (Fig. 5.18). However, there are often other symptoms present prior to the onset of visible swelling, which can include altered sensation (numbness, tingling, diffuse fullness and pressure, heat), pain, and decreased shoulder mobility. Once lymphedema is visibly present, the swelling can include the entire thorax wall, or it can be localized to the armpit, the scapula, the area over the clavicle or around mastectomy or lumpectomy scar lines, around the reconstructed breast or implants, or it may be limited to the breast tissue only. The breast in patients who have undergone lumpectomy or reconstructive surgery may be larger and heavier, or the shape and height of the breast tissue may change due to fibrotic tissue, resulting in added psychological distress due to problems involving clothing, bra fitting, and body image issues. Postoperative swelling following breast cancer surgery is to be expected and generally lasts up to about 3 months; it appears almost immediately following surgery and places additional stress on the lymphatic system by contributing to the lymphatic workload. The difference between “normal” postoperative edema and lymphedema is its perseverance following the completion of treatment, and the presence of changes in tissue texture, such as lymphostatic fibrosis. While several methods are available to assess truncal and breast edema (skinfold calipers, bioimpedance), subjective examination of the anterior and posterior aspect of the thorax and breast focused on the observation of signs of swelling (asymmetry, bra strap and seam indentations, orange peel phenomenon, changes in skin color), palpation of the tissue texture, and comparison of skinfolds between the affected and nonaffected sides remain the most practical means for assessment of lymphedema affecting the trunk. Serial photographs depicting the anterior and posterior view are helpful tools in assessing changes before and after treatment. Most of the symptoms associated with truncal lymphedema can be treated successfully with complete decongestive therapy. Treatment may be necessary only during the initial period following breast cancer treatment to facilitate edema removal and wound healing, or it may be applied at a later point; truncal lymphedema with or without the involvement of the arm may appear at any time following surgery for breast cancer. Manual Lymph Drainage: Due to the fact that truncal involvement is difficult to identify, particularly if obesity is a factor, it is recommended to generally assume truncal involvement in extremity lymphedema, in which case the decongestion of the involved trunk has priority over the treatment of the swollen extremity, and the truncal preparation is more complex. MLD techniques concentrate on the neck, the anterior and posterior aspects of the upper trunk, as well as the inguinal lymph nodes, followed by techniques focused to redirect lymphatic fluid from congested areas into areas with sufficient lymphatic drainage. If necessary, additional techniques aimed to soften fibrotic tissues may also be applied. The treatment sequences listed under “unilateral secondary upper extremity lymphedema” are based on this assumption. Once the adjacent truncal quadrant is successfully decongested (this is generally the case if volume reduction in the involved extremity is noted), the treatment of the lymphedematous extremity becomes the priority, and the truncal preparation may be abbreviated. For patients who have undergone TRAM-flap procedures, careful attention should be given to address scar tissue that could lead to trapping of lymphatic fluid. During the initial stages of the treatment, patients should be instructed in self-MLD (see page 320) and encouraged to perform self-treatment for at least 20–30 minutes daily. Skin care: Areas between skinfolds on the trunk or the underside of the breast are particularly prone to skin damage and infections. Edematous areas should be kept clean and dry and suitable ointments or lotions formulated for sensitive skin, radiation dermatitis, and lymphedema should be applied (refer to Chapter 4, Skin and Nail Care, for more information on skin care). Exercises: Truncal lymphedema is often associated with restrictions in thorax and shoulder movements, which should be evaluated by a physical therapist. Specific exercises addressing these issues and to increase range of motion and function with daily activities should be performed. Depending on the location and quality of scars, mobilization of adherent scar tissue by a qualified therapist may be necessary to improve range of motion. Breathing and aerobic exercises further facilitate decongestion by improving drainage in superficial and deep lymphatic pathways. Compression therapy: Frequently, compression of the affected area may be challenging due to tenderness of the tissue, or irritated skin secondary to radiation therapy. However, to address fluid accumulation and to avoid worsening of the swelling, the application of compression bandages and/or compression bras or vests is very important. Compression bandages are applied circumferentially around the chest with special care not to impair blood supply to grafts and/or healing scars. Due to the lack of muscle pump activity in the truncal area, the use of wide-width (15–20 cm) medium and long-stretch bandages is preferable over the normally used short-stretch bandages for lymphedema affecting the extremities. Custom-cut or commercially manufactured foam pads (Fig. 5.19) or foam chips may be inserted underneath the bandages or compression bra or vest to increase localized pressure in areas of excess fluid pooling, or to soften localized fibrotic tissue. Flat foam pieces can be used to shape and stabilize the compression bandages and to distribute the pressure evenly over a greater surface area. The patient should be fitted with a specially designed lymphedema bra (see Fig. 5.197) or compression vest following decongestion of the trunk to assist with maintaining the positive results of CDT. Compression bras and vests have minimal seams and wide straps, are available as off-the-shelf or custom-made garments, and ensure that the trunk and breast tissues are properly supported. Compression bras and vests should fit comfortably, provide sufficient support around the trunk and not squeeze breast tissue; pockets to accommodate a prosthesis can be sewn into these garments. Patients using regular bras or sports bras should make sure to avoid narrow bra straps and obtain bra strap pads or wideners, if necessary, to avoid restriction of lymphatic pathways on the shoulder. This condition is most often the result of mastectomy or lumpectomy with the removal and/or irradiation of the axillary lymph nodes in breast cancer surgery. The following sequence should be used until the truncal quadrant is decongested (Fig. 5.20). Patient in supine position: 1. Abbreviated manipulation of the lateral neck lymph nodes, including the shoulder collectors (observe contraindications) 2. Activation of the axillary lymph nodes on the contralateral side. Anterior thorax on the contralateral side (omit intercostal and parasternal techniques) 3. Activation and utilization of the AAA anastomosis to move lymph fluid from the affected to the unaffected side 4. Manipulation of the inguinal lymph nodes on the ipsilateral, affected side Therapist moves to other side of table: 5. Activation and utilization of the AI anastomosis on the affected side 6. Manipulation of lymph fluid from the congested upper quadrant in the direction of the inguinal lymph nodes on the same side, utilizing the AI anastomosis. Rotary techniques and stationary circles should be used. 7. Intercostal and parasternal techniques on the affected trunk quadrant to utilize deep drainage pathways Patient on the side (or prone position), with the affected extremity on top: 8. Rework of the AI anastomosis and shoulder collectors Patient in prone position (or on the side): 9. Posterior thorax on the unaffected side (omit intercostal and paravertebral techniques) 10. Activation and utilization of the PAA anastomosis to move lymph fluid from the affected to the unaffected side. Stationary circles should be used. Therapist moves to other side of table: 11. Manipulation of lymph fluid from the congested posterior upper quadrant in the direction of the inguinal lymph nodes on the same side, utilizing the AI anastomosis. Rotary techniques and stationary circles should be used. Patient on the side (or prone position), with the affected extremity on top: 13. Rework of PAA anastomosis, AI anastomosis, and shoulder collectors Patient in supine position: 14. Rework of AAA anastomosis, axillary lymph nodes on the contralateral side, and inguinal lymph nodes on the ipsilateral side 15. Application of compression bandages on the involved extremity The following sequence should be used if the truncal quadrant is decongested and the treatment of the upper extremity is the primary focus: Patient in supine position. Abbreviated trunk preparation (pretreatment): 1. Abbreviated manipulation of the lateral neck lymph nodes, including the shoulder collectors (observe contraindications) 2. Manipulation of the axillary lymph nodes on the contralateral side 3. Activation and utilization of the AAA anastomosis to stimulate lymph flow from the affected to the unaffected side 4. Manipulation of the inguinal lymph nodes on the ipsilateral (affected) side Therapist moves to other side of table: 5. Activation and utilization of the AI anastomosis on the affected side to stimulate lymph flow toward the drainage area Patient on the side (or prone position), with the affected extremity on top: 6. Rework of AI anastomosis and shoulder collectors 7. Activation and utilization of the PAA anastomosis to stimulate lymph flow from the affected to the unaffected side If the upper extremity is considerably swollen, it is not recommended to treat the entire extremity during a single session. The treatment should proceed in steps; for example, only the upper arm (or parts of it) may be treated, which prevents overload of the healthy lymphatics in the drainage areas. 8. Manipulation of the lateral upper arm between the lateral epicondyle and the acromion, using basic techniques (“bulk flow” techniques) 9. Rework of shoulder collectors, AI and PAA anastomosis Patient in supine position: 10. Rework of AAA anastomosis 11. Manipulation of the lateral upper arm between the lateral epicondyle and the acromion. Modified effleurage as well as pump techniques and combination of pump and stationary circles should be used (see sequence 4–5, upper arm). This sequence should be followed up with rework techniques across the watershed into pretreated drainage areas. 12. Manipulation of the medial aspect of the upper arm toward the lateral aspect, using stationary circles (dynamic technique). This technique should be followed up with rework techniques of drainage areas as in step 11. The entire length of the upper arm is treated in this manner. 13. Vasa vasorum technique in the area of the cephalic vein (see Fig. 4.9) 14. Manipulation of elbow, forearm, and hand as outlined in the basic sequence techniques 15. If necessary, edema or fibrosis techniques should be incorporated at this point 16. Rework of upper extremity, AAA anastomosis, axillary lymph nodes on contralateral side, inguinal lymph nodes on ipsilateral side, and shoulder collectors Patient on the side (or prone position), with the affected extremity on top: 17. Rework of the PAA and AI anastomoses (on the same side) 18. Application of compression bandages on involved extremity This condition is most often the result of mastectomy or lumpectomy with the removal and/or irradiation of the axillary lymph nodes in breast cancer surgery. Ideally, bandages should be applied on both upper extremities. If this is not possible, compression bandages should be applied to the more involved extremity. The following sequence should be used until the truncal quadrant(s) is/are decongested (Fig. 5.21). Patient in supine position: 1. Abbreviated manipulation of the lateral neck lymph nodes, including the shoulder collectors (observe contraindications) 2. Abdominal treatment: superficial and deep (modified) techniques as outlined in the basic sequences (observe contraindications). If abdominal techniques are contraindicated, diaphragmatic breathing should be used to substitute. 3. Manipulation of the inguinal lymph nodes on both sides 4. Activation and utilization of the AI anastomoses on both sides to promote lymph flow from the congested quadrants to the drainage areas 5. Manipulation of lymph fluid from the congested upper quadrants in the direction of the inguinal lymph nodes, utilizing the AI anastomoses. Rotary techniques and stationary circles should be used. 6. Intercostal and parasternal techniques on both affected trunk quadrants to utilize deep drainage pathways Patient in prone position (or on side): 7. Rework of both AI anastomoses 8. Manipulation of lymph fluid from the congested posterior upper quadrants in the direction of the inguinal lymph nodes, utilizing the AI anastomoses. Dynamic rotary techniques and stationary circles should be used. 9. Intercostal and paravertebral techniques on both affected trunk quadrants to utilize deep drainage pathways Patient in supine position: 10. Rework of AI anastomoses on both sides, deep abdominal technique (modified), inguinal lymph nodes on both sides, and shoulder collectors 11. Application of compression bandages on both, or the more involved extremity The following sequence should be used if the truncal quadrant(s) is/are decongested and the treatment of the upper extremities becomes the primary focus. It is not recommended to treat both extremities in the same session. The more involved extremity should be treated first until decongested, then fitted with a compression sleeve. If the extremity is considerably swollen, it should be treated in steps; for example, only the upper arm (or parts of it) should be treated, which prevents overload of the healthy lymphatics in the drainage areas. Therapy proceeds with the other arm, once the more involved extremity is decongested. Patient in supine position: 1. Abbreviated manipulation of the lateral neck lymph nodes, including the shoulder collectors (observe contraindications) 2. Deep abdominal technique (modified) as outlined in the basic sequence (observe contraindications). If abdominal techniques are contraindicated, diaphragmatic breathing should be used to substitute. 3. Manipulation of the inguinal lymph nodes on both sides 4. Activation and utilization of the AI anastomoses on both sides to promote lymph flow across the watersheds into the drainage areas Patient on the side (or prone position), with the more involved extremity on top: 5. Rework of AI anastomosis on the more involved side, and the shoulder collectors 6. Manipulation of the lateral upper arm between the lateral epicondyle and the acromion, using basic techniques (“bulk flow” techniques) 7. Rework of shoulder collectors and AI anastomosis on more involved side Patient in supine position: 8. Manipulation of the lateral upper arm (more involved extremity) between the lateral epicondyle and the acromion. Modified effleurage as well as pump techniques and combination of pump and stationary circles should be used (see sequence 4–5, upper arm). This sequence should be followed up with rework techniques across the watershed into pretreated drainage areas. 9. Manipulation of the medial aspect of the upper arm toward the lateral aspect, using stationary circles (dynamic technique). This technique should be followed up with rework techniques of drainage areas. The entire length of the upper arm is treated in this manner. 10. Vasa vasorum technique in the area of the cephalic vein 11. Manipulation of elbow, forearm, and hand as outlined in the basic sequence techniques 12. If necessary, edema or fibrosis techniques should be incorporated at this point. 13. Rework of upper extremity, inguinal lymph nodes on both sides, AI anastomoses on both sides, shoulder collectors, and deep abdominal technique (modified) 14. Application of compression bandages on both, or the more involved extremity This condition is most often the result of the removal and/or irradiation of the inguinal and/or pelvic lymph nodes in cancer surgery (prostate, bladder, female reproductive organs, melanoma). Secondary lower extremity lymphedema may also occur as a result of trauma and may be combined with swelling of the lower truncal quadrant on the same side, and/or the external genitalia. The following sequence should be used until the truncal quadrant is decongested (Fig. 5.22). Patient in supine position: 1. Abbreviated manipulation of the lateral neck lymph nodes (observe contraindications) 2. Manipulation of the axillary lymph nodes on the ipsilateral side 3. Activation and utilization of the IA anastomosis to move lymph fluid from the swollen lower quadrant toward the drainage area 4. Manipulation of the inguinal lymph nodes on the contralateral side 5. Activation and utilization of the AII anastomosis to move lymph fluid from the swollen lower quadrant toward the drainage area on the opposite side 6. Abdominal treatment: superficial and deep (modified) techniques as outlined in the basic sequences (observe contraindications). If abdominal techniques are contraindicated, diaphragmatic breathing should be substituted. Patient on the side (or prone position), with the affected extremity on top: 7. Rework of the IA anastomosis on the affected side Patient in prone position (or on side): 8. Manipulation of the lumbar area on the unaffected side (omit step 4) 9. Activation and utilization of the PII anastomosis to move lymph fluid from the swollen lower quadrant toward the drainage area on the opposite side 10. Paravertebral techniques on the affected lumbar area to promote deep lymphatic pathways 11. Rework of the PII anastomosis Patient in supine position: 12. Rework of AII anastomosis, IA anastomosis on the affected side, inguinal lymph nodes on contralateral and axillary lymph nodes on ipsilateral sides, and deep abdominal techniques (modified) 13. Application of compression bandages on the affected extremity The following sequence should be used if the truncal quadrant is decongested and the treatment of the lymphedematous leg is the primary focus. Patient in supine position. Abbreviated trunk preparation (pretreatment): 1. Abbreviated manipulation of the lateral neck lymph nodes (observe contraindications) 2. Manipulation of the axillary lymph nodes on the ipsilateral side 3. Activation and utilization of the IA anastomosis to promote lymph flow across the watershed toward the drainage area 4. Manipulation of the inguinal lymph nodes on the contralateral side 5. Activation and utilization of the AII anastomosis to promote lymph flow across the watershed toward the drainage area on the opposite side 6. Deep abdominal technique (modified) as outlined in the basic sequences (observe contraindications). If abdominal techniques are contraindicated, diaphragmatic breathing should be substituted. Patient on the side (or prone position), with the affected extremity on top: 7. Rework of the IA anastomosis on the affected side 8. Activation and utilization of the PII anastomosis to promote lymph flow across the watershed toward the drainage area on the opposite side 9. Manipulation of the lateral thigh between the lateral knee and the iliac crest, using basic techniques (“bulk flow” techniques) 10. Rework of the PII and IA anastomoses (on the affected side) Patient in supine position: 11. Rework of the AII anastomosis If the lower extremity is considerably swollen, it is not recommended to treat the entire extremity in a single session. The treatment should proceed in steps; for example, only the thigh (or parts of it) should be treated, which prevents overload of the healthy lymphatics in the drainage areas. 12. Manipulation of the lateral thigh between the knee and the iliac crest. Modified effleurage as well as pump techniques, combination of pump and stationary circles, and rotary techniques should be used. This sequence should be followed up with rework techniques across the watersheds into pretreated drainage areas. 13. Manipulation of the medial aspect of the thigh toward the lateral aspect, using stationary circles (dynamic technique). This technique should be repeated over the entire length of the thigh and followed up with rework techniques toward the drainage areas. 14. Vasa vasorum technique in the area of the femoral vein 15. Manipulation of knee, lower leg, and foot as outlined in the basic sequence techniques 16. If necessary, edema or fibrosis techniques should be incorporated at this point. It may also be necessary to turn the patient into the prone position for the treatment of the posterior leg. 17. Rework of lower extremity, AII anastomosis, IA anastomosis on the affected side, axillary lymph nodes on ipsilateral side, inguinal lymph nodes on contralateral side, and deep abdominal techniques (modified) Patient on the side (or prone position), with the affected extremity on top: 18. Rework of the PII anastomosis 19. Application of compression bandages on the affected extremity This condition is most often the result of the removal and/or irradiation of the inguinal and/or pelvic lymph nodes in cancer surgery (prostate, bladder, female reproductive organs, melanoma). Secondary lower extremity lymphedema may also occur as a result of trauma and may be combined with swelling of the lower truncal quadrant on the same side, and/or the external genitalia. Ideally, bandages should be applied on both lower extremities. If this is not possible, compression bandages should be applied to the more involved extremity. The following sequence should be used until the truncal quadrant(s) is/are decongested (Fig. 5.23). Patient in supine position: 1. Abbreviated manipulation of the lateral neck lymph nodes (observe contraindications) 2. Manipulation of the axillary lymph nodes on both sides 3. Activation and utilization of the IA anastomoses on both sides to promote lymph flow from the congested quadrants to the drainage areas 4. Abdominal treatment: superficial and deep (modified) techniques as outlined in the basic sequences (observe contraindications). If abdominal techniques are contraindicated, diaphragmatic breathing should be substituted. Patient in prone position (or on side): 5. Rework of IA anastomoses on both sides 6. Decongestion of the swollen lower truncal quadrants on both sides toward the axillary lymph nodes, using modified lumbar techniques: modified effleurage; rotary techniques starting at the sagittal watershed to the side, followed by stationary circles (dynamic technique) toward the axilla using the IA anastomosis; paravertebral techniques to utilize deep drainage pathways Patient in supine position: 7. Rework of IA anastomoses and axillary lymph nodes on both sides 8. Rework abdominal area: superficial and deep (modified) techniques 9. Application of compression bandages on both or the more involved extremity It is not recommended to treat both extremities in the same session. The more involved extremity should be treated first until decongested. If the extremity is considerably swollen, it should be treated in steps; for example, only the thigh (or parts of it) should be treated, which prevents overload of the healthy lymphatics in the drainage areas. Therapy proceeds with the other leg, once the more involved extremity is decongested. Generally, a pantyhose-style compression garment is ideal for this condition once both extremities are decongested. To preserve the results in the leg that was treated first, compression bandages should be applied. If this is not possible, the patient should be fitted with a thigh-high compression garment (preferably a relatively inexpensive standard-size garment) while the other extremity receives treatment, then he or she should be fitted with a pantyhose-style garment. Patient in supine position. Abbreviated trunk preparation (pretreatment): 1. Abbreviated manipulation of the lateral neck lymph nodes (observe contraindications) 2. Manipulation of the axillary lymph nodes on both sides 3. Activation and utilization of the IA anastomoses on both sides to promote lymph flow across the watersheds into the drainage areas 4. Abdominal treatment: superficial and deep (modified) techniques as outlined in the basic sequences (observe contraindications). If abdominal techniques are contraindicated, diaphragmatic breathing should be substituted. Patient on the side (or prone position), with the more involved extremity on top: 5. Rework of the IA anastomosis on the more involved side 6. Manipulation of the lateral thigh between the lateral knee and the iliac crest, using basic techniques (“bulk flow” techniques) Patient in supine position: 7. Rework of IA anastomoses on both sides Treatment of the lower extremity: 8. Manipulation of the lateral thigh between the knee and the iliac crest. Modified effleurage as well as pump techniques, combination of pump and stationary circles, and rotary techniques should be used. This sequence should be followed up with rework techniques across the watersheds into pretreated drainage areas. 9. Manipulation of the medial aspect of the thigh toward the lateral aspect, using stationary circles (dynamic technique). This technique should be repeated over the entire length of the thigh and followed up with rework techniques toward the drainage areas. 10. Vasa vasorum technique in the area of the femoral vein 11. Manipulation of knee, lower leg, and foot as outlined in the basic sequence techniques 12. If necessary, edema or fibrosis techniques should be incorporated at this point. It may also be necessary to turn the patient into the prone position for the treatment of the posterior leg. 13. Rework of lower extremity, IA anastomoses on both sides, axillary lymph nodes on both sides, and abdominal techniques 14. Application of compression bandages on both, or the more involved extremity This condition is the result of developmental abnormalities (see Chapter 3, Primary Lymphedema) of the lymphatic system, which are either congenital or hereditary. Primary lower extremity lymphedema may be combined with swelling of the adjacent truncal quadrant and/or the external genitalia. Congenital malformations of the lymphatic system may also be present in the contralateral leg. If the volume of the unaffected leg increases, or if any changes in tissue consistency are noted during the treatment, the use of interinguinal anastomoses (AII and PII) should be discontinued. Treatment sequences for this condition are very similar to the treatment of secondary lymphedema of the lower extremity. The inguinal lymph nodes in primary lymphedema are still present and should be stimulated. The goal of intervention, however, is to relieve these lymph nodes; lymph fluid is therefore rerouted around the inguinal lymph nodes toward sufficient drainage areas located in the adjacent trunk territories. The following sequence should be used until the truncal quadrant is decongested (Fig. 5.22). Patient in supine position: 1. Abbreviated manipulation of the lateral neck lymph nodes (observe contraindications) 2. Manipulation of the axillary lymph nodes on the ipsilateral side 3. Activation and utilization of the IA anastomosis to move lymph fluid from the swollen lower quadrant toward the drainage area 4. Manipulation of the inguinal lymph nodes on the contralateral side 5. Activation and utilization of the AII anastomosis to move lymph fluid from the swollen lower quadrant toward the drainage area on the opposite side 6. Abdominal treatment: superficial and deep (modified) techniques as outlined in the basic sequences (observe contraindications). If abdominal techniques are contraindicated, diaphragmatic breathing should be substituted. Therapist moves to the other side of the treatment table: 7. Manipulation of the inguinal lymph nodes on the affected side Patient in prone position (or on side): 8. Manipulation of the lumbar area on the unaffected side (omit manipulation of the inguinal lymph nodes) 9. Activation and utilization of the PII anastomosis to move lymph fluid from the swollen lower quadrant toward the drainage area on the opposite side 10. Paravertebral techniques on the affected lumbar area to promote deep lymphatic pathways 11. Rework of the PII anastomosis Patient in supine position: 12. Rework of AII anastomosis, IA anastomosis on the affected side, axillary lymph nodes on the ipsilateral side, inguinal lymph nodes on both sides, and deep abdominal techniques (modified) 13. Application of compression bandages on the affected extremity The following sequence should be used if the truncal quadrant is decongested and the treatment of the lymphedematous leg is the primary focus. Patient in supine position. Abbreviated trunk preparation (pretreatment): 1. Abbreviated manipulation of the lateral neck lymph nodes (observe contraindications) 2. Manipulation of the axillary lymph nodes on the ipsilateral side 3. Activation and utilization of the IA anastomosis to promote lymph flow across the watershed toward the drainage area 4. Manipulation of the inguinal lymph nodes on the contralateral side 5. Activation and utilization of the AII anastomosis to promote lymph flow across the watershed toward the drainage area on the opposite side 6. Deep abdominal technique (modified) as outlined in the basic sequences (observe contraindications). If abdominal techniques are contraindicated, diaphragmatic breathing should be substituted. Patient on the side (or prone position), with the affected extremity on top: 7. Rework of the IA anastomosis on the affected side 8. Activation and utilization of the PII anastomosis to promote lymph flow across the watershed toward the drainage area on the opposite side 9. Manipulation of the lateral thigh between the lateral knee and the iliac crest, using basic techniques (“bulk flow” techniques) 10. Rework of the PII and inguinal-axillary anastomoses (on the affected side) Patient in supine position: 11. Rework of the AII anastomosis If the lower extremity is considerably swollen, it is not recommended to treat the entire extremity in one session. The treatment should proceed in steps; for example, only the thigh (or parts of it) may be treated, which prevents overload of the healthy lymphatics in the drainage areas. If the swelling is more distally pronounced (as is often the case in primary lymphedema), more time should be spent treating the areas below the knee. 12. Manipulation of the inguinal lymph nodes on the affected leg As discussed earlier, inguinal lymph nodes in primary lymphedema are used as additional drainage areas. Lymph fluid from more distal sections of the leg should not be manipulated toward the inguinal nodes but rerouted around them as in the treatment of secondary lymphedema. 13. Manipulation of the lateral thigh between the knee and the iliac crest Modified effleurage as well as pump techniques, combination of pump and stationary circles, and rotary techniques should be used. This sequence should be followed up with rework techniques across the watersheds into pretreated drainage areas. 14. Manipulation of the medial aspect of the thigh toward the lateral aspect, using stationary circles (dynamic technique). This technique should be repeated over the entire length of the thigh and followed up with rework techniques toward the drainage areas. 15. Vasa vasorum technique in the area of the femoral vein 16. Manipulation of knee, lower leg, and foot as outlined in the basic sequence techniques 17. If necessary, edema or fibrosis techniques should be incorporated at this point. It may also be necessary to turn the patient into the prone position for the treatment of the posterior leg. 18. Rework of lower extremity, including the inguinal lymph nodes; rework of the anterior AII anastomosis, IA anastomosis on the affected side, axillary lymph nodes on ipsilateral side, inguinal lymph nodes on the contralateral side, and deep abdominal techniques (modified) Patient on the side (or prone position), with the affected extremity on top: 19. Rework of the PII anastomosis 20. Application of compression bandages on the affected extremity This condition is the result of developmental abnormalities (see Chapter 3, Primary Lymphedema) of the lymphatic system, which are either congenital or hereditary. Primary lower extremity lymphedema may be combined with swelling of the adjacent truncal quadrant and/or the external genitalia. Treatment sequences for this condition are very similar to the treatment of bilateral secondary lymphedema of the lower extremities. The inguinal lymph nodes in primary lymphedema are still present and should be stimulated. The goal of intervention, however, is to relieve these lymph nodes; lymph fluid is therefore rerouted around the inguinal lymph nodes toward sufficient drainage areas located in the upper truncal territories (axillary lymph nodes). The following sequence should be used until the truncal quadrant(s) is/are decongested (Fig. 5.23). Patient in supine position: 1. Abbreviated manipulation of the lateral neck lymph nodes (observe contraindications) 2. Manipulation of the axillary lymph nodes on both sides 3. Manipulation of the inguinal lymph nodes on both sides 4. Activation and utilization of the IA anastomoses on both sides to promote lymph flow from the congested quadrants to the drainage areas 5. Abdominal treatment: superficial and deep (modified) techniques as outlined in the basic sequences (observe contraindications). If abdominal techniques are contraindicated, diaphragmatic breathing should be substituted. Patient in prone position (or on side): 6. Rework of IA anastomoses on both sides 7. Decongestion of the swollen lower truncal quadrants on both sides toward the axillary lymph nodes, using modified lumbar techniques: modified effleurage; rotary techniques starting at the sagittal watershed to the side, followed by stationary circles (dynamic technique) toward the axilla using the IA anastomosis; paravertebral techniques to utilize deep drainage pathways Patient in supine position: 8. Rework of IA anastomoses and axillary lymph nodes on both sides 9. Rework abdominal area: superficial and deep (modified) techniques 10. Application of compression bandages on both or the more involved extremity The following sequence should be used if the truncal quadrant(s) is/are decongested and the treatment of the lower extremities becomes the primary focus. It is not recommended to treat both extremities in the same session. The more involved extremity should be treated first until decongested. If the extremity is considerably swollen, it should be treated in steps; for example, only the thigh (or parts of it) may be treated, which prevents overload of the healthy lymphatics in the drainage areas. Therapy proceeds with the other leg, once the more involved extremity is decongested. Generally, a pantyhose-style compression garment is ideal for this condition, once both extremities are decongested. To preserve the results in the leg that was treated first, compression bandages should be applied. If this is not possible, the patient should be fitted with a thigh-high compression garment (preferably a relatively inexpensive standard-size garment) while the other extremity receives treatment, then be fitted with a pantyhose-style garment. Patient in supine position. Abbreviated trunk preparation (pretreatment): 1. Abbreviated manipulation of the lateral neck lymph nodes (observe contraindications) 2. Manipulation of the axillary lymph nodes on both sides 3. Activation and utilization of the IA anastomoses on both sides to promote lymph flow across the watersheds into the drainage areas 4. Manipulation of the inguinal lymph nodes on both sides As discussed earlier, inguinal lymph nodes in primary lymphedema are used as additional drainage areas. Lymph fluid from more distal sections of the leg should not be manipulated toward the inguinal nodes, but rerouted around them, as in the treatment of secondary lymphedema (see secondary lower extremity lymphedema). 5. Abdominal treatment: superficial and deep (modified) techniques as outlined in the basic sequences (observe contraindications). If abdominal techniques are contraindicated, diaphragmatic breathing should be substituted. Patient on the side (or prone position), with the more involved extremity on top: 6. Rework of the IA anastomosis on the more involved side 7. Manipulation of the lateral thigh between the lateral knee and the iliac crest, using basic techniques (“bulk flow” techniques) Patient in supine position: 8. Rework of IA anastomoses on both sides Treatment of the lower extremity: 9. Rework the inguinal lymph nodes on the more involved leg 10. Manipulation of the lateral thigh between the knee and the iliac crest Modified effleurage as well as pump techniques, combination of pump and stationary circles, and rotary techniques should be used This sequence should be followed up with rework techniques across the watersheds into pretreated drainage areas 11. Manipulation of the medial aspect of the thigh toward the lateral aspect, using stationary circles (dynamic technique). This technique should be repeated over the entire length of the thigh and followed up with rework techniques toward the drainage areas. 12. Vasa vasorum technique in the area of the femoral vein 13. Manipulation of knee, lower leg, and foot as outlined in the basic sequence techniques 14. If necessary, edema or fibrosis techniques should be incorporated at this point. It may also be necessary to turn the patient into the prone position for the treatment of the posterior leg. 15. Rework of lower extremity, including the inguinal lymph nodes; rework of the IA anastomoses on both sides, axillary lymph nodes on both sides, inguinal lymph nodes on the less swollen leg, and abdominal techniques 16. Application of compression bandages on both, or the more involved extremity Genital lymphedema is a challenging condition that very often causes real and long-lasting physical, emotional, and social problems for the affected patients. This condition can affect both males and females but is more common in males due to the greater tissue elasticity of the scrotum and penis, combined with the effects of gravity (Fig. 5.24). Reliable numbers on the incidence of genital swelling are unavailable because this condition often remains undiagnosed; genital edema is generally not a topic of conversation, unlike swelling of an extremity following surgery. Genital lymphedema is usually irreversible without treatment, and once it develops, it tends to become more fibrotic and increases in size. It can be effectively controlled and maintained with complete decongestive therapy (CDT). In some cases, genital swelling may occur acutely following surgery or trauma and may resolve completely by itself. In most cases genital lymphedema is combined with lower extremity lymphedema. For a detailed discussion of genital lymphedema treatment, see p. 280–291. Fig. 5.24 Genital lymphedema with involvement of the penis in an uncircumcised patient. Arrows indicate drainage directions. Genital swelling can be classified as malignant, benign, primary, and secondary. Advanced pelvic and/or abdominal malignancies may block or reduce the lymphatic and venous return from the genital area. The onset of genital swelling without apparent reason, the presence of a clear vaginal discharge, or lymphorrhea, may be a symptom of an active malignant process and needs to be thoroughly examined by a physician. Primary genital swelling is usually the result of congenital malformations (dysplasia) of lymph vessels and/or lymph nodes in the region. As with all primary forms, the swelling may be present at birth (rare) or develop later in life with or without obvious cause. Minor surgical interventions, such as a circumcision, may trigger the onset of pediatric genital swelling if congenital malformations of the lymphatic system are present. Isolated swelling of the genital region is not common. In many cases other parts of the body are involved in the swelling as well, such as the lower quadrant(s) and/or one or both of the lower extremities. It was also reported that obese patients with lower extremity lymphedema have an increased risk of developing genital swelling due to greater pressure on the lymphatic system in the groin from the enlarged abdomen. Fig. 5.25 Genital lymphedema with lymphatic cysts and fistulas. Arrows indicate drainage directions. Trauma or surgical interventions in combination with the removal and/or irradiation of lymph vessels and/or lymph nodes (especially pelvic lymph nodes) to remove gynecological, testicular, penile, urological, abdominal, intestinal, or prostatic cancers are a common cause. The incidence of genital swelling tends to increase with the combination of surgery and radiation, and if the patient has a history of recurrent episodes of cellulitis. The swelling may occur immediately post surgery or years later as with other forms of lymphedema. Reports suggest that genital swelling in combination with lower extremity lymphedema occurs in ~10% of patients. The incidence of genital swelling in females has been estimated at 10% to 20% of patients following surgery. In males, the incidence of genital edema following oncological surgery (prostatectomy, bladder cancer) and/or irradiation seems to be considerably higher. Filariasis is another common cause of genital swelling in endemic regions (see Chapter 3, Pathology, and Fig. 3.4a, b). A very common reason for the onset of genital swelling is the use of pneumatic compression pumps for the treatment of lower extremity lymphedema. Boris, Weindorf, and Lasinski published a paper in the March 1998 edition of Lymphology and concluded that the use of external pneumatic compression pumps in the treatment of lower extremity lymphedema produces an unacceptable high incidence of genital edema1 (See Chapter 3, Therapeutic Approach to Lymphedema). Various combinations of genital anatomy swelling may occur. In males, isolated penile swelling is rare. Combined penile and scrotal swelling is a more common presentation. The scrotum may swell to such an extent that ambulation becomes difficult. The lower quadrants and/or lower extremities often accompany genital swelling. Additional involvement of the pubic area frequently causes the penis to retract into the scrotum. In females, the labia minora and the labia majora may be included in the swelling. These areas could project several centimeters out of the vagina. Clear labial/vaginal discharge (lymphorrhea), the appearances of papillomas or warty growths are often symptoms indicating genital involvement, especially if the patient had pelvic or gynecological procedures. Vaginal discharge for other reasons is often a curdish, white, thick discharge. Genital swelling frequently causes problems in urination and sexual activity, depending on the extent of the involvement. Other conditions, such as active malignancies, renal, liver, cardiac or venous problems can cause genital edema. A thorough evaluation with a clear diagnostic picture is necessary before MLD/CDT can be initiated. • What kind of surgery (if any) was performed and how many lymph nodes were excised? • Were there any cellulitis attacks in the past? Where did they start? • Pain? Some patients describe bursting sensation or an ache around the genital area (pain generally recedes with treatment). Males often complain about painful erections. • Were/are there any problems with bowel or bladder function following surgery or radiation? • Are appropriate hygienic measures possible? • Is the patient circumcised? • Any moist areas, lymphatic cysts, lymphatic fistulas (Fig. 5.25), lymphorrhea (patients often use sanitary or incontinence pads)? • Extent of the swelling? Penis/scrotum; external/internal labiae; pubic area; lower quadrant and/or lower extremity (unilateral/bilateral) • Scars? • Skinfolds in the genital region? • Papillomas, warts? • Bacterial or mycotic infections? (Patients with discharge from the area often complain about malodor; lymph itself has no odor, but is very high in protein content, which presents an excellent breeding ground for bacteria, causing malodor.) • Tissue quality—fibrosis, scars • Tissue quality in other involved areas • Can the foreskin be pulled back in uncircumcised male patients? As discussed earlier, genital swelling is often associated with lower extremity lymphedema. The treatment of the genital swelling may be included in the treatment sequence or it may be performed as a stand-alone treatment. If lower extremity swelling (or truncal edema) is present, the treatment of the genital swelling should precede the sequence for leg lymphedema. Lymphatic cysts and/or fistulas, lymphorrhea, bacterial and mycotic infections are common complicating factors found in combination with this condition. Meticulous hygiene is therefore imperative. If fistulas are present, the area must be cleaned and disinfected with proper agents, and the treatment should be performed wearing sterile gloves. To maximize the therapeutic effect, genital bandaging may be performed prior to the application of hands-on techniques for the pretreatment of the drainage areas. Following the treatment sequence, the bandages are removed and the MLD techniques in the swollen genital area are performed (see page 283). The therapist then proceeds with the application of the final compression bandage. The application of compression bandages on the genital area is discussed later in this chapter. Patient in supine position: 1. Abbreviated manipulation of the lateral neck lymph nodes (observe contraindications) 2. Manipulation of the axillary lymph nodes on both sides 3. Activation and utilization of the IA anastomoses on both sides to promote lymph flow across the watershed into the drainage areas 4. If inguinal lymph nodes are present, manipulation of the inguinal lymph nodes on both sides 5. Abdominal treatment: superficial and deep (modified) techniques as outlined in the basic sequences (observe contraindications). If abdominal techniques are contraindicated, diaphragmatic breathing should be substituted. If the lower truncal quadrants are congested, the patient is turned into the prone position at this point, and the lumbar areas are decongested in the following manner. Decongestion of the swollen lower truncal quadrants on both sides toward the axillary lymph nodes, using modified lumbar techniques; modified effleurage; rotary techniques starting at the sagittal watershed to the side, followed by stationary circles (dynamic techniques) toward the axilla using the IA anastomosis; paravertebral techniques to utilize deep drainage pathways. The patient is then turned back into the supine position. 6. Treatment of the scrotum: stationary circles on both sides of the scrotum to manipulate the lymph fluid toward the pubic area, and from here toward the axillary lymph nodes on the respective side, utilizing the IA anastomoses. 7. Application of bandages (see Lower Extremity Bandaging, p. 256 and Compression Bandaging for Male Genital Lymphedema, p. 286 later in this chapter) This condition is a result of a venous insufficiency (for pathology, refer to Chapter 3, Chronic Venous and LymphoVenous Insufficiency). The deficient venous valves in chronic venous insufficiency (CVI) fail to prevent retrograde flow of venous blood during muscle pump activity, which in turn directly affects the lymphatic system. Over time, and if CVI is left without treatment, damage to the lymphatic system, combined with reduction in transport capacity is unavoidable. The presence of lymphedema in stages II and III of CVI necessitates the application of the complete spectrum of complete decongestive therapy. If venous ulcerations are present, appropriate wound dressings and skin care products, prescribed by the physician, are applied before CDT starts (refer to Chapter 3, Complete Decongestive Therapy). The wound remains covered during the treatment, and MLD techniques are directed away from and around the ulcer bed. Treatment in and around the wound area is performed wearing sterile gloves. Decongestion of the extremity greatly increases the tendency of venous stasis ulcerations to heal. The treatment protocol for lymphedema associated with CVI corresponds with the protocol for primary lymphedema; fibrosis and edema techniques are contraindicated. Should any signs or symptoms of thrombophlebitis in deep veins or symptoms of pulmonary embolism develop (see Chapter 3, Thrombophlebitis in Deep Veins), the patient must see a doctor immediately, and any treatment must be interrupted until the condition is cleared up. Patient in supine position. Abbreviated trunk preparation (pretreatment): 1. Abbreviated manipulation of the lateral neck lymph nodes (observe contraindications) 2. Manipulation of the axillary lymph nodes on the ipsilateral side 3. Activation and utilization of the IA anastomosis to promote lymph flow across the watershed toward the drainage area 4. Manipulation of the inguinal lymph nodes on the contralateral side 6. Deep abdominal technique (modified) as outlined in the basic sequences (observe contraindications). If abdominal techniques are contraindicated, diaphragmatic breathing should be substituted. Patient on the side (or prone position), with the affected extremity on top: 7. Rework of the IA anastomosis on the affected side 8. Activation and utilization of the PII anastomosis to promote lymph flow across the watershed toward the drainage area on the opposite side 9. Manipulation of the lateral thigh between the lateral knee and the iliac crest, using basic techniques (“bulk flow” techniques) 10. Rework of the PII and IA anastomosis (on the affected side) Patient in supine position: 11. Rework of the AII anastomosis Treatment of the lower extremity (experience shows that the swelling in phlebolymphostatic edema is generally pronounced more distally; in these cases, more time should be spent treating the tissues distal to the knee joint) 12. Manipulation of the inguinal lymph nodes on the affected leg 13. Manipulation of the lateral thigh between the knee and the iliac crest Modified effleurage as well as pump techniques, combination of pump and stationary circles, and rotary techniques should be used. This sequence should be followed up with rework techniques across the watersheds into pretreated drainage areas. 14. Manipulation of the medial aspect of the thigh toward the lateral aspect, using stationary circles (dynamic technique). This technique should be repeated over the entire length of the thigh and followed up with rework techniques toward the drainage areas. 15. Manipulation of knee, lower leg, and foot as outlined in the basic sequence techniques To maximize the decongestive effect, it is often beneficial to turn the patient into the prone position at this point for the treatment of the posterior lower leg 16. Rework of lower extremity, including the inguinal lymph nodes. Rework of the AII anastomosis, IA anastomosis on the affected side, axillary lymph nodes on the ipsilateral side, inguinal lymph nodes on the contralateral side, and deep abdominal techniques (modified) Patient on the side (or prone position), with the affected extremity on top: 17. Rework of the PII anastomosis 18. Application of compression bandages on the affected extremity. In many cases of phlebo-lymphostatic insufficiency, compression bandages need to be applied only up to the knee; this depends on the severity of the swelling and is determined by the physician. Lipolymphedema generally involves both lower extremities, and the treatment protocol of this condition corresponds with that of primary lymphedema. The lymphedematous component responds well and relatively fast to CDT; the lipedema itself responds more slowly, sometimes not at all. Lighter pressures in manual and compression bandage techniques during the initial treatment sessions may be necessary because lipedema and lipolymphedema are often associated with hypersensitivity and pain, which typically diminish after several treatments. Patients often require more padding under the compression bandages, particularly in the anterior tibial area. In some cases, it may be necessary not to apply a bandage at all during the first few treatments. Edema and fibrosis techniques are contraindicated in the treatment of this condition. The following sequence should be used until the truncal quadrant(s) is/are decongested. Patient in supine position: 1. Abbreviated manipulation of the lateral neck lymph nodes (observe contraindications) 2. Manipulation of the axillary lymph nodes on both sides 3. Manipulation of the inguinal lymph nodes on both sides 4. Activation and utilization of the IA anastomoses on both sides to promote lymph flow from the congested quadrants to the drainage areas 5. Abdominal treatment: superficial and deep (modified) techniques as outlined in the basic sequences (observe contraindications). If abdominal techniques are contraindicated, diaphragmatic breathing should be substituted. Patient in prone position (or on side): 6. Rework of IA anastomoses on both sides 7. Decongestion of the swollen lower truncal quadrants on both sides toward the axillary lymph nodes, using modified lumbar techniques: modified effleurage; rotary techniques starting at the sagittal watershed to the side, followed by stationary circles toward the axilla using the IA anastomosis (IA); paravertebral techniques to utilize deep drainage pathways 8. Rework of IA anastomoses and axillary lymph nodes on both sides 9. Rework abdominal area: superficial and deep (modified) techniques 10. Application of compression bandages on both, or the more involved extremity The following sequence should be used if the truncal quadrant(s) is/are decongested and the treatment of the lower extremities becomes the primary focus. It is not recommended to treat both extremities in the same session. The more involved extremity should be treated first until decongested. If the extremity is considerably swollen, it should be treated in steps; for example, only the thigh (or parts of it) may be treated, which prevents overload of the healthy lymphatics in the drainage areas. Therapy proceeds with the less involved leg, once the more involved extremity is decongested. Generally, a pantyhose-style compression garment is ideal for this condition, once both extremities are decongested. To preserve the results in the leg that was treated first, compression bandages should be applied. If this is not possible, the patient should be fitted with a thigh-high compression garment (preferably a relatively inexpensive standard-size garment) while the other extremity receives treatment, and then he/she can be fitted with a pantyhose-style garment. Patient in supine position. Abbreviated trunk preparation (pretreatment): 1. Abbreviated manipulation of the lateral neck lymph nodes (observe contraindications) 2. Manipulation of the axillary lymph nodes on both sides 3. Activation and utilization of the IA anastomoses on both sides to promote lymph flow across the watersheds into the drainage areas 4. Manipulation of the inguinal lymph nodes on both sides 5. Deep abdominal techniques (modified) as outlined in the basic sequences (observe contraindications). If abdominal techniques are contraindicated, diaphragmatic breathing should be substituted. Patient on the side (or in prone position), with the more involved extremity on top: 6. Rework of the IA anastomosis (IA) on the more involved side 7. Manipulation of the lateral thigh between the lateral knee and the iliac crest, using basic techniques (“bulk flow” techniques) Patient in supine position: 8. Rework of IA anastomoses on both sides Treatment of the lower extremity: 9. Rework the inguinal lymph nodes on the more involved leg 10. Manipulation of the lateral thigh between the knee and the iliac crest. Modified effleurage as well as pump techniques, combination of pump and stationary circles, and rotary techniques should be used. This sequence should be followed up with rework techniques across the watersheds into pretreated drainage areas. 11. Manipulation of the medial aspect of the thigh toward the lateral aspect, using stationary circles. This technique should be repeated over the entire length of the thigh and followed up with rework techniques toward the drainage areas. 12. Vasa vasorum technique in the area of the femoral vein 13. Manipulation of knee, lower leg, and foot as outlined in the basic sequence techniques 14. Rework of lower extremity, including the inguinal lymph nodes If necessary, patient in prone position: 15. Manipulation of the posterior knee and lower leg as outlined in the basic sequence techniques Patient in supine position: 16. Rework of the IA anastomoses (IA) on both sides, axillary lymph nodes on both sides, inguinal lymph nodes on the less swollen leg, and abdominal techniques 17. Application of compression bandages on both, or the more involved extremity Head and neck lymphedema (HNL) is much less common than edema of the extremities, but HNL is a particularly concerning complication for patients and their families, especially when severe, as in the case shown in Fig. 5.26a, b. When HNL causes eyelid swelling, tasks involving vision, such as reading, writing, walking, and driving, may be affected. When the lips and tongue are edematous, articulation, chewing, swallowing, and even respiration can be impaired, possibly requiring a tracheotomy. Breathing can also be affected in patients who have undergone a total laryngectomy when severe submental and anterior neck edema occludes the tracheostoma, requiring the use of a device such as a laryngectomy tube or laryngectomy button to maintain a patent airway, as in Fig. 5.26b. Even when the edema is relatively minor and does not create a functional impairment, cosmetic concerns can arise that create psychosocial and emotional issues, since neck and facial edema cannot be easily hidden. HNL is often overlooked, misdiagnosed, or minimized as an inevitable and untreatable outcome of cancer treatment. At other times, a clinician may identify HNL but be ill prepared to treat the patient because of a lack of experience of the condition. The ability to effectively evaluate and treat HNL is crucial to maximizing the patient’s quality of life. The information presented in this chapter is intended to reduce clinician concerns and assist in the evaluation, treatment planning, and management of HNL. Fig. 5.26a, b Severe lingual and facial edema. a 16 days after base of tongue resection. b 11 months after total laryngectomy. HNL may be present with primary lymphedema, either in isolation or as part of a syndrome, and is a characteristic of Hennekam syndrome, Turner syndrome, Milroy disease, Apert syndrome, and other disorders.2 Primary lymphedema of the head and neck, however, is less common than primary lymphedema of the extremities and will not be addressed in this chapter. Inflammatory causes of facial lymphedema include severe rosacea (including rhinophyma and otophyma), acne vulgaris, Melkersson–Rosenthal syndrome, and other dermatologic conditions.2 While the most common cause of lymphedema worldwide is filariasis,3,4 this author is unaware of any articles documenting filarial lymphedema of the head and neck. More commonly, HNL presents as a secondary lymphedema due to injury of the lymphatic tissues from chronic infections, blunt force trauma, surgery, radiotherapy, or vascular obstruction by a mass (malignant lymphedema)2 as shown in Fig. 5.27. Facial edema is a potential complication of certain cosmetic and dermatologic procedures, though chronic HNL after cosmetic procedures is not commonly reported. Manual lymph drainage (MLD) following facelift procedures has been used to reduce postoperative edema. Variations of traditional facial drainage pathways are implemented according to surgically altered tissue orientation.5 HNL is not common after surgery for noncancerous maladies of the head and neck, though with any surgery the potential exists for drainage impairment and edema due to scarring. One possible explanation for the higher incidence of HNL after the removal of malignant lesions compared with nonmalignant lesions is that the lymphatics are typically not removed in head and neck surgeries for patients not undergoing cancer treatment.6–9 HNL occurs most frequently in patients who have undergone surgery and/or radiotherapy for cancer3 and seems to be most severe when multimodality treatment is provided, though the role of chemotherapy in the development of HNL is not known. Taxane-based chemotherapy has been linked to lymphedema of the extremities,10 and HNL has been reported in patients treated with cisplatin10,11 combined with radiotherapy. There are no published accounts of HNL following chemotherapy in isolation for head and neck cancer, though pemetrexed-induced edema of the eyelid and periorbital region has been reported with lung cancer treatment.13 At this time, there are not sufficient data to suggest a causative relationship between most current chemotherapy regimens and chronic HNL. HNL has been documented in as many as 48% of patients who received radiotherapy to the head and neck.14 The insult to the lymphatic system that occurs from radiotherapy can be widespread, since the primary tumor, adjacent soft tissues, bony structures, and relevant lymphatic drainage pathways may all be irradiated in an effort to shrink existing tumors, treat persistent microscopic disease, and prevent metastasis. Tissue fibrosis is a common complication of radiotherapy and can inhibit lymphangiomotoricity and effective tissue drainage. Patients who receive radiation to the head and neck often develop chronic edema of tissues within the irradiated field, which commonly encompasses the lower face, neck, and supraclavicular fossa. When re-irradiation is required to treat cancer recurrence, further tissue damage occurs, increasing the severity of tissue fibrosis and associated HNL.15 Surgery to address head and neck cancer commonly requires the removal of the tumor and the surrounding soft tissues. Removal of bone may also be required if there is tumor invasion or if there is severe damage to the bone from radiotherapy (osteoradionecrosis).16 Depending on the extent of the surgery, reconstruction may be required with pedicled flaps such as pectoralis and rotational flaps, which retain their native venous, arterial, and lymphatic vessels. In more complex cases, free tissue transfers from one part of the body to another may be required. For example, tissue from the forearm or thigh may be used to replace a portion of the tongue or pharynx or to cover the surgical defect after removal of a portion of the face, as shown in Fig. 5.28. These “free flaps” require microvascular surgery to reattach blood vessels for flap viability. Lymphatic vessels are not commonly reconnected in these procedures, however, leaving only the venous system to drain the free flap, which can swell substantially at times. Lymphadenectomy is a common surgical procedure in the treatment of head and neck cancer, often requiring removal of more than 30 cervical, facial, mediastinal, paratracheal, or supraclavicular lymph nodes.17–19 When sacrifice of jugular veins is required due to tumor involvement or severe radiation scarring, the disruption of the venous drainage system in the head and neck increases the risk of HNL. This lymphatic and venous disruption results in a lympho-venous or “mixed edema,” which is typically less responsive to treatment than a pure lymphedema. Additionally, surgical scarring can directly impact the development of HNL due to a “trapdoor effect,”20 in which a scar prevents drainage through the lymphatic channels of the skin, resulting in edema above the scar but not below. Multimodality cancer treatment creates a unique environment for the development of both mild and severe lymphedemas in the face and neck that can be challenging to evaluate and treat. Piso et al. published a reliable assessment protocol for facial edema in 2001,21 yet HNL evaluations vary from facility to facility and often from clinician to clinician. Inconsistency in evaluation methodology hinders objective data acquisition and analysis to determine best treatment practices, forcing reliance on subjective data such as visual assessment, patient questionnaires, and clinicianscored rating scales. Development of high-tech solutions to evaluate HNL has been limited, though ultrasound and magnetic resonance imaging have been reported as diagnostic tools for edema assessment in the head and neck.2,22,23 Efforts are being made, however, to implement standard evaluation protocols for HNL.24,25 Components of a basic HNL evaluation are suggested below. Clinical assessment of the patient is the most important aspect of any lymphedema evaluation, but there are specific concerns when evaluating a patient with HNL. The traditional assessment of tissue integrity, warmth, color, firmness, pitting, and tissue changes must be included. An accurate, thorough medical history is crucial, since intraoral, facial, or neck edema may result from infection, hypothyroidism, allergic reactions, postoperative seroma, hematoma, angioedema, lymphatic metastasis, or other causes.2,26 When the presentation and history do not support the diagnosis of lymphedema, referral to the patient’s physician for further evaluation is appropriate. For example, distended jugular veins in the presence of facial edema suggests superior vena cava syndrome, which is often caused by a mass compressing the superior vena cava and can constitute a medical emergency.27 A significant history of upper-quadrant deep vein thrombosis (DVT), cerebrovascular accident (CVA), transient ischemic attack (TIA), carotid artery compromise, congestive heart failure (CHF), renal disease, hyperthyroidism, tissue breakdown, or other medical concerns may be sufficient to withhold lymphedema treatment, despite the severity of the swelling.26 Lymphedema treatment may result in a CVA or increased edema if provided inappropriately and could cause death if there is tumor invasion of the carotid artery and manipulation results in rupture of the vessel (carotid blow-out). Lymphedema management may be requested as a palliative treatment to temporarily alleviate discomfort or reduce functional impairments that result from massive facial edema. Palliative treatment can improve the patient’s quality of life and should be provided if it appears that treatment can be effective and there is no immediate risk of harm, but treatment is not appropriate in all cases. If you have concerns about the patient’s safety, further discussion with the patient’s physician may be warranted, since physician approval is essential before initiating any HNL treatment. Fig. 5.30 Facial composite measurements. 1. Tragus to mental protuberance; 2. Tragus to mouth angle; 3. Mandibular angle to nasal wing; 4. Mandibular angle to internal eye corner; 5. Mandibular angle to external eye corner; 6. Mental protuberance to internal eye corner; 7. Mandibular angle to mental protuberance. (Adapted from Smith and Lewin 2010.)24 Table 5.1 Obtaining a composite neck measurement
General Considerations
Application of Basic MLD Techniques on Different Parts of the Body
Lateral Neck and Submandibular Area
Abbreviated Neck Sequence
Posterior Neck and Occipital Area
Face
Posterior Thorax
Lumbar Area
Anterior Thorax
Abdomen (Superficial and Deep Manipulations)
Superficial abdominal treatment (modified)
Deep abdominal treatment (modified)
Upper Extremity
Lower Extremity
Anterior leg
Posterior leg
Treatment Sequences
Truncal Lymphedema
Unilateral Secondary Upper Extremity Lymphedema
Bilateral Secondary Upper Extremity Lymphedema
Unilateral Secondary Lower Extremity Lymphedema
Bilateral Secondary Lower Extremity Lymphedema
Unilateral Primary Lower Extremity Lymphedema
Bilateral Primary Lower Extremity Lymphedema
Genital Lymphedema
Classification
Malignant Conditions
Primary Conditions
Secondary Conditions
Clinical Picture
Evaluation
History
Inspection
Palpation
Treatment
Phlebo-Lymphostatic Edema
Lipolymphedema
Head and Neck Lymphedema
Introduction
Etiology
HNL after Cancer Treatment
Evaluation
Clinical Assessment
Neck composite |
1. Superior neck: immediately beneath mandible |
2. Medial neck: midway point between 1 and 3 |
3. Inferior neck: lowest circumferential level |
Adapted from Smith and Lewin, 201024
Tape Measurement
Tape measurements are an essential tool for documenting change over time and assessing the effectiveness of treatment. Consistent tape placement and tightness are required for the most accurate measurements possible, though the potential for error exists with all manual tape measurement practices. For consistency, the following guidelines should be observed. If possible, obtain measurements while the patient is sitting upright with the head in a neutral position to assess edema in a natural posture. Mark the measurement landmarks on the skin to ensure consistent tape placement. Measurements should be obtained in centimeters and recorded on a tracking form or in a database for future comparison. The patient’s trunk and head positions should be replicated in each evaluation to ensure consistent data acquisition. The measurement protocol published by Smith and Lewin24 includes a combination of neck circumferences, head circumferences, and point-to-point facial measures to provide a comprehensive assessment of the face and neck. These are described below.
The superior, middle, and inferior neck circumferences, shown in Table 5.1 and Fig. 5.29, can be combined to obtain a composite neck measurement that reflects change throughout the entire neck rather than in just one area. The superior circumference should be obtained by placing the tape measure horizontally around the upper portion of the neck, just below the mandible and chin. The inferior neck circumference is obtained in a similar fashion at the base of the neck. The medial neck circumference is obtained at the midpoint between the superior and inferior neck measurement sites. Adding these three circumferences creates a composite neck score that can then be used for comparison over time. A difference of 2% or more between the baseline and follow-up composite scores has been considered significant.28 Changes of less than 2% are not considered clinically significant because of the potential for errors in tape placement, positional inconsistencies, and other variables. Only composite scores, and not individual measurements, can be assessed using the 2% rule.
Facial Composite
A composite facial score can be achieved by combining seven point-to-point facial measurements, as shown in Fig. 5.30. These measurements are totaled on each side of the face to create left and right hemifacial scores. The hemifacial scores are then combined to create the total facial composite score, which can be compared with facial composite scores over time to assess facial changes using the 2% rule. The hemifacial scores cannot be compared with each other to determine the presence of edema in one side of the face, unlike comparisons made between right and left limbs. Treatment of the head and neck is often bilateral, and even when treatment is provided unilaterally, bilateral edema is common. There are no published data specifying a percentage of swelling to distinguish between edematous and normal facial tissues. Therefore, measurements of facial edema should be reported as a total facial composite.
Fig. 5.31a–d Additional measurements for assessing edema.
a Tragus to tragus
b Distance between mandibular angles
c Vertical circumference
d Diagonal circumference
Indicators of Change
While treatment effectiveness can be demonstrated by a 2% change in composite scores, a reduction of less than 2% may not be indicative of a lack of improvement overall. Other clinical indicators of improvement should also be considered, including but not limited to reductions in tissue firmness, reductions in edema duration and fluctuation, and obvious visual changes over time. The clinician should be aware of weight gain or loss between evaluations, which can minimize or exaggerate the percentage of edema reduction demonstrated by measurements.
Other Measurements
Additional measurements as shown in Fig. 5.31 can be used to assess submental or lateral facial and mandibular edema. Distances between the right and left tragus or between the right and left mandibular angles can be helpful, as can vertical and diagonal circumferences of the head. These measurements are not included in the neck or facial composite scores and are not subject to the 2% rule, but they can provide valuable feedback regarding treatment changes. Additional circumferential measures can be obtained when there is substantial edema in the forehead, eyebrows, eyelids, or lips. Measures of lip or tongue protrusion and swelling of the nose or ear can also be obtained if necessary, but these are not commonly utilized.
Facial Irregularities
Sometimes a total facial composite cannot be obtained because a facial landmark cannot be identified. This may result from surgical removal of the landmark, tissue breakdown, tumor eruption, nonremovable dressings, or excessive edema that prevents palpation. Comparison of partial composites or hemifacial scores may be helpful in these cases in which only certain measurements can be obtained, though the 2% rule cannot be applied if the total facial composite is unavailable. However, composite scores can be obtained if the correlate of the missing landmark can be used to replicate its position. For example, if the right mandibular angle cannot be identified, the vertical distance between the unaffected left tragus and the left mandibular angle can be measured. If this distance is 5 cm, a mark can be placed 5 cm below the tragus on the right side, providing a usable landmark for the affected side. Likewise, if the right tragus is not present, the clinician should first obtain a horizontal measurement from the existing tragus to the tip of the nose. If this distance is 13.5 cm, a mark can be made 13.5 cm from the tip of the nose to the approximate location of the left ear, providing an alternative tragus landmark that can be used to complete the facial composite score. If both landmarks are missing, as in Fig. 5.32, first recreate the tragus landmark, and then the mandibular angle location can be determined. Photographic documentation featuring the locations of the replicated landmarks and the distances between each anchoring point are helpful for recreating the landmarks in future evaluations.
Fig. 5.32a–d Recreating missing tragus and mandible landmarks.
a Measure from existing tragus to existing mandibular angle (not shown) and from tragus to nose
b Recreate the measurement on the other side from nose to alternative tragus
c Recreate the measurement from alternative tragus to alternative mandibular angle
d Alternatives marked
Neck Irregularities
On occasion, a patient may present with an irregular neck shape that interferes with the determination of superior, medial, or inferior marking points for circumferential measures. Neck irregularities may be the result of scarring, the slope of the neck, skinfolds, edema, or other causes and can require the use of nontraditional tape placements. It may be possible to use these irregular landmarks as measuring points if they are stable. Surprisingly, when a slender patient has a very prominent mandible, the absence of submental edema can make it difficult to obtain separate medial and superior neck measures. It may be necessary to request assistance to hold the tape at the proper location on the upper neck or submandibular region to obtain the appropriate circumference.
Photography
Basic photographic documentation is an excellent source of data and should be used to evaluate a patient’s appearance before, during, and after treatment. Digital photography provides immediate access to high-resolution images, allowing for instant comparison of baseline and follow-up photos and even for assessment of changes that occur during a single treatment. While detailed photographs of particular areas of concern may be helpful, a standard series of three portrait-style photos featuring the face and neck from the front, right, and left are typically the most beneficial. It is important to maintain a consistent camera angle, patient body alignment, and distance between the photographer and the patient during each photo session so images can be compared reliably. Side-by-side photographic comparisons can be very powerful tools, providing feedback to patients, physicians, and third-party payers who may require proof of improvement to continue funding lymphedema rehabilitation services.
3-D Imaging
Although seldom used outside of large facilities because of their cost, 3-D imaging systems offer the potential to provide more advanced head and neck measurement data. Surface area, volumetric measures, and both linear and contoured point-to-point measurements are purported as benefits of this technology. Current systems are able to instantly capture a 3-D image of the face and neck without requiring the patient to remain still for long periods of time, as is required with 3-D scanning technology. The ability to superimpose baseline and follow-up images for volumetric assessment promises to be one of the technology’s most beneficial applications for HNL assessment. Currently, 3-D imaging provides excellent feedback for visual comparison of changes in facial edema, but there remain concerns with consistency of patient alignment from session to session, making comparisons of combined face and neck images difficult. Measurement templates and landmarking capabilities appear to offer great promise for point-to-point measurement without the variances that can occur with manual placement of a tape measure on the skin. The increased precision of measurement offered by this technology would improve the reliability of the data collected and the quality of future HNL research.
Lymphedema Rating Scales
The severity of lymphedema has traditionally been classified according to clinician-graded rating scales. The most well known is the Földi scale,3 which was developed on more than 100 000 patients and features stages 0, 1, 2, and 3, ranging from nonvisible but perceptible edema to irreversible swelling with severe fibrosis and tissue changes including hyperkeratosis and papillomatosis. Most lymphedema rating scales, including the Földi scale, were developed for assessment of limbs and have been applied to the head and neck by default. Unfortunately, these scales do not capture subtle differences that often exist with HNL, resulting in a forced classification that does not completely describe the HNL patient’s presentation. Recently, the Patterson scale25,29 has been used to assess internal edema of the pharynx, larynx, and base of the tongue, but it is limited to visual assessment via endoscopy and does not address “external lymphedema” in the neck or face. In 2010, the MD Anderson Cancer Center Head and Neck Lymphedema (MDACC HNL) Rating Scale was published.24 The MDACC HNL scale is a nonvalidated tool developed to document lymphedema presentations common among patients with HNL, but not identified by Földi’s scale. It offers a stage 1a classification to identify patients with visible but nonpitting edema and stage 1b for patients presenting with pitting, reversible edema. Criteria for stages 0, 2, and 3 reflect the original descriptions by Földi. Table 5.2 compares these two scales. It should be noted that all clinician rating scales are subjective assessment tools, and clinician judgment can vary according to training and experience. Further investigation and development of a comprehensive, standardized, user-friendly scale that accurately depicts the characteristics of HNL would enable more consistent data comparison for future clinical research.
Table 5.2 Comparison of the MDACC HNL and Földi scales
MDACC HNL Scale | Földi Scale |
0 No visible edema, patient reports heaviness | 0 No visible edema, patient reports heaviness |
1a Soft, visible edema, no pitting, reversible | 1 Clinical swelling, pitting edema, reduced swelling with elevation |
1b Soft pitting edema, reversible | |
2 Firm, irreversible edema without tissue changes | 2 Hard swelling, does not recede during the day, no tissue change |
3 Hard, nonpitting, irreversible edema, tissue changes | 3 Clinical symptoms of elephantiasis, tissue changes |
Adapted from Smith and Lewin, 201024
Treatment of HNL
HNL has historically been perceived as a difficult condition to manage. This perception may be due to limited experience with head and neck cancer and its treatment, unfamiliarity with the anatomy of the head and neck, the various presentations of HNL, or uncertainty regarding treatment techniques, which can differ from traditional treatment of lymphedema in the extremities. Techniques used to manage HNL are often taught in advanced courses and are not typically addressed during training for certification in manual lymph drainage (MLD) or complete decongestive therapy (CDT), most likely due to the relatively low incidence of head and neck cancer compared with that of breast cancer and other conditions. Clinicians who do not practice in a tertiary care center30 with an emphasis on head and neck cancer, which comprises only 3–5% of all cancers,31 may rarely encounter a patient with HNL.
HNL should be treated using a standard CDT approach, though MLD and compression are typically the two primary CDT components used to address the head and neck.32 Exercises and stretches for the neck, face, and shoulder region are commonly applied as part of post-treatment rehabilitation to address speech and swallowing function as well as cervical and upper extremity range of motion. These rehabilitation techniques are generally appropriate for HNL as well, especially while the patient is wearing compression. Skin and wound care is extremely important for patients recovering from surgery and for those undergoing radiotherapy. Skin and wound care should be performed under the guidance of the patient’s medical team when required, but once the skin is healed, persistent care is not commonly required for patients with HNL. Variations of MLD and compression techniques may be needed to treat HNL. Irradiated tissues should be addressed with caution, and certain precautions must be observed when applying compression to the head and neck region. While the differences between treating HNL and lymphedema of the extremities may be considered challenging, HNL can be treated very effectively with appropriate intervention, as shown in Fig. 5.33. Additional treatment considerations are outlined below.
Outpatient versus Self-Administered Treatment
Traditionally, lymphedema has been treated on an outpatient basis so that skilled MLD treatment, compression wrapping, and wound care can be provided by a certified lymphedema therapist (CLT) several times a week for a period of weeks or months. When possible, it is recommended that HNL be treated on an outpatient basis by a CLT, though the frequency and duration of treatment is often less than that required for lymphedema of the extremities. While extended therapy may be required in some cases, it is not uncommon for HNL treatment plans to feature 2 to 3 visits per week for 1–2 weeks, after which patients are discharged to perform their home program. Patients should always be trained in a home program during the early stages of rehabilitation to enhance carryover. After treatment, follow-up evaluations at 1, 3, and 6 months are recommended to ensure adequate home program follow-through and continued progress. However, treatment modifications are common and more frequent reassessments or prolonged treatment may be required depending on patient progress. Naturally, severe cases may require intensive treatment of greater frequency per week and longer duration overall.
A though outpatient treatment is preferred, patients with HNL have also been shown to benefit from training in the use of a “self-CDT” approach, primarily featuring self-administered MLD and compression.28 The self-administered therapy approach is most appropriate when the patient presents with mild edema and is physically and mentally capable of self-treatment or has good caregiver support. It can also be implemented when consistent access to a qualified lymphedema therapist is not available as a result of the patient’s illness, issues with finances, transportation, or because health care resources are limited in the patient’s home locale. Once the patient and/or caregiver are trained, the treatment is implemented at home, with follow-up evaluations to evaluate progress and address any changes required in the treatment plan.
Of course, treatment effectiveness is of the utmost importance, and self-CDT does have limitations. These may be related to the physical or cognitive abilities of the patient or caregiver, inconsistent or inaccurate performance of MLD routines, or lack of caregiver support. The absence of a CLT is a disadvantage, as well. However, Lewin et al.28 reported compliance as the primary factor influencing successful edema reduction in patients primarily treated with a self-administered lymphedema management protocol. Significant edema reductions were observed at the first follow-up visit in 83% of patients who were compliant in their home management program and in 54% who were partially compliant. The noncompliant group did not demonstrate improvement as a whole.
Whether a self-administered home lymphedema management protocol is appropriate for a particular patient depends on the ability and willingness of the patient or caregiver to perform the prescribed routine independently. For example, when a patient requires posterior drainage due to significant neck scarring, it is preferable that the anterior and posterior trunk be decongested for maximum benefit. MLD of the back cannot typically be performed by the patient, mandating caregiver assistance. If a caregiver is unavailable and the patient must perform self-MLD, only anterior trunk decongestion can be achieved, which is less efficient and may not be as effective for posterior drainage. However, a capable caregiver may be able to perform the prescribed routine proficiently, so caregiver availability and willingness to assist should always be addressed in the evaluation. Simultaneous training of the patient and caregiver is preferred, and individual responsibilities should be clearly identified to ensure acceptable levels of involvement by both parties.
When outpatient treatment for HNL is recommended but is not convenient, the use of a self-CDT home program often becomes the primary intervention. While success has been achieved with some severe cases using a home management approach, many cases are simply too complex for self-administered treatment and require intensive outpatient treatment by a skilled, experienced clinician to achieve significant improvement. If it is clear during re-evaluation that the home program has been ineffective and reasonable treatment modifications are not possible, further discussion may be required to determine additional options to obtain treatment from a qualified lymphedema therapist.
MLD Treatment Sequences for HNL
In theory, MLD sequences for HNL are not vastly different from standard MLD protocols for limbs. Anterior and posterior MLD sequences for HNL are intended to mobilize lymph from the head and neck to the bilateral axillae, with sequence selection dependent on scarring or other obstructions. Stationary circles can be used as the primary MLD technique in almost all locations, making these routines easy to teach for self-MLD treatment. Other techniques may be substituted by certified lymphedema therapists as appropriate. Standard Vodder technique26 pacing (once per second) and frequency (7–10 repetitions per location) apply until the edematous region is reached, where a minimum of 20–30 repetitions should be performed in each location. Progression to the next adjacent area is based on tactile changes identified by the clinician.
Positioning
Patient positioning during treatment can vary with HNL management. While a supine or reclined sitting position is preferred for posterior facial and neck drainage in patients with significant scarring or severe edema, many patients with HNL do not tolerate lying in a supine, prone, or even reclined position because of respiratory difficulties, kyphosis, neck fibrosis, or other conditions. In these cases, MLD should be performed with the patient lying on his or her side or sitting in an upright position. The most important benefit of seated treatment is that the patient can breathe more easily and remain comfortable during treatment. Although seated treatment may reduce the effectiveness of posterior drainage in severe HNL, seated MLD is very effective for most posterior, anterior, and trunk decongestion routines.
Trunk Decongestion
For maximum effectiveness, trunk decongestion must be performed to open lymphatic channels and promote lymph flow from congested areas to functional drainage basins. Many clinicians have started treatment for patients with HNL in the edematous face and neck without first decongesting the trunk. This is not recommended. Likewise, it is common to perform a neck decongestion routine in a “normal” neck before addressing the trunk as part of upper extremity treatment.26 This is not appropriate when HNL is present. Decongestion of the terminus, abdomen, axillae, and trunk should be addressed before the edematous head or neck is treated. An exception to this recommendation is when the patient has very mild edema and has not received radiotherapy to the neck or supraclavicular fossa. If the supraclavicular region is not damaged, it may be possible to treat with an abbreviated MLD routine that begins at the terminus and progresses directly to the neck and face, without the need to decongest the trunk or axillary lymph node beds. Otherwise, trunk decongestion is essential prior to addressing edema in the head and neck.
Strossenreuther and Klose previously described posterior trunk decongestion for HNL in a seated position.32 However, a standard trunk decongestion sequence featuring anterior and posterior trunk decongestion is preferred for maximum drainage. If the patient is in an upright seated position, a clinician or caregiver can decongest the anterior and posterior trunk simultaneously via the “sandwich technique” shown in Fig. 5.34. To perform the sandwich technique, the clinician or caregiver is positioned to the side of the patient. In steps 1, 5, 6, 7, and 8 in the sequence outlined below, hands are placed on the chest and back simultaneously, sandwiching the patient between them. Performing simultaneous stationary circles, pulling laterally toward the axilla, the clinician can simultaneously decongest the anterior and posterior trunk on one side. The clinician or caregiver can then move to the opposite side of the patient or reposition the patient’s chair so that the remainder of the trunk can be addressed, allowing for a complete trunk decongestion in 5–8 minutes, typically. This is a more efficient means of addressing the trunk, providing much more time to address the edematous regions of the face and neck during the treatment session.
Trunk Decongestion Manual Lymph Drainage Sequence
A standard trunk decongestion sequence is shown below. If pitting edema is present, the patient should wear a softening pad 30 minutes prior to and during the trunk decongestion sequence (steps 1–8). The softening pad should be removed at step 9 and a flattening pad applied after MLD is complete. Additional information regarding compression padding is outlined in the Compression section of this chapter. This sequence can be performed with the patient in any position, though is optimized in a seated position.
Fig. 5.34 The “sandwich technique” for simultaneous decongestion of the anterior and posterior trunk.
Deep system:
1. Stationary circles in supraclavicular fossa
2. Abdominal decongestion routine/diaphragmatic breathing
Surface system trunk (target: axillary nodes):
3. Axillary node decongestion: Fingers in the axilla. Stationary circles up and inward.
4. Pectoral node decongestion: Flat hand beneath axilla, on side of chest. Stationary circles vertical to axilla.
5. Inferior anterior chest: Flat hand, little finger above nipple. Overhand stationary circles out to axilla.
6. Mid-chest: Move hand up one hand width. Repeat overhand stationary circles out to axilla.
7. Upper chest: Move hand beneath clavicle. Repeat overhand stationary circles out to axilla.
8. Supraclavicular fossa: Repeat stationary circles as in step 1.
Repeat trunk sequence steps 1–8 on opposite side.
9. “Softening pad” should be removed after trunk decongestion to allow access to the head and neck region.
Anterior Face and Neck Drainage for HNL
Once the trunk is decongested, MLD should be applied to the head and neck. Anterior drainage is appropriate when no significant scarring is present in the face or neck to prevent drainage through the lateral and anterior neck to the axillary lymph nodes. Patients who have undergone radiotherapy without surgery or who have minor surgical scars are most likely to benefit from this approach. Although simultaneous bilateral facial MLD is typically preferred, unilateral self-MLD of the lateral and anterior neck is recommended to avoid simultaneous carotid sinus stimulation. The direction of MLD should be toward the lateral neck and jugular lymph node chains.
HNL anterior MLD routine: 1–8. Bilateral trunk decongestion, as described above.
9. Posterior neck: Overhand anterior stationary circles toward the ear. (If the posterior trunk has been decongested, the posterior neck circles can be directed posteriorly rather than anteriorly.)
10. Lateral neck: Move hand anteriorly, fingertips beneath the ear. Overhand posterior stationary circles toward ear. (For unilateral approach, patients may elect to use opposite hand.)
11. Anterior neck: Move hand to midline of anterior neck, second knuckle beneath chin. Overhand posterior stationary circles toward ear. (Opposite hand preferred for patients.)
12. Preauricular and postauricular region: Bilateral. Two fingers on either side of ear. Stationary circles down and posteriorly.
13. Lateral face: Bilateral. Flat hands on lateral cheeks and mandible, posterior stationary circles toward ear.
14. Anterior face: Bilateral. Flat hands to anterior cheeks, posterior stationary circles toward ear. Avoid upward movement toward eyes to prevent filling of lower eyelids.
If applicable, relevant areas of edema, including the intraoral region, nose, eyelids, and forehead, can now be addressed as described in the Intraoral MLD section below.
If no additional sequences are required, reverse the sequence and perform steps 14, 13, 12, 11, 10, 9, 8, 7, 6, and 5 to mobilize fluid from the face through the neck to the bilateral axillae.
After completion of this MLD sequence, compression should be applied as directed.
Scarring and Other Obstructions
In some cases, significant scars exist that prevent anterior drainage. Scars can frequently be softened and reduced with the use of scar massage, scar reduction creams, silicone sheeting, elastic therapeutic tape, and other techniques. Scar reduction can improve the ability to mobilize lymph through the scarred area, allowing a more direct drainage pathway. Reestablishment of drainage across scars in the head and neck has been recently documented,33 supporting longstanding clinical beliefs that with proper intervention, the effects of scarring can be overcome to some degree. However, thick scars, tissue breakdown, or erupted tumors may force a redirection of lymph from the preferred drainage channels, requiring posterior drainage.
Posterior Neck and Facial Drainage for HNL
The HNL posterior MLD sequence is designed to mobilize lymph away from significant scarring in the face or neck as discussed above. Stationary circles can be used as the primary technique in almost all locations. Before this sequence is performed, posterior trunk decongestion is required. This sequence should be performed by a caregiver or clinician. If self-MLD is required, please refer to the Combined Self-MLD sequence on page 320.
HNL posterior MLD routine: 1–8. Bilateral trunk decongestion
9. Posterior neck: Flat hands, perform MLD downward into upper back
10. Repeat inferior MLD movements, progressing up the posterior neck into the lower posterior scalp, mobilizing fluid into the neck and back
11. Progressively moving across the lateral scalp, perform posterior MLD techniques to mobilize fluid to the posterior head and upper neck
12. Move hands to the preauricular region, mobilizing upward and posteriorly to the lateral scalp using MLD techniques
13. Move hands to the anterior face, performing downwards stationary circles away from midline toward the preauricular region, avoiding upward pressure that can fill the eyelids
14. Move hands inferiorly to address the lateral jowls and mandibular regions. Perform MLD techniques upward to the preauricular region and primary drainage channel over the ear and into the lateral scalp.
15. If intraoral edema is present, perform intraoral techniques at this time
16. Move hands to the submandibular and submental regions, performing MLD techniques upward to the lateral face
17. Continue in this fashion in the upper neck, mobilizing away from midline and upward, away from the neck scar. Begin posteriorly, then advance anteriorly until the midline is reached.
18. Once the neck and face have been decongested, reverse the sequence and perform steps 17, 16, 15, 14, 13, 12, 11, 10, 9, 8, 7, 6, and 5 to mobilize the fluid to the axillary nodes
After completion, apply compression as directed.
Intraoral MLD
Intraoral edema may range from mild to severe and can impair articulation, chewing, swallowing, and respiration, depending on the structures involved. MLD can usually be performed to reduce intraoral swelling but should be avoided in patients with mucositis (Fig. 5.35), open surgical wounds, and other tissue injuries.26 Depending on hand size, the presence of trismus, and the severity of the edema, the patient, caregiver, or clinician may only be able to use 1 or 2 fingers to address intraoral edema. Caution should be observed with loose or jagged teeth, stitches, and hypersensitive gag or bite reflexes to avoid injury. Due to the moisture in the mouth, fingers tend to slide along the mucosa. Water-based lubricants that are safe for intraoral use can be beneficial if the mouth and lips are excessively dry. In most cases, bilateral intraoral MLD is recommended due to the extensive contralateral drainage in this region.34 Occasionally, an oral free flap will be present and may also appear edematous. MLD is generally not recommended for free flaps due to the lack of lymphatic re-anastomosis, but MLD can be performed on the flap if trials prove effective. Free flaps atrophy over time, and MLD to this tissue does not typically affect the speed of flap reduction. As a result, intraoral MLD should address native tissues in most cases. A description of intraoral MLD is provided below.
MLD techniques for the tongue, floor of the mouth, and palate follow a similar pattern of lateral and posterior drainage. Decongestion should begin as far posterior as tolerated, with posterior and lateral stationary circles away from the midline.26 Move anteriorly to the next adjacent area once judged appropriate. Repeat the sequence until the entire region is decongested. MLD of the tongue requires caution, since MLD without cushioning the underside of the tongue may result in tissue injury from friction against the teeth. If swelling is not too severe, it may be possible to position the tongue lower in the mouth between the teeth before treating. If the tongue is protruding from the mouth or lying against sharp teeth, the clinician should protect the underside of the tongue by using a finger, tongue depressor, gauze pad or by grasping and supporting it during MLD. Protection of the tissue is of utmost importance to avoid infection, and MLD in this region should be avoided if there is potential for injury as a result of tissue manipulation.
Decongestion of the lips also begins laterally, near the oral commissure. Place the lip between the thumb and forefinger, with the thumb inside the mouth, and stabilize with the outer finger. Finger and thumb placement can be reversed if necessary. Perform stationary circles laterally to the mouth corner. After the appropriate number of repetitions, move medially and repeat the sequence until reaching the midline. Reverse the sequence and drain laterally from the midline until the oral commissure is reached and the entire half of the lip is decongested. Repeat the sequences on the other half of the lip. In severely swollen lips, this sequence may need to be repeated multiple times in one session but immediate reductions can often be obtained. Pressing the lips together for 10–20 seconds during brief stoppages of MLD can also help prevent the rapid refilling of tissues during treatment.
MLD for the cheek and buccal mucosa should address the inner and outer tissues. Place 1 or 2 fingers against the swollen buccal mucosa. Support the outer cheek with the opposite hand.26 Begin as far posteriorly as possible and perform posterior overhand stationary circles. Repeat the sequence in the anterior, superior, and inferior portions of the buccal mucosa until the entire cheek is addressed. The exterior cheek can also be addressed in this fashion, with the internal fingers providing support. Patients can perform a one-handed approach using the thumb inside the opposite side of the mouth and using the remaining fingers to support the cheek. Again, posterior overhand stationary circles can be applied. This method is usually less efficient since less tissue is being manipulated during MLD, but may be beneficial in some cases.
“Internal Lymphedema”
Intraoral MLD can be a very effective tool for reducing edema of the oral cavity. Unfortunately, MLD has not been proven effective in the reduction of edema that is present in the pharynx or larynx, sometimes called internal lymphedema,25 which can affect swallowing and pose airway concerns. While the presence of edema in these regions for 3–6 months is not uncommon and edema around the internal carotid artery has been identified 2 years after completion of radiotherapy,15,23,35,36 there remains debate whether persistent swelling in the pharynx and larynx is edema or lymphedema. The inability to assess tissue characteristics with techniques other than endoscopic examination currently limits clinical evaluation of edema in the upper aerodigestive tract. Regardless of etiology, treatment options available to address internal lymphedema have been limited to medical management with steroids or other anti-inflammatory regimens. Traditional approaches for direct lymphedema management, such as MLD, are impractical for addressing internal structures such as the pharynx and larynx. No studies that demonstrate the effectiveness of CDT for reducing internal edema of the larynx and pharynx are available, though anatomic connections suggest that MLD to the external tissues of the neck should reduce edema internally.34 Additional research is warranted.
Compression for HNL
The use of compression garments and wrapping for the head and neck is a controversial subject, with proponents utilizing a wide variety of compression techniques and opponents using no compression at all. The primary concern related to compression in this region is the potential for compression of major blood vessels in the neck and complications from resultant vascular events, such as hypoxia, thrombosis, and CVA/TIA.37,38 This risk is markedly increased in patients with blockages of the carotid artery, significant cerebrovascular disease, history of CVA, or other vascular abnormalities like tumor invasion of a major blood vessel in the neck. These contraindications should have been identified during the initial evaluation, but their absence must be verified before the application of compression. Excessive anterior neck compression is also problematic, often creating respiratory distress in patients with a compromised airway or other pre-existing respiratory conditions.
A secondary effect of excessive compression is the blockage of lymphatic drainage in the neck, creating increased facial edema. This is a common finding during reevaluations when neck measurements have decreased with treatment but facial measures have increased. Proper fit must be assessed by the clinician to ensure that garments or wraps are not too tight. Chinstraps worn too tightly can increase fullness throughout the cheeks and anterior face. Excessive tightness of a facial compression mask can result in swelling of tissues through eye or mouth openings, worsening the edema in those regions. The increased edema can often be reversed by decreasing the tightness of the compression device, though sometimes complete garment revisions are required if edema is too great or the patient has gained a substantial amount of weight. However, increasing edema or a sudden plateau in progress during treatment may be related to a recurrent mass impeding lymphatic flow and should be evaluated by the patient’s physician if the pattern does not reverse when garment adjustments have been made.
Compression of the head and neck is not without risk, and not all patients with HNL are candidates for its use, though modifications can sometimes allow treatment despite the area of concern. For example, if severe neck edema is compromising the airway of a laryngectomized patient with one blocked carotid artery, it may be possible to modify the compression and MLD regimens sufficiently to avoid the area of concern and still apply appropriate pressure to the remainder of the neck and face. When in doubt regarding medical contraindications for use of compression for HNL, the therapist should contact the patient’s physician to determine the patient’s risk for adverse effects. If excessive risk exists, compression may be completely contraindicated. In most cases, however, compression can be applied safely and effectively. The proper use of compression has been shown to be an effective and essential component of CDT for HNL39,40 and should be implemented when appropriate. However, specific instructions and training must be provided to ensure patient safety. Use of excessive compression by a patient may be accidental or intentional, to increase the effect of treatment. If repeated instances of misuse occur, modifications must be made or the compression garment/wrap should be discontinued for the patient’s safety, despite the potential impact the loss of compression will have on treatment effectiveness.
Compression Padding
Historically, lymphedema therapists may or may not have elected to use foam padding as a component of compression treatment. The use of foam padding as an adjunct to compression wrapping has been reported to improve uniform pressure distribution to the tissues, provide structure for wrapping irregular surfaces, and soften fibrotic tissues.39 Many padding options can either be fabricated or purchased, but in general, HNL treatment benefits from softening pads and flattening pads, such as those shown in Fig. 5.36. These pads are held in place by either a short-stretch bandage or an off-the-shelf compression garment.
Softening pads, also known as “chip bags” or “Schneider packs,”39,41 are used prior to MLD when pitting edema is present. The pad softens the edematous tissue, increasing skin pliability and responsiveness to treatment. In most cases, softening pads should be worn for a minimum of 30 minutes before beginning MLD and throughout the trunk decongestion portion of the routine. After trunk decongestion is complete, the pad and compression garment should be removed as the neck and face are addressed. Softening pads are typically not used after MLD except in cases of very hard, fibrotic tissues.
Softening pads can be constructed from open or closed cell foam, depending on the firmness of the tissues being addressed. Chip bags are most appropriate for soft pitting edema and are constructed by filling a length of tubular gauze or stockinette with small (about 6–12 mm) blocks of 12 mm gray open cell foam. The spongy, resilient texture of the gray foam makes it an excellent choice for this application. Advantages of the chip bag include flexible positioning for irregular surfaces and the ability to reach crevices and skin contours when necessary. Disadvantages of the chip bag are its lack of durability and the need to redistribute the foam blocks within the stockinette to ensure even coverage with each application. Closed cell foam blocks do not stay evenly distributed within chip bags and are better suited for Schneider packs.
Schneider pack-style pads can be constructed by placing foam blocks between two sheets of soft cloth surgical tape, moleskin, or other flexible adhesive-backed material to create a flat, flexible pad with an uneven surface that can be used to soften firm edema and enhance the pliability of even somewhat fibrotic skin. To increase durability and decrease skin irritation, these pads should be covered by a stockinette or similar material before use. A pad made with small blocks of 12 mm gray open cell foam usually is sufficient to address a soft pitting edema. However, firm edema typically requires the use of closed cell foam cut into 6 mm blocks. Advantages of Schneider packs include their low profile, flexibility, and effectiveness on both soft and firm edemas. Another advantage is the fact that the foam blocks are held in position, providing a consistent application of pressure with each application. Also, Schneider pack pads can be cut into various shapes or modified to add an extended pad where additional coverage is required, as shown in Fig. 5.36b. Disadvantages are lengthier time for fabrication, difficulty with coverage of concave surfaces, and the potential for tissue damage from the closed cell foam if not used properly.
Fig. 5.36a–d Types of compression padding.
a Chip bag
b Custom Schneider pack
c Custom flattening pad
d Beveled flattening pad
Additional options for softening tissue include smaller, textured closed cell foam sheets that are available in various styles featuring fine nap for softening fibrotic tissue or narrow drainage channels designed to improve directionality of lymphatic flow. These products are much thinner than the 12 mm closed cell sheeting or the coarse nap products used for larger surfaces and can be appropriate for HNL use, but skin integrity should be monitored carefully.
Finally, quilted pads featuring various levels of firmness are also available for compression of the head and neck. Since the foam padding or other items are sewn into soft fabric, quilted pads can be used directly against the skin and can be laundered, unlike homemade pads. Another advantage of quilted pads is their durability and the wide variety of shapes, sizes, and textures, which range from very soft to very hard to address severely fibrotic tissue. Great caution must be exercised, however, when using extremely hard products due to the risk of tissue breakdown. Use of a very hard product on severely fibrotic tissue may soften the skin within 3 minutes and cause breakdown if left in place for longer periods of time, so careful monitoring is required. Quilted pads can be used by themselves or with compression bandaging, nonquilted off-the-shelf garments, or custom-quilted compression garments to achieve the desired coverage and pressure.
Once MLD is complete, immediate compression with a flattening pad under a wrap or garment is recommended, regardless of the edema stage. Flattening pads are intended for use with all patients receiving compression to reshape and flatten tissues after MLD, prevent refilling of edematous tissues, and promote continued lymph flow to the axilla. Flattening pads are typically cut from 12 mm open cell foam sheets into various shapes dictated by the area to be compressed. A typical shape for a flattening pad for the neck is a rectangle with a rounded top, shown in Fig. 5.36d. This allows the pad to fit well beneath the chin and curve along the top of the neck, staying below the mandible. The pad should cover the entire anterior and bilateral neck, extending back to the mandibular angles if bilateral edema is present, but can be customized as needed or constructed for unilateral use. The edges of the flattening pad should be beveled to lay flat against the skin, preventing creases that can occur if the edge is unbeveled. Modifications can be made if the pad is needed to compress the lower face or chin, and often, slots or vents can be cut into the exterior surface of the foam to enhance flexibility, as shown in Fig. 5.36c. The smooth side of the pad should always be against the skin. The flattening pad should be comfortable and should not restrict range of motion when in place.
Flattening pads should only be constructed of open cell foam to avoid tissue breakdown that can result if a closed cell pad is used. A pad constructed from 12 mm gray foam provides adequate pressure to the tissues without collapsing under the garment, which can occur with 6 mm foam. However, when a patient is very petite or supplemental padding is needed near the eyes, 6 mm foam is more appropriate. Also available are smaller open cell products with drainage channels to help direct lymph flow, as well as Velfoam, which connects directly to Velcro and is soft enough to use for padding in areas of increased sensitivity.
Anecdotally, there appears to be a positive correlation between the length of time the flattening pad is worn after MLD and the refilling of the tissues. However, it is often difficult for patients with HNL to wear a compression garment or wrap for extended periods of time for a variety of reasons. Some report feeling claustrophobic if they wear the compression garment or wrap for more than 1 hour, while others may be able to wear a compression mask all night while sleeping. The minimum recommended wear time is 3–4 hours immediately after MLD, but more time is encouraged if tolerated by the patient, since longer wear time will generally enhance the effect of the treatment.
Short-Stretch Bandages
Compression bandaging for HNL can be very difficult, especially when one attempts to apply an entire bandage using a traditional multilayer wrap. Pressure application to the neck must be light to avoid vascular constriction, so circumferential neck wrapping should be avoided if possible. Because of the need to drain each side of the face away from the midline, compression of the face is quite difficult using bandages. While it is possible, facial wrapping can be impractical and typically will result in coverage of one eye, the mouth, and/or the nose, creating additional functional impairments. It is typically easier to achieve a functional degree of facial compression using a compression garment. However, short-stretch bandages can be especially effective for submental compression when the patient’s neck circumference is greater than 50 cm or the diagonal head circumference is greater than 70 cm, based on anecdotal experience. These patients typically cannot wear off-the-shelf facial compression garments, even with Velcro strap extensions, because the improper fit would decrease effectiveness. There are two primary techniques for using bandages to address submental edema.
The first technique uses a complete short-stretch bandage. First, place the appropriate foam pad against the neck or submental area as necessary. Anchor the bandage against the pad as appropriate, and wrap the bandage diagonally from the neck around the crown of the head, adjusting each layer with a 50%–75% overlap to ensure adequate coverage of the neck and relevant facial structures. The pad should be held securely in place and the bandage secured with tape or the clips that come with the bandage. If clips are used, careful bandage placement is required so the clips can be placed on the foam pad rather than the skin. Bandaging is often difficult for patients to perform independently, so caregiver assistance may be required.
An easier way of using a bandage for compression of the anterior neck and submental region is to cut the bandage and create a shorter compression wrap that can be directly connected to the compression pad. Depending on the portion of the neck to be compressed, the alignment may be more vertical than horizontal, as shown in Fig. 5.37. To create this type of wrap, hold the pad in place and wrap the bandage vertically or diagonally, as appropriate, until one circumference has been achieved with a single layer of the compression bandage. Mark the distance where the bandage overlaps. If the distance is 70 cm, double the length of that segment and cut the bandage at 140 cm. In most cases, the remaining bandage can be used to create a second compression wrap. Fold the bandage in half so the two loose edges of the cut bandage meet, and then secure them to the foam pad with a safety pin, tape, or by sewing. Hold the pad against the neck and wrap the folded bandage around the top or crown of the head; the end of the bandage should terminate in the middle of the foam pad. After ensuring proper tightness, secure the end to the pad with the bandage clips. Adjust the wrap alignment if necessary to ensure that the patient’s skin is not touched by any of the retention clips or pins. This technique features a double layer of bandaging with padding to provide adequate pressure to the edematous tissues. Once the bandage is attached to the pad, it is easily placed and removed by the patient in most cases, increasing patient independence.
Off-The-Shelf HNL Compression Garments
Noncustom or off-the-shelf garments are commercially available and can be used without detailed neck or facial measurements. They may be offered as “one size fits all” garments or in small, medium, and large sizes based on measurements of head or neck circumference. Chinstraps are indicated for HNL that is present in the neck and lower face only because they do not provide coverage for the upper or midface. Some chinstraps compress only the submental region while others address the neck as well. Two styles are shown with pads in Fig. 5.38. Other chinstraps are hybrids of these two styles and feature variations in neck length as well as general size options. These garments are generally less expensive than custom garments, though prices vary widely by manufacturer. Due to their lower cost and immediate availability, these garments are sometimes stocked by lymphedema clinics to be issued at the onset of treatment, whether for home program use or as an interim device to be used while awaiting a custom garment. These off-the-shelf chinstraps are generally considered appropriate for lymphedema management but must be used under the supervision of a CLT to ensure patient safety.
Noncustom full facial compression masks are also available but should be approached with caution; most are inappropriate for HNL use due to several concerns. Primarily, an off-the-shelf full face mask cannot properly fit the specific facial features of an individual with HNL. Improper fit can result in misalignment of eye, ear, or mouth openings, creating improper distribution of edema due to excessive tightness in some areas and insufficient compression in others. Generic facial masks often do not feature adequate adjustment capabilities, preventing appropriate pressure adjustments to prevent tissue damage and worsening edema. Low-cost fleece or neoprene facemasks and spandex turtleneck shirts that are not designed for HNL have also been used as inexpensive alternatives. Appropriate evaluation and supervision by a qualified therapist is essential before implementing these types of garments.
Custom Compression Garments for HNL
Custom-fit, made-to-measure chinstraps and full facial compression masks are almost always preferred if available. Custom face and neck measurements are required to fabricate these garments and may be obtained by a vendor representative or by clinicians using the manufacturer’s measurement templates. These measurements make it possible to accommodate the patient’s individual physical characteristics, and a proper fit is usually guaranteed by the manufacturer. Revisions are typically available for little or no charge, depending on the vendor. Another benefit of custom garments is the availability of options such as eye or mouth patches, closure of ear or mouth openings, ponytail openings, etc., as shown in Fig. 5.39. Quilted custom garments are also available, providing bulkier material to help soften tissues after MLD if necessary. The cost of custom garments varies widely and usually reflects differences in the materials used and the manufacturing process. These garments can cost several hundred dollars, which may delay or prevent their acquisition for some patients. The lower cost custom garments are functional, appropriate, and especially advantageous when finances are limited, but there is often a difference in quality and comfort. An additional disadvantage of custom garments is the delay in acquisition due to the need to fabricate the garment. Although some vendors can deliver a custom garment in a few days for rush orders, others require weeks for delivery. In some cases, immediate compression is necessary while awaiting the arrival of the custom garment, so consideration of all compression options is essential for each patient.
Elastic Therapeutic Tape
An adjunct to compression is the use of tape (such as K tape, kinesio tape, muscle tape, etc.). Its ability to stimulate lymphatic drainage by opening lymphatic channels during natural skin movement makes it a very appealing option for some patients. With proper application, elastic therapeutic tape can be a very effective tool to facilitate drainage outside of outpatient or home-based therapy sessions. It can also be used effectively for musculoskeletal support and scar management, though caution must be exercised due to concerns with skin irritation from the adhesive. Of particular concern is previously irradiated skin, though each patient should be considered individually and carefully monitored for adverse effects. For patients with HNL, the use of this product may meet with some resistance because of its high visibility when placed on the face or neck, but this is not true in all cases.
Fig. 5.39a–d Custom facial garments.
a No mouth, eye patch
b Chinstrap
c Ponytail opening
d Standard facemask
In general, the application of elastic tape is consistent with its use to facilitate lymphatic drainage in other parts of the body, anchoring with a solid piece of tape near the drainage destination, and radiating with “fingers” to drain the edematous region. As seen in Fig. 5.40, common anchor points for HNL use are the anterior chest near the axilla, the supraclavicular fossa, and the scapular region, depending on the location of the edema. The tape can be placed bilaterally or unilaterally and in certain cases may be applied to create contralateral drainage if significant scarring prevents drainage ipsilaterally. Adequate skin pliability can be achieved by placing the tape with “zero stretch” as the patient looks up and away from the clinician, resulting in tape contraction when the patient returns to the neutral position. The tape may be left in place for 2–3 days before removal in most cases. Again, careful observation of the skin is required to prevent adverse skin reactions, especially with irradiated tissue. Excessive wear time has been noted to cause significant skin irritation in some patients, even with no previous history of tape allergy. Elastic tape, when used appropriately, is an excellent option for HNL management.
Supplemental MLD Sequences
Alternative HNL MLD Sequence for Unilateral Axilla
Appropriate when one axilla is unavailable due to previous treatment.
1–8. Unilateral trunk decongestion on available side. See Trunk Decongestion routine.
9. Sequentially decongest upper chest of impaired side, MLD toward available axilla
10. Stationary circles in supraclavicular fossa, medially, away from impaired axilla
11. Proceed with anterior or posterior drainage of neck and face, as appropriate
12. Reverse head, neck, and trunk sequence to available axilla
Fig. 5.40a–d Elastic therapeutic tape for head and neck lymphedema.
a Unilateral face
b Bilateral to axilla
c Bilateral neck to supraclavicular fossa
d Contralateral face
Combined Self-Manual Lymph Drainage for Head and Neck Lymphedema
Appropriate for self-MLD when posterior facial drainage is needed without a caregiver.
1–8. Bilateral anterior trunk decongestion with self-MLD to axillae. See Trunk Decongestion routine.
9. Posterior neck: Overhand anterior stationary circles toward the ear and lateral neck. Can use one or both hands, depending on the patient’s physical abilities.
10. Lateral neck: Using opposite hand, move anteriorly on one side of the neck only. Place fingertips beneath the ear. Overhand posterior stationary circles toward ear.
11. Anterior neck: Move hand to midline of anterior neck, second knuckle beneath chin. Overhand posterior stationary circles toward ear.
12. Repeat on opposite neck with opposite hand
13. Pre and postauricular region: Bilateral. Two fingers on either side of ear. Stationary circles down and posterior.
14. Lateral face: Bilateral. Flat hands on lateral cheeks and mandible, posterior stationary circles toward ear.
15. Anterior face: Bilateral. Flat hands to anterior cheeks, posterior stationary circles toward ear. Avoid upward movement toward eyes to prevent filling of lower eyelids.
If applicable, relevant areas of edema, including the intraoral region, nose, eyelids, and forehead, can now be addressed.
16. Reverse the sequence and perform steps 14, 13, 12, 11, 10, 9, 8, 7, 6, and 5 to mobilize fluid from the face through the neck to the bilateral axillae.
Manual Lymph Drainage for the Forehead, Eyelid, Nose, and Ear
Forehead and eyebrows: 1–8. Bilateral trunk decongestion
9. Standard neck and facial decongestion as described in other routines
Address prior to moving into anterior face.
10. Posterior decongestion of temples and central scalp into posterior head
11. Proceed with posterior and lateral MLD away from midline toward posterior head, first addressing the superior aspect of the forehead, then moving inferiorly to the lower forehead and eyebrows as appropriate
12. Once the forehead is decongested, the rest of the face can be addressed
13. Reverse sequence and mobilize fluid to posterior head and neck
Eyelids: 1–8. Bilateral trunk decongestion
9. Standard neck and facial decongestion as described in other routines
Address once lateral face and forehead (if necessary) are decongested.
10. Using fingertips with very light pressure, begin at the lateral edge of the eyelid
11. Perform stationary circles outward, away from mid-line
12. Move medially and repeat until the entire eyelid has been decongested
13. Reverse sequence and mobilize fluid to lateral face
Nose: 1–8. Bilateral trunk decongestion
9. Standard neck and facial decongestion as described in other routines
Address once lateral and anterior face has been addressed.
If a scar divides the nose, direct to adjacent drainage areas, even if it requires crossing midline. If there are no significant scars on the nose:
10. Begin at the lateral edge of the lower part of the nose
11. Perform stationary circles away from midline, moving medially to address the entire lower nose
12. Move superiorly up the nose, repeating lateral to medial decongestion
13. Exercise caution near the top of the nose so that fluid is not moved into the eyelid
14. Once the entire nose has been decongested, reverse sequence and mobilize fluid to lateral face
Ear: 1–8. Bilateral trunk decongestion
9. Standard neck and facial decongestion as described in other routines
Depending on scarring, drainage may be limited. Address after the neck and adjacent facial regions have been decongested.
10. Grasp the ear between your fingers in the area closest to a functional drainage pathway
11. Stationary circles between your fingers toward the target pathway, moving sequentially around the ear. If a scar is present, begin away from it and move toward the scar as MLD progresses.
12. Once the entire ear has been addressed, reverse sequence until the fluid has been mobilized to the face
Summary
HNL management can be straightforward or complex. As outlined in this chapter, proper evaluation is key to identifying proper treatment candidates and establishing effective treatment plans. Documentation of progress with tape measurement and photography allows clinicians to gather reliable data to support treatment and perhaps perform clinical research that will contribute to improved treatment methods over time. With proper use of the CDT methods described above, facial and neck edema after cancer treatment can be effectively managed, improving the quality of life for patients affected by HNL.
Pediatric Lymphedema
In the majority of cases, pediatric lymphedema is caused by congenital malformations of the lymphatic system and may be present at birth or later in life. It can be divided into two groups, based on the age of onset. Primary lymphedema, which is present at birth and associated with a family history, is termed Milroy’s disease. This form of pediatric lymphedema is described as typically involving the lower extremities (Fig. 5.41), but the arms, hands, and face may be involved. It also may be associated with malformations of the lymphatics in the intestinal system. The term Meige’s disease (lymphedema praecox) is often used to describe primary lymphedema that occurs after birth, but before the age of 35; the age of onset is generally in adolescence. Both types can affect both sexes; however, the majority of cases occurs in females.
The most important aspect in the treatment of pediatric lymphedema is the education and training of the parents. It is necessary for the parents to invest time and effort to learn basic hands-on MLD skills and bandaging techniques from a lymphedema therapist in the clinic. Parents cannot learn these techniques from a book; interaction between the parent and the therapist in the clinic setting is necessary to provide for feedback, question-and-answer sessions, and so on. Early on in the treatment, the parent(s) should be actively involved in the treatment process. The treatment sequences and bandaging techniques can be observed during the therapy session and repeated at home. Well-educated parents are capable of providing good-quality care for their child.
Pediatric lymphedema may benefit greatly from a course of CDT initiated as early as possible. Following an intensive course consisting of daily treatments, routine check-ups with the lymphedema therapist ensure continuous feedback regarding the parents’ treatment skills and bandaging technique. Normal limb size may be achieved and maintained, and the typical secondary tissue changes associated with lymphedema may be greatly reduced or eliminated. The general approaches concerning MLD and compression therapy used in adult patients, as well as the duration of the individual treatment session, have to be modified significantly, especially in lymphedematous children of up to 3 years of age. It is also important to realize that treatment progress generally is slower in pediatric lymphedema.
Table 5.3 Klippel–Trénaunay syndrome and Parkes Weber syndrome comparison (From Cohen MM Jr. Klippel–Trénaunay syndrome. Am J Med Genet A. 2000;93(3):171–175. Reprinted with permission.)
Klippel–Trénaunay syndrome | Parkes Weber syndrome | |
Types of vascular malformations | Slow flow: capillary, lymphatic, venous | Fast flow: capillary; arterial; venous |
Color of cutaneous malformations | Bluish to purplish | Pink and diffuse |
Arteriovenous fistulas | Insignificant | Significant |
Lateral venous anomaly | Very common | Not found |
Lymphatic malformations | Common | Rare |
Lymphatic vesicles | Present | Not found |
Venous flares | Present | Not found |
Limb affected | ||
• Upper | 5% | 23% |
• Lower | 95% | 77% |
Limb enlargement | Usually disproportionate, involving soft tissue and bone; macrodactyly, particularly of toes, is common | Arm or leg length discrepancy |
Prognosis | Usually good; pulmonary embolism encountered in ~10% of children; risk is increased postoperatively | More problematic, particularly in those who develop heart failure resulting in cardiac enlargement and cutaneous ischemia, requiring limb amputation |
Various other conditions that may be associated with pediatric lymphedema are discussed in the following sections.
Amniotic Band Syndrome
The congenital disorder amniotic band syndrome is caused by intrauterine constriction rings or bands that cause tissue depressions or strangulation marks on the digits, extremities, and sometimes the thorax, neck, and abdomen. These constriction rings are caused by strands of amniotic tissues adherent to the embryo or fetus and often cause the onset of swelling.
Turner’s Syndrome and Noonan’s Syndrome
The genetic disorder Turner’s syndrome involves girls and is characterized by the absence of an X chromosome. Turner’s syndrome is associated with multiple malformations, such as deformed fingernails, anomalies of the ears and palate, skeletal deformities, dwarfism, and dysplasia of the ovaries and kidneys. Lymphedema may present in the extremities, head, trunk, and other areas.
Noonan’s syndrome resembles Turner’s syndrome; however, Noonan’s syndrome involves males and females, and no chromosomal abnormality is present.
Klippel–Trénaunay Syndrome and Parkes Weber Syndrome
Klippel–Trénaunay syndrome (KTS) and Parkes Weber syndrome (PWS) are two distinct conditions that involve diffuse vascular malformations with limb overgrowth. KTS is a slow-flow malformation including a triad of cutaneous capillary malformations (port wine stain), venous malformations, and overgrowth of bone and soft tissue. Complicating factors may include lymphatic abnormalities, coagulopathy, cellulitis, venous thrombosis, pulmonary embolism, hand and feet anomalies, or involvement of the abdominal and pelvic organs. Occasionally a patient may present with atrophy of an affected area instead of enlargement.
Parkes Weber syndrome is a fast-flow anomaly that can resemble KTS but has the additional characteristic of arteriovenous malformation associated with true tissue hypertrophy. It can be associated with high output cardiac failure which does not occur in KTS patients. The comparison between KTS and PWS is outlined in Table 5.3.
KTS is a sporadic condition with an unknown cause. Each individual has unique characteristics with varying degrees of symptoms ranging from mild port wine stains to life-threatening pelvic or rectal bleeding. KTS characteristics may not be apparent at birth and become more evident as a person develops. It may be difficult to diagnose KTS due to the complexity and lack of awareness of the syndrome and therefore some patients aren’t diagnosed until later in life.
Lower extremity involvement tends to be the most common area affected, followed by upper extremity, pelvic and abdominal, thorax, and rarely head and neck involvement. The lower extremity KTS venous malformations are frequently related to persistent embryonic veins. The lateral marginal vein (vein of Servelle) and the sciatic vein are two common embryonic veins that are expected to disappear during normal development but often persist in KTS patients. The lateral margin vein presents along the lateral part of the foot and leg. Significant venous malformations of the leg can lead to syncope and lightheadedness when standing for which compression may be helpful in reducing the symptoms.
Pain is a common complaint especially in the lower extremity. Pain has been identified to be caused by multiple factors including chronic venous insufficiency, cellulitis, superficial thrombophlebitis, deep vein thrombosis, calcification of vascular malformations, growing pains, intraosseous vascular malformation, arthritis, and neuropathic pain. Therapeutic modalities may be helpful in pain reduction.
Epiphysiodesis is a surgical procedure used to treat limb length discrepancy. It involves slowing down the growth of the longer extremity by damaging the growth plate. This procedure may be indicated for a leg discrepancy of more than 2 cm and is usually performed of age between the ages of 10 and 14 years. Shoe lifts can be used with limb length discrepancies less than 2 cm.
Lymphatic involvement is common in KTS patients but is often overlooked because of the difficulty in proper diagnosis. Complete decongestive therapy is indicated in individuals with lymphedema. Compression, elevation, exercise, and a compression pump may be beneficial in improving venous drainage. Awareness of the increased risk of venous thrombosis and pulmonary embolism needs to be considered throughout treatment.
Patients with KTS are prone to cellulitis and skin issues. The skin temperature is often elevated in an affected area. Skin breakdown, draining wounds, and weeping ulcerations are common and therefore wound and skin care education is important. A compression garment can help protect the skin in addition to facilitating venous and lymphatic flow. In some patients, compression may irritate the skin due to the fragility of the skin. In a small number of KTS patients, the deep venous system may be absent or hypoplastic and therefore the application of compression may increase venous stasis and cause pain. Careful evaluation of the appropriate treatment and compression garment needs to be assessed to obtain the best results.
Manual Lymph Drainage
Because the tissues in pediatric cases are delicate, great care should be taken to avoid discomfort or injury. Depending on the age and size of the child, soft stationary circles and pump techniques may be used; these soft skin manipulations are generally well received by the child. Abdominal techniques are absolutely contraindicated.
Children generally are very active and will not lie still for the entire length of the treatment session. It is therefore recommended that parents bring distractions, such as a favorite toy, game, or book, and the treatment room should be equipped with a television set, preferably with a DVD player. If therapy is not possible on a treatment table, the session may be performed on the floor, or the parent may hold the child in his or her lap during treatment.
Compression Therapy
The application of compression bandage materials requires great care and may not be possible in infants. In standing or walking children, gravity represents an additional factor that may exacerbate the swelling, and compression therapy becomes necessary. In very young children, feedback regarding pressure and comfort is not provided; therefore, the therapist and parents need to embrace a very careful approach when it comes to bandaging. Materials and techniques used in compression bandaging (see later in this chapter) depend on the child’s age and developmental situation. Bandages must not interfere with normal growth and should not greatly compromise the patient’s ability to toddle and walk. In older children, normal activities and play should not be considerably restricted. In general, 4-cm- and 6-cm-wide short-stretch bandages are used, toes are not wrapped, and 2.5 cm gauze bandages are recommended to bandage the fingers, if appropriate. The delicate tissues require extra-soft padding, which can be achieved with nonwoven padding bandages (Artiflex, Cellona), soft foam, or foam containing a fleece lining (Velfoam), or a combination of these materials. It is necessary to check the bandage several times during the day for possible slipping or tourniquet effects; in most cases, the bandages have to be renewed multiple times per day during the intensive phase. Compression garments are not recommended for children younger than 1 year of age. When compression garments are needed, custom garments are used. Close interaction with the referring pediatrician is necessary to determine the appropriate compression level. In general, 20–30 mmHg of compression should not be exceeded in children younger than 4 years of age.
Home Care
In addition to wearing the compression garment during the day, in many cases it is necessary to apply a mild bandage during the nighttime. It is recommended that MLD treatment be administered at least once a day. In infants and young children, parents may find that the best time to provide treatment is when the child is asleep. Older children should be taught appropriate self-care techniques as they mature.
The use of compression garments during the day generally does not affect normal activities, such as sports and play, as long as they fit properly. The therapist or physician should check the compression garments) every 4–6 months for general condition, proper compression, and size. More frequent assessments may be required for children experiencing growth spurts.
Elastic Taping for Lymphedema
General Information
Therapeutic elastic taping (commonly referred to as K tape or kinesiology tape) originated with the work of Japanese chiropractor Kenzo Kase in the early 1970s. Despite a lack of hard evidence, many different techniques have been adopted in common clinical practice with several product manufacturers in the current market. Elastic taping has continued to gain mainstream application popularity and clinical anecdotal evidence since its introduction to the United States during the 2008 summer Olympics. In recent years, applications for edema techniques have evolved to the specialty methods for patients with lymphedema.
Elastic taping for edema conditions is postulated to create variations in pressure with resultant tissue deformation when correctly applied with convolutions (Fig. 5.42). A negative pressure effect under the superficial integument is also thought to lift the skin from the fascia and subcutaneous tissues below, which allows for increased lymphatic pathway flow. As the patient performs respirations, general daily movements, and therapeutic exercise, the tape creates a slight tug on the superficial integument which replicates the effect of manual lymph drainage. Taking up the elasticity of the skin through rhythmical movements results in pulling on the anchoring filaments and a resultant “open junction” of the initial lymphatic vessels allowing for uptake of lymphatic loads. Shim showed a 24%–37% increase of lymphatic flow rates when elastic taping and passive range of motion were combined (Shim, 2003). An early pilot study has also questioned whether Kinesio taping could replace bandaging and has shown Kinesio taping to have better patient comfort and quality of life indicators (Tsai 2009). Elastic taping has also been advocated for edema after post-traumatic and surgical interventions (Bialoszewski 2009). At this time, the remainder of current literature is limited to case studies or articles in nonpeer-reviewed trade journals.
Indications and Contraindications
With the lymphedema population, elastic taping treatment indications include: activation of anastomoses, generalized and focal areas of edema, truncal and head or neck edema where bandaging is difficult, scar management, traditional and alternative drainage pathways, ecchymosis, and pain relief. Contraindications/precautions include: new scars or incision sites, radiation fibrosis, skin sensitivities, fragile skin, allergy and sunburn directly over wound sites and cysts or fistulas, and deep vein thrombosis. Commonly, practitioners recommend a small test strip is applied to an uninvolved area to test for any type of adverse reaction 1 day prior to widespread application.
Fig. 5.42 Demonstration of the general fan cut and application. The base of the tape is placed proximal to the desired lymphatic flow route with the tails following distal to cover the desired treatment area. Notice that the tape is applied with the wrist in an extended position allowing visible convolutions upon recoil (neutral positioning) as demonstrated in this application.
Preparation and Materials
Elastic tape properties vary slightly between manufacturers; however, generally: tape is 100% cotton with acrylic heat-activated adhesive, has a 5-day wear schedule, is able to be worn in water and with activities, and is hypoallergenic. Elastic taping was designed originally to replicate “normal” skin properties of epidermal thickness and longitudinal extensibility. The tape can be purchased in 1 inch (2.5 cm), 2 inch (5.1 cm), and 3 inch (7.6 cm) wide rolls as well as precut versions. The goal of edema taping is to cover a wide skin surface area in which the 3 inch (7.6 cm) roll is typically preferred.
Additional materials include high quality scissors with carbon-coated stainless steel recommended for preventing adhesive build-up and dulling. An electric razor may be needed for hair removal and is typically recommended over a straight razor due to microtrauma that can occur to the skin surface with close shaving and possible tape irritation. Athletic adhesive spray or skin preparation pads typically utilized in wound care can also be incorporated in treatment to form a protective barrier film on the skin surface for prevention of trauma and irritation from wearing and removal of elastic tape. Adhesive removal preparation pads are also helpful for removal; however, most oil-based products (olive, mineral, baby, etc) could also be utilized.
Fig. 5.43 General application of elastic taping for upper and lower extremity bundles. Taping toward the involved lymph nodes may be utilized in general edema techniques or primary lymphedema. Taping toward involved lymph nodes would be avoided and a rerouting technique utilized in treatment planning for secondary lymphedema.
Fig. 5.44 Ecchymosis/focal edema technique: Two or more fan applications are placed over an area of focal edema or ecchymosis. In an area of normal lymphatics, the orientation of the base and tails is unimportant as the goal of application is to move lymphatic loads to a functional surrounding area to be carried away by intraterritorial lymphatic anastomoses.
Application
As with manual lymphatic drainage, the goal of elastic taping is to direct lymphatic fluids toward areas of a less congested lymphatic pathway or lymph node grouping. The patient is assessed for the optimal route of clearance. This may include taping across an anastomosis for activation, along a bundle in the limbs, an alternative route to decongested lymph nodes, around scars or other barriers, etc. The taping application should enhance and follow the patient’s individualized treatment strategy.
Lymphedema and Generalized Edema Technique
Preparation: Off the roll, the tape strip is placed on the patient to allow an estimation of the length needed for application. The goal of the treatment can be achieved in one long application (typically 15–20 cm), or in several smaller length applications placed in succession to one another.
• The tape is then cut into what is typically referred to as a fan shape with a 1 cm base on one end (see Fig. 5.42). The fan-shaped cut allows for the spreading of the tails to cover a larger surface area. Tail numbers can range from 3–8 typically; however, this depends on the skin’s properties, the experience of the practitioner, the surface area to be treated, and the width of the tape. Tails are usually 1–2 cm in width, with variability in this recommendation as well depending upon specific circumstances.
• Square edges are rounded with the scissors to discourage them from catching and peeling prematurely. The paper backing is then torn to allow for separation of the base from each individual tail for ease of precise application. Once the skin has been prepared and is free of oils, lotions, perspiration, and hair, the tape is ready to be applied.
Skin application: Place the patient’s skin into a position of full stretch if possible. Upon application in the stretched position, return to the natural resting state, allowing the skin and tape to recoil with the desired rippling convolutions visible (see Fig. 5.42).
• The base of the tape is adhered at the “end point” where flow is directed with the tails over the treatment area.
• Each tail strip is then adhered by removing the paper backing and placing the strip over the skin with no stretch applied to the tape. Repeat tail application individually until all strips have been placed over the treatment coverage area. Tape tails are allowed to overlap or cross one another.
• Once the tape is in place, the practitioner gently rubs over the tape longitudinally to adhere and warm the acrylic adhesive. Maximal adherence is achieved in 30–60 minutes due to body heat activation and tape removal should be avoided during the first 24 hours due to risk of skin damage upon removal (Fig. 5.43).
Ecchymosis/Focal Edema Specialty Technique
• The skin and tape are prepared in the same manner as described previously.
• Application of the focal area is in a criss-cross pattern, creating a grid over the involved area. The base and tails of one strip are nearly perpendicular to the other strip with an overlapping checkered pattern covering the area of involvement (see Figs. 5.44 and 5.45).
Stable Scar Technique
• An additional specialty technique can be utilized for stable scars that demonstrate hypertrophy, decreased mobility, pain, and adherence issues. This technique is most typically utilized for surgical incision sites, but can be adapted to other scarring as well. Scarring over large body surface areas (such as burns, wide range radiation fibrosis, etc.) is not an ideal application for this technique.
• Skin is prepared as previously described. The tape is cut into several 25 mm by 6 mm tablike strips, making sure that the stretch of the tape remains longitudinal.
• The base of the first tiny strip is placed near the edge and perpendicular to the scar. The backing paper is torn away with the base adhered with no stretch on the tape. The central portion of the tape is then pulled to a 50% stretch on the tape and adhered. The second base of the tape is then laid down with no stretch applied.
• The second strip is applied in the same manner; however, it is placed one tape-width further along the scar, pulling in the opposite direction. This continues to alternate in pull direction as the strips are placed along the length of the scar. With subsequent applications, the direction of pull can be alternated for increased mobilization of the tissues in all directions (see Fig. 5.46).
Anastomosis Technique
• The anastomosis taping technique is illustrated in Fig. 5.47.
Rerouting Technique
• The rerouting taping technique is illustrated in Fig. 5.48.
Patient Education for Elastic Taping
As with all aspects of complete decongestive therapy, the elastic therapeutic taping component requires extensive patient education. With initial applications, patients are instructed to avoid high-level activity for 60 minutes before and after application to allow for improved adherence. Removal of the tape is discouraged in the first 24 hours, except in the case of adverse reaction, as it can cause epithelial damage during this time period of maximal bonding. Patients are allowed to swim and shower. However, they should pat the tape dry and expect a sensation of moisture for up to 1 hour. In the case of areas that begin to loosen or peel up, patients or caregivers are encouraged to carefully cut the tape back to the level of the skin to avoid further premature removal. In case of emergency, patients also need to be instructed in safe removal techniques, which are explained below.
Fig. 5.45 An example of tape removal in an area of ecchymosis demonstrating the visible clearance of lymphatic loads from the medial lower leg.
Fig. 5.46 Stable scar technique: The tape is cut into tabs for alternating application of pull along a stable scar. The small bases on each end of the tab are applied without stretch, while the central portion of each tape strip is stretched to ~50%. With subsequent applications, the orientation and pull of the tape tabs should be altered depending on patientspecific restrictions.
Patients are encouraged to perform muscle pumping exercise and stretches as well as general daily activities to facilitate maximal tape effectiveness and lymphatic uptake. Taping can be utilized with or without bandages, with combinations of techniques found to be highly effective in the clinic. Utilization of elastic taping and manual lymphatic drainage are also complementary and can be beneficial in conjunction with one another. The elastic properties of the tape pull on anchoring filaments and create a slow smooth stretch on the lymph collectors with resultant angion contraction, which has the same effect as manual lymphatic drainage. When taping is used in combination with manual techniques, the resultant effects are enhanced.
Fig. 5.47a, b Anastomosis technique: Taping of interterritorial anastomoses is applied with the base of the tape in the healthy quadrant crossing the watershed along the appropriate anastomoses. The tails of the tape follow in the congested quadrant with resultant flow across the anastomosis into an area of normal lymphatics. a. Taping of available anterior anastomoses for secondary UE lymphedema including the AAA and AI anastomoses. b. Taping of the PAA and PII for the example of primary left UE and LE lymphedema. Appropriate routing is patientspecific and should follow the patient’s individualized MLD treatment plan.
Fig. 5.48 Rerouting technique: Elastic taping can be applied with the goal of rerouting lymphatic loads around barriers to lymphatic flow. Since the tape affects the anchoring filaments and initial lymphatics, the plexus can be utilized for altering the pathway of flow in any direction. In this example, the patient has a fibrotic and restricting scar from the base of the neck distally to the umbellicus. To facilitate flow from the right upper quadrant to the left upper quadrant, taping was applied proximal to the scar in the general direction MLD would also be applied for rerouting.
Although elastic taping should not be clinically performed by untrained professionals, with time, patients can be instructed in correct usage for long-term therapeutic effects. Elastic taping is readily available via public vendors and internet shopping. An easy-to-understand patient analogy is to cut the fan shape and then explain to the patient it is shaped like and behaves like an octopus. The head of the octopus (base), should be placed where you want the fluid to flow toward with the tentacles (tails) following behind. Remind the patient that the “octopus swims where you want the fluid to go.”
Removal
After several days of wear, the tape is usually easily removed due to shedding of the superficial epithelium. Ease of removal is enhanced when the tape is moistened and is removed in the direction of the body hair. As mentioned earlier, commercial adhesive removers as well as oils will also reduce the adhesive bond. During removal, separate the tape from the skin by utilizing your finger to push the skin down and away from the tape, rather than pulling up on the tape itself. Inspect the integument for any adverse effect. It is recommended that a different application site be used when reapplying the tape or, alternatively, the patient should wait for 24 hours before reapplying tape to the same area to allow for recovery of the integument.
Treatment Strategies for Common Complications of Lymphedema
The so-called “typical” lymphedema patient routinely presents with a complex medical history and clinical picture resulting in significant and sometimes numerous additional complicating concerns. Secondary lymphedema by definition involves trauma and or removal of lymphatic tissue, often at the demise of surrounding structures. Primary lymphedema is often neglected due to misdiagnosis and or poorly designed plans of care, making advancement of severity and subsequent tissue changes common. With more advanced stage 2 or 3 limbs, a far more extensive clinical intervention (intensive phase CDT) and long-term comprehensive care plan are mandatory to achieve adequate results.
In both possible classifications (primary, secondary) the underlying cause is a mechanical insufficiency of the lymphatic system. Inherited dysplasia or secondary tissue damage result in the same treatment challenges with predictable advancement through stages of severity. Since the lymphedema therapist is working with a less robust lymphatic transport system it is of great importance that treatment be adjusted to preserve the remaining integrity and status of lymphatic tissues and surrounding structures. In so doing a more generalized improvement in residual lymphatic drainage and the reversal of lymphostatic fibrosis and its sequelae can be achieved. If the immune system is severely compromised infections may be frequent, acute, and life threatening. Regarding complications to therapy, it should be noted that poorly administered therapy could have lasting negative impact tarnishing the appeal of the gold standard of care CDT which should be avoided at all costs. The following complications are considered common in the lymphedema patient population and require a heightened awareness of negative consequences and vigilant tailoring of CDT protocols to deliver safe and effective care.
Surgical Scars
Surgical scars disrupt the superficial vessels in many patients especially where consideration of the superficial lymphatic collector anatomy has been disregarded. Lymphatic vessels are capable of repair and will, if undisturbed, re-anastomose via lymphangiogenesis. Upon close inspection vessels repair in a less structured fashion often missing valves or smooth muscle; however, this repair process is crucial to avoid secondary lymphedema in tissues distal to the node beds.42 When nodes are removed lymphedema is more likely since these represent the terminal point for a whole network of vessels. Without this inherent vessel repair process simple cuts and lacerations during a person’s lifetime would cause significant loss of lymphatic transport.
Assess Scars to Discern the Impact on Lymphatic Transport
With an understanding of the normal superficial anatomy of limb and truncal areas, assess the potential for interrupted flow within a territory. A poorly healed, disturbed scar, thickened, inflamed or keloid scar may entrap fluid on the distal side of the skin region. If so a palpable tissue change (fibrosis) and or pitting quality (congestion) of the edematous tissues will be present.
Treatment Strategy
The MLD sequence should relate to any collateral pathways around the scar rather than through the scar when possible. As a rule MLD should strive to utilize the most efficient intact pathways and substantiate the lion’s share of the session. Scar tissue mobilization techniques or other specialized scar work should only be administered during secondary treatment sessions to avoid inefficient use of valuable MLD session time. Remember the overarching treatment goal is improvement of collateral drainage pathways via intact and patent collectors rather than local scar improvement.
Debulking Scars
Surgical treatment of lymphedema occurs by default when patients are not informed of CDT as the prevailing noninvasive therapy. Primary lymphedema patients are the most common recipients of surgical treatments due to the lack of appropriate diagnostic resources available to most physicians, insufficient physician knowledge about primary lymphedema pathophysiology and the lack of a clear external cause (idiopathic edema).
Primary lymphedema patients may also receive less radical procedures such as collector transplantation, microvascular bridging, lympho-venous anastomosis, or liposuction. Others, however, receive the most radical procedures which “debulk” the limb of much or all of the involved tissues with the foremost goal of limb girth reduction (Fig. 5.49). These radical procedures effectively remove the entire superficial lymphatic network leaving the therapist with little viable tissue with which to recruit efficient alternative drainage.
Debulking Procedures
• Staged excision techniques (Sistrunk, Homans, Thompson)
• Radical excision techniques (Charles)
Staged Excision Techniques
These procedures involve removal of the subcutaneous tissues (fat, lymphostatic fibrosis) down to the deep fascia via a large longitudinal incision. These incisions may extend along the medial and lateral calf and thigh and are usually planned as staged operations. The reduction involves more than the local incision area encompassing several centimeters of margin on either side effectively removing large strips of subcutaneous tissue. Strong tourniquets are applied and remain in place for as long as 2 hours. An Esmarch bandage, essentially a wide rubber band, is applied in spiral fashion to squeeze venous blood from the limb under great pressure in preparation for the surgery. Steinman pins are drilled into the calcaneus and proximal tibia to suspend the leg for circumferential access to all involved surfaces (Fig. 5.50).
Radical Excision Techniques
These procedures involve complete removal of all skin from the surgical area. The deep fascia is exposed and split thickness skin grafts are harvested from the excision tissue to be sutured in strips back onto the muscle fascia. Similar presurgical prep techniques are used to minimize blood loss and improve access to all sites. The removal of all tissues leaves an extremely altered and unsightly appearance in all patient subjects. Commonly the calf region is excised using the Charles procedure.43 Thigh areas may more commonly employ Homans or Sistrunk procedures.44
Treatment Strategy
Status Post-Radical Charles Procedure (Fig. 5.51)
Since the entire superficial lymph vessel network has been removed, MLD treatment of the grafted tissues has no apparent impact or rationale. With skin grafted directly to the deep fascia, no true subcutaneous space exists where swelling can occur. Furthermore, skin grafts quickly scar down adhering to the fascia and lose normal elasticity, rendering manual traction (MLD) impossible. Distal nonexcised tissues on the foot, ankle, and toes (a typical occurrence), tend to worsen, progressing toward elephantiasis more rapidly than they would as a natural course. Effective long-term drainage of these tissues relies upon perforating collectors interfacing with the deep spared lymphatics of the limb. As such, treatment should encompass the following:
• Focus on proximal, spared areas and the deep lymphatic anatomy with MLD
• Moisturize the grafted skin areas liberally to improve hydration status and elasticity (slow improvement can be expected)
• Use foam padding generously to fill the defect areas and assist in creating a more conical limb contour for gradient flow of blood and lymph
• Expect distal nonexcised areas to remain chronic and largely treatment resistant. These patients typically require more intensive follow-up and home care protocols
Status Post “Staged Excision” (Homans, Sistrunk, Thompson) Procedures
Cosmetic results are far better in these cases leaving the epidermis more elastic and less altered. As described the subcutaneous space has still been radically altered and as such superficial lymph vessels are far less numerous. Coupled with hypoplasia, the most common underlying dysplasia in primary lymphedema patient cases, a far less treatment-responsive limb can be expected. All postsurgical patients are candidates for CDT but individual outcomes may be more difficult to predict. Considerations include:
• Assume surgical scars are effective barriers to drainage (will entrap fluid)
• Plan MLD to maximize collateral flow around scars
• Expect slow improvement as compared with nondebulked limbs
• Expect compression garment to be stronger compression class
• Expect bandaging pressures to be higher to achieve softening and volume reduction
• Compression strategy is normal regarding padding (no alterations are necessary)
Hyperkeratosis
Hyperkeratosis can be described as an epidermal hyperplasia due to lymph stasis, which appears as a local overabundant thickening of the skin with rough calluses,45 wartlike formations or papillomas (Fig. 5.52). Hyperkeratosis is one of the key descriptors of stage 3 lymphedema (elephantiasis), which is a common consequence of chronic lymph stasis, which always involves secondary connective tissue disease. These skin changes are most commonly seen in the toes, but may encompass larger regions that are directly associated with the most chronic areas of static lymph. Sometimes the term “lichenization” is used to describe odd presentations of hyperkeratosis due to the mosslike appearance seeming to grow on the skin surface. It is important to note that the presentation of hyperkeratosis in venous disease (venous edema) changes the diagnosis more accurately to phlebo-lymphostatic edema.
Treatment Strategy
Hyperkeratosis may be extreme, imparting a resistant quality due to extensive overgrowth of hardened, calloused tissue. Surgical excision should be avoided due to local immune deficiency and delayed healing of edematous tissues. The presence of hyperkeratosis, especially on the toes, usually corresponds with a loss of normal shape or cross-sectional contour, making toes appear square. This leads to a loss of normal air circulation and the accumulation of moisture and fungal colonies. Maceration, tissue fragility, and recurrent infections are frequently associated with this clinical picture. Some suggestions include:
Compress using closed cell foam (Komprex) and short-stretch materials. Fibrosis will soften although initially it will be stubborn. Continued compression will allow some tissues to be restored over time and toes can become remodeled from square to round in cross-section.
Manual tissue manipulation. Self administered gentle skin rolling and focused digital pressure can decongest underlying swelling allowing hardened epidermal skin to become more pliable and slowly be restored to a more normal texture.
Lotions. Amlactin is an ammonium lactase lotion, which gently softens and erodes calloused tissue. Prescription grade, 12% concentration is available, or over-the-counter (OTC) 9% solution is available. Apply daily to regions of hyperkeratosis only and monitor for improvement while avoiding adverse tissue affects.
Meticulous hygiene. Keep the inter-digital spaces dry and all skin clean. Identify tissue erosion early from treatment elements that may be too intensive. Protect fragile areas from further breakdown since avoidance of infection is of paramount importance.
Abnormal Folds
As lymphedema severity progresses skin creases develop due to edema filling forces, gravity, limb position, elasticity of the skin, and even genetic traits (Fig. 5.53). In some cases a limb enlarges without contour changes, in others the distortions can be remarkable and alarming. When abnormal limb contours exist the lymphedema therapist must adapt the compression strategy accordingly. Therapist considerations should include the following before commencing treatment:
• Is the current limb shape counterproductive to the Laws of LaPlace? (reverse cone shape, areas of narrowing, lobular outgrowths)
• Will the folds/creases entrap the fluid or allow for accumulations of bandages that are counterproductive to therapy?
• Are the folds/creases sites of recurrent infections?
• Are the areas within the skinfolds clean and dry or macerated and colonized with bacteria or fungus?
Treatment Strategy
During the pretreatment presentation lymphedema will appear in its most advanced and treatment-resistant form. Lobular outgrowths and distorted tissues typically exhibit a pitting-resistant texture due to extensive fibrosis, hyperkeratosis, and fluid pressure. It is important to adapt treatment with sensible, thoughtful approaches such as:
• Cleaning and inspecting folds and skin creases
• Treating with antibacterial preparations as necessary
• Drying and protecting skin-on-skin areas thoroughly; tissue fragility is likely in protected, unstimulated skin areas
• Packing the region with synthetic cotton and/or soft foam strips
• Building out valleys (with padding) to create a continuous, smooth plane
• Building out narrow girths (with padding) to avoid entrapment of fluid (Law of LaPlace)
In all cases a correctly bandaged limb will improve texturally each session allowing odd contours to become progressively more supple and compliant for each subsequent bandage application. In brief, the limb will transform rapidly from day to day so that even the most strikingly abnormal shapes will return toward normalcy again. Although cases involving abnormal lobes and folds are generally categorized as elephantiasis limbs, they should not be viewed as untreatable. However, commonsense modifications can be made to accommodate the abnormal contours. Bandage suggestions include:
• Modifying the directions of bandage turns, (e.g., Omit Heel Ankle Sole “HAS” pattern, use the Figure 8 pattern only, omit toe wraps if impossible, etc.)
• Bandage first: Bandage distal limb areas prior to performing MLD, then administer MLD to proximal nonbandaged regions (thigh); finish with proximal limb bandaging to complete the limb coverage)
• Use generous amounts of padding to offset defects and deformed tissue contours
• Leave distal (more advanced areas) limb wrapped longer to focus on proximal decongestion (e.g., rewrap every 2 days)
• Use adhesive tape generously to secure regions that slip or seem unsecured
• Alter bandage turns creatively. Depart from basics and use many more layers to create necessary structure and adherence.
Odors and Odor Control
Lymph Leakage (Lymphorrhea)
With advancement through the stages lymphedema tissues become more prone to leaking lymph fluid. This stagnant lymph has a characteristic, malodorous smell that is difficult to describe but is largely consistent from one patient to the next. Usually with thorough hygiene and decongestion this problem can be managed and if small wound areas exist closure can be expected as the limb decongests. Sometimes lymph will encrust on regions around superficial wounds (cysts, abrasions, punctures) creating a scablike feature of yellow, dried exudate (Fig. 5.54).
Treatment strategy
• Clean meticulously with normal soap and water
• Protect fragile skin with soft materials or wound dressings
• Avoid maceration (use absorbent dressings)
• Watch for evidence of cellulitis (occurrence is common)
• Expect spontaneous closure of lesions with decongestive therapy
• Avoid active debridement of lymph crust. As with a scab fragile underlying skin loses protection. Allow sloughing to occur naturally
• Hyperhydrate crust areas with petroleum jelly to soften and promote sloughing
Bacterial Skin Colonies
Another source of odor may be related to the presence of bacterial colonies on the surface of the skin or those harbored in creased skinfolds. Some emit distinctive odors that can be specifically described and treated. Regardless of type, bacterial colonies must be controlled with meticulous hygiene and antibiotic ointments or other topical preparations to avoid potential cellulitis.
Treatment Strategy
• Triple antibiotic ointment
• Atomized Flagyl spray (requires prescription and preparation)
• Regular soap and water (antibacterial soaps may create resistance)
• Corn starch (for moist skin areas)
• Towel dry after showering
Odor Absorbers
• Activated charcoal pads (use external to wound dressings, not against skin)
• Stoma powder (use as indicated)
• Atomized Flagyl spray (requires prescription and preparation)
• Shaving cream (use generously on malodorous, intact skin areas)
Fungal Odor
Fungal infections produce a characteristic sweet or yeast-like odor and generally reside on the feet, or in skin creases, where moisture, warmth, and darkness prevail. Sometimes the groin or abdominal pannus become involved or areas where limbs are so enlarged that skin-to-skin contact cannot be avoided.
Treatment Strategy
OTC antifungal preparations may be adequate to arrest infections. However, a physician should be consulted to accurately assess the severity and type of infection to determine if special intraoral medication is necessary. Odors should resolve with treatment.
Fistulas
A fistula is an abnormal connection between two epithelial-lined organs or, as is the case in lymphatic abnormalities, lymphatic vessels and the surface of the skin create a lymphocutaneous fistula. In lymphedema patients fistulas may be present in a variety of anatomical places such as the genital and rectal regions, within irradiated tissue, between arteries and veins as in complex vascular syndromes, or, in some cases of primary lymphedema, fistulas may occur between lymphatic vessels and the skin surface. In such cases leakage of body fluids directly from these openings can create strong malodorous and infectious complications.
Treatment Strategy
If surgical repair can be performed, fistulas may be corrected or closed. However, when active disease such as cancer is causal, fistulas can remain persistent and untreatable. Activated charcoal pads as a palliative treatment perform well in these situations to control odor, increase the patient’s sense of dignity, and make treatment progress more comfortable for both therapist and patient.
Fungal Infections
Patients with lymphedema of the legs and feet often encounter fungal infections due to several factors such as:
• Loss of normal contour of toes (square instead of round): decreases air flow and increases moisture, darkness and warmth (Fig. 5.55)
• Loss of footwear choices due to abnormal size and shape of foot: causes recontamination within same pair of shoes
• Decreased local immune function
Although fungal infections may be acute, they are usually not regarded as strict contraindications to therapy unless the tissues are fragile or open. A normal plan of care would dictate that fungal infections be arrested prior to commencement of therapy to reduce the avoidable complication of spread to other skin regions. However, should treatment begin during an active fungal infection of lesser severity, with caution, the therapist may carry out complete decongestive therapy bearing in mind the following suggestions:
Treatment Strategy
• Apply topical antifungal preparations, stockinette, and toe bandages with hands gloved
• Wrap to the knees first (prior to MLD) to cover distal involvement and avoiding contamination of other areas
• Administer MLD to proximal, truncal areas (above bandage) only to avoid contact and spread. MLD is not required in the infected areas temporarily.
• Discard all materials that are intimate with skin to avoid recontamination, daily
• Discard contaminated footwear and instruct patient as to how to avoid future problems
Radiation Trauma
When considering lymphedema patients, the single largest group is comprised of cancer therapy recipients (in the western hemisphere north of the equator).
Since radiation therapy is a mainstay of gold-standard care for many types of cancer, lymphedema therapists must carefully consider the secondary effects of this therapy on tissues within the field. MLD and compression, although approached with care, skill, and a low level of intensity can have harsh affects on irradiated tissue. Radiation causes a slow retreat of microcirculation (dieback) in soft issues leading to ischemia and scar-tissue formation. Soft tissues may become palpably altered and exhibit a loss of elasticity, supple texture, and normal color. When assessing radiation effects, lymphedema therapists should familiarize themselves with the conditions in the following sections.46
Telangiectasia
Upon close inspection in some cases a visual, palpably undetectable yet permanent change occurs in the superficial skin of the area of irradiation. Telangiectasia is a spider-veinlike presentation, where the capillary plexus of blood vessels is distinctly visible, engorged or even varicose in appearance (Fig. 5.56). Although the presentation may at first glance be alarming, it is generally not an indication of severe radiation trauma. Tissues remain elastic and normal to the touch. The cause of telangiectasia is related to the loss of sympathetic motor control of the precapillary arteriole’s ring of smooth muscle. This sphincter muscle controls the arterial inflow within the blood capillary plexus and when paralyzed relaxes to allow an excess of pressure locally. This increased blood capillary pressure dilates and enlarges the capillary bed making it more visibly apparent.
Treatment Strategy
• Avoid forceful stretch and pull on the local area—even normal MLD traction force may be excessive
• Further assess the status of the underlying tissues in the region as they may indicate or raise suspicion of further radiation damage necessitating strong caution. Is radiation fibrosis present?
• Moisturize skin thoroughly and instruct the patient in careful self-management
Radiation Fibrosis
Tolerance of radiation therapy is highly variable and some patients do not suffer secondary effects. In others, however, with the development of ischemia, connective tissue slowly impregnates the region of irradiation. As it becomes more extensive, tissue texture, elasticity, and skin tension continue to worsen. As time passes and without physical therapy, fibrosis may become irreversible causing many additional concerns.
Superficial and Deep Radiation Fibrosis
Upon palpation superficial textural changes may be apparent. The skin and subcutaneous tissue may feel like a continuous, solid sheet with a loss of normal elasticity. In some cases the margins of this connective tissue may define and correspond precisely to the field of irradiation. If the skin is still pliable and nonadherent to underlying structures (mobile), it is generally considered a less advanced presentation. Regardless of this, superficial radiation fibrosis may still present challenges indicating a significant reduction in local lymphatic collector transport capacity due to mechanical entrapment. Superficial nerve and/or blood vessel entrapment is also possible causing collateral vein formation and numbness or other neurological changes.
With extensive radiation damage soft tissues become chronically and severely altered exhibiting signs of color change (rusty red, brown) with a complete loss of elasticity and further adherence to the underlying structures (bone, soft tissues) (Fig. 5.57).
Complications from Deep Radiation Fibrosis
These include:
• Osteonecrosis: Damage to the periosteum causes bone necrosis, decalcification and possible bone reabsorption. This condition is irreversible.
• Limb paralysis: Motor and sensory nerve entrapment from direct damage to nerve plexuses with demyelination. Secondary connective tissue entrapment resulting in total loss of function and sensation. This condition is irreversible.
• Skin fragility: Superficial skin may become extensively dry, brittle, atrophic and prone to ulceration. Tearing is possible if overstretched.
Treatment Strategy: Superficial Radiation Fibrosis (Nonadherent)
Significant improvement of tissue affected by radiation therapy is slow and should not detract from the overarching aim of therapy, which addresses total limb edema reduction. A separate session with new goals may be advisable if a special focus on fibrotic tissue release is desired or planned.
• Avoid deep techniques (MLD or other) in the field regardless of severity
• Liberally apply moisturizer to maintain hydration and avoid fragility or dryness
• Study the radiation zone to see how it impedes the known anatomical vessel drainage and then strategize to redirect the flow toward collateral vessels and anastomoses
• Time permitting, using very light pressure stretch the tissue using only MLD techniques (stationary circles with finger pads) to soften and reorganize the connective tissue (collagen matrix)
• Palpate the region daily to detect improvements and adjust the intensity of manual techniques with special caution at all times. Ask for patient feedback.
• Gentle compression with foam padding (either smooth or contoured surface) may soften tissues depending upon the severity of induration. A careful study of the outcome of each treatment is required to further moderate intensity and avoid tissue injury.
Treatment Strategy: Deep Radiation Fibrosis (Adherent)
When damage is so extensive that a “glued down” or adherent quality is clearly present the lymphedema specialist’s chief concern must be avoidance of secondary tissue injury during therapy. Skin tears, hemorrhage, unremitting pain and spontaneous bone fracture are real concerns while positioning patients during therapy. Flaccid paralysis of the edematous limb is not uncommon when significant radiation has been administered in the regions of major nerves and nerve plexuses.
Additional Considerations
• Position the patient with consideration for the inextensibility (frozen state) of irradiated tissue and underlying structures. The supine or prone position may not be possible.
• Bolster flaccid or insensate limbs to avoid loss of limb position control (slippage)
• Do not attempt to reorganize or soften irradiated tissues with manual therapy as it may create significant, irreversible damage or pain
• Hydrate tissues often to offset dryness and brittle skin. Consider special skin products.
• Do not attempt to improve lymph drainage through tissues severely affected by irradiation. Use treatment time wisely recruiting neighboring healthy regions.
• Look out for minor skin tears at the edge of radiation field tissues. Stretching of adjacent normal skin (with MLD) can extend backward into the atrophic, adherent skin region causing chafing and small tears.
• Instruct the patient in sensible lifestyle adjustments to avoid injury and preserve or improve the current tissue status. Do not employ aggressive strategies.
• Avoid direct compression over severely irradiated tissue. Irritation or allergy caused by compression materials can be slow to heal. Softening with compression may be too aggressive to warrant application. Risks may be too high.
• Deep MLD techniques are strictly contraindicated! Superficial MLD must be extremely light if used at all. Strict avoidance may be the safest plan.
Papillomas
A papilloma is defined as an overgrowth of the papillae of the skin or mucous membrane and is one of the key descriptors of stage 3 lymphedema.47 This benign formation could be characterized as a skin tag that has become inflated with fluid and is therefore a bulbous, balloon-like feature attached with a highly vascularized stem of tissue (Fig. 5.58). When lymphedema becomes chronic a direct relationship exists between the level of inflammation and the formation of hyperkeratosis and papillomatosis in certain individuals. Typically, papillomas form at the most chronic distal tissue regions or along scar formations following debulking procedures. Other papillomas form in thin pliable tissues such as those found in the genitalia. Notably, if regional decongestion is achieved through treatment and before the papilloma becomes impregnated with fibrosis, a dramatic shrinking and even complete disappearance of these formations can occur in many cases.
Due to the fragile nature of the papilloma, injury is common due to mechanical stresses such as toweling, donning and removing of garments, application of lotions, etc. For this reason they can often be cited as the entry point for pathogens and may be responsible for recurrent episodes of cellulitis. Leaking and bleeding are common and lead to great patient frustration. Lymph exudate is commonly malodorous and affects a patient’s sense of dignity, compounds quality-of-life constraints, and, in particular, affects his or her enjoyment of socialization.
Treatment Strategy: Considerations
• Many papillomas will soften and shrink away if not yet fibrotic. Injury and leakage may cease and further improvement may occur with continued compression.
• Chronic fibrotic papillomas are prone to injury and infection, warranting surgical removal. Decongest the territory first so that postoperative healing will be enhanced.
Although surgical interventions are not embraced as treatment for lymphedema, and protection of the skin barrier is of paramount importance, a suggestion for surgical removal of chronic papillomas is viewed as a minor, low risk procedure aimed at correcting a defect that is responsible for cellulitis.
Lymph Cysts and Varicosities
Lymph cysts occur due to congestion and dilatation of lymph vessels (Fig. 5.59). Cysts mostly occur due to congenital malformation; however, a local surgical interruption of lymph drainage can also create sufficient collector hypertension and reflux to cause cyst formation.48 This is more commonly evident in areas where skin is thin and extensible such as the axillae and genital regions. Depending upon the tissue structure related to the cyst (collector, capillary) a distinction can be made as to the level of congestion of surrounding tissues and origin of the problem. If caused by primary malformation, cysts may be less correctable by decongestive therapy since the underlying cause may involve valvular incompetence or hyperplasia of the deep lymphatic system. In some cases chylous fluid is seen weeping from the skin.
White cysts rather than clear cysts indicate chylous reflux from deep intestinal lymphatics or the thoracic duct itself.47 A lymph varicosity is similar to a varicose vein and involves a collector (Fig. 5.59). In thin-skinned (geriatric) patients visualization of hypertensive, engorged or varicosed lymphatics may be possible. This presentation is not common, however, where subcutaneous adipose is more substantial.
Treatment Strategy
• Cysts are extremely fragile and are likely to rupture when exposed to any mechanical stressors (bandages, garment, MLD, exercise). Apply a sterile, highly absorbent dressing over cysts prior to compression bandage application.
• Assess patients risk level for infection based upon history or level of concern. Always identify antibiotic of choice and attain full prescription as a precaution.
• Discuss signs and symptoms of cellulitis with the patient and a sensible plan for antibiotic administration (physician directed) if required
• Expect most cysts to resolve (shrink or disappear) once the involved territory is thoroughly decongested
• If chylous reflux is present, consider imaging studies to determine if a surgical solution is required. Recurrent cellulitis is life-threatening with pathogens gaining direct access to the deep lymphatic system via chylous cysts.
Collateral Veins
During an initial physical examination close inspection of the involved quadrant should be thoroughly documented. When lymphedema is caused by surgical intervention secondary trauma may be apparent. Upon close inspection certain asymmetries may require further investigation such as comparative status of nonirradiated skin to irradiated skin, atrophic or hypertrophic tissues, palpable or visual masses, abnormally prominent or altered vein formations, etc. It is always important to recall the causes of swelling to differentiate between various presentations. Venous obstruction alone may cause swelling (venous edema).
Causes of venous obstruction include:
• Superficial or deep vein thrombus
• Tumor obstruction
• Mechanical entrapment due to radiation fibrosis, scar tissue formation, bone fracture, etc.
Stay updated, free articles. Join our Telegram channel

Full access? Get Clinical Tree


