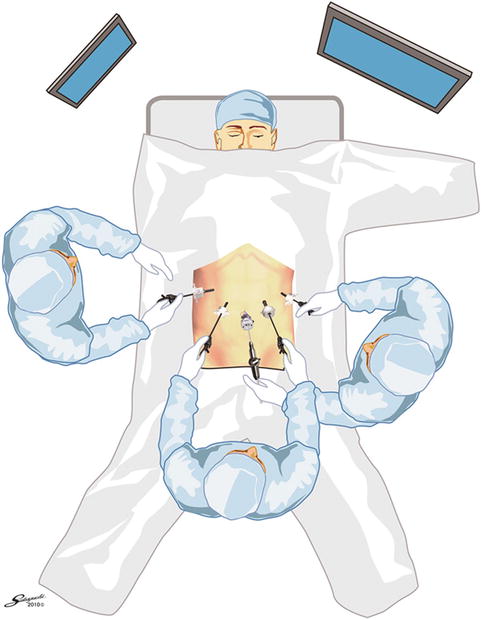
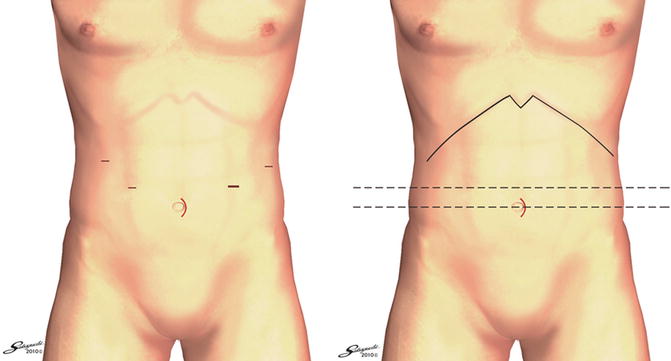
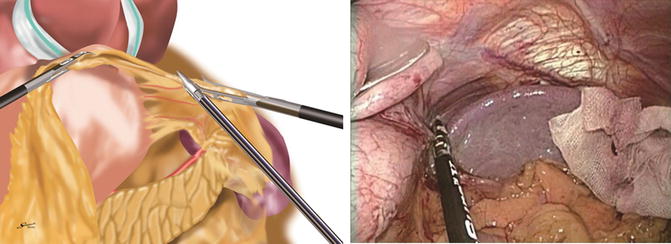
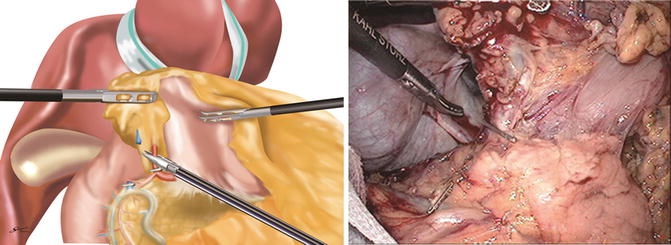
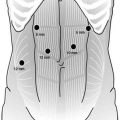
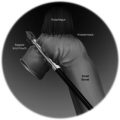
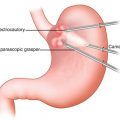
Fig. 24.1
Patient positioning
Port Placement
Entry into the abdomen is gained through a 2 cm vertical skin incision that is made just above the umbilicus and a 12 mm Ethicon Excel blunt port is inserted. The supraumbilical optical port serves as a reference point for insertion of all other ports, two on either side of patient’s abdomen. Both operative ports are placed 2 cm above the umbilical port and at a handbreadths distance laterally (12 mm right-hand and 5 mm left-hand port). Two further ports (both 5 mm) for the assistants are placed further superiorly near the costal margins, between the mid-clavicular and anterior axillary lines on the patient’s right and more laterally on the mid-axillary line on the patient’s left ensuring that the ports don’t clash with the operative ports [2–4]. The umbilical wound is extended 3 cm superiorly along the midline for proximal procedures such as total and proximal gastrectomy that require esophagojejunal anastomosis and insertion of the circular stapler through a wound protector in the umbilical wound (Fig. 24.3) [5].
Ports are first inserted into the right side of the abdomen (5 mm upper lateral port then 5 mm lower operative port) followed by the left side (5 mm upper lateral port then 12 mm lower operative port). The long needle is inserted through the skin at the marked site and peritoneal entry in the correct position and direction is confirmed. The needle is then withdrawn, and the skin is incised to accommodate the trocar. Artery forceps are used to separate the muscle before inserting the trocar in the desirable direction while avoiding visceral injury.
Liver Retraction
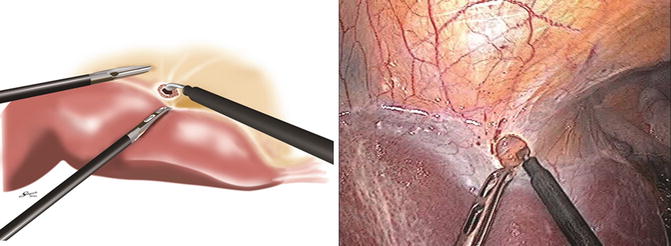
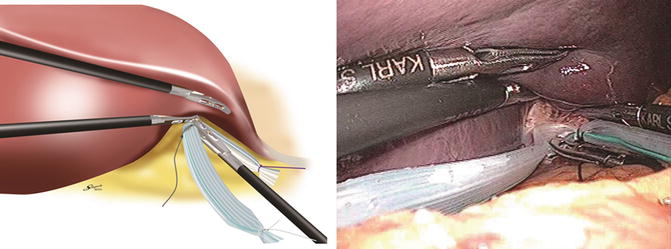
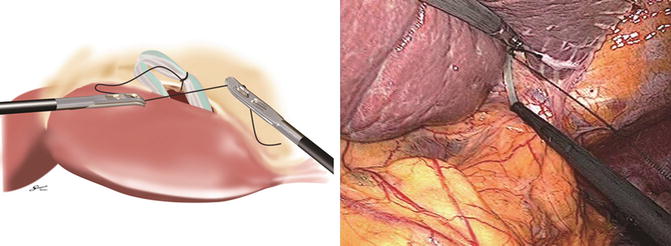
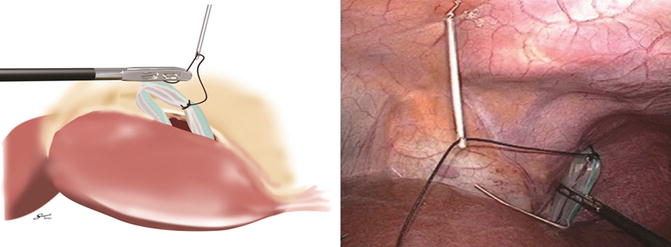
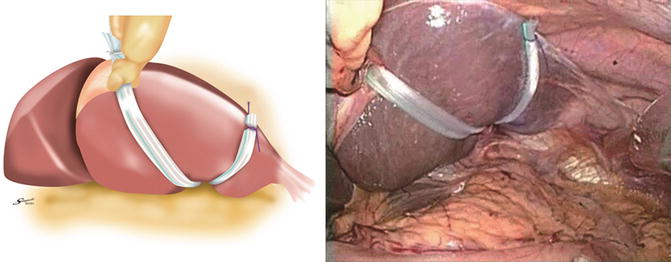
A 6 mm Penrose drain is prepared outside the body with colored sutures placed through it to provide ties for liver retractions. An incision is made on the superior leaf of the left triangular ligament above the left lobe of the liver with the Opti 2 while the assistants hold down the liver to apply tension. A space is created behind between the liver and the diaphragm with atraumatic graspers for passage of the middle part of the Penrose drain. The left lobe is then lifted to identify the corresponding space from below and the middle portion of the Penrose drain passed from beneath mounted on a curved Karl-Storz grasper facing upward. Occasionally (especially with large left lobe of liver), the Penrose drain cannot be passed easily, and the black tie needs to be mounted on the tip of an Endo-Mini retractor to bring it through.
Once the middle portion is delivered over the liver, the white tie is placed to the right and the dye-stained tie to the left of the patient. Three small punctures are made in the epigastric skin with a number 11 blade for retrieval of each of the sutures. The Endo Close is inserted into the middle hole first and confirmed to enter the abdomen just to the left of the falciform ligament. The black tie is grasped and brought out to the skin where it is clipped secure with a mosquito. The white tie is brought through the right side skin hole and similarly the dye-stained tie through the left. The ties are then pulled laterally to lift the left lobe of the liver. Fine adjustments are made to achieve adequate exposure for the procedure. Ties are usually tightened in the order of white tie, dye-stained tie, and finally the black tie to complete the liver retraction (Figs. 24.4, 24.5, 24.6, 24.7, 24.8, and 24.9) [1]. There are other alternative techniques, but this is our preference.
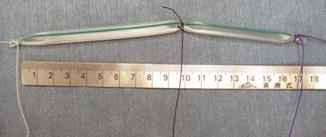

Fig. 24.4
Technique utilized for liver retraction
Dissection
Division of the Gastrocolic Ligament to the Left
The assistant on the patient’s right grasps the anterior surface of the gastric body near the greater curve, and the assistant on the patient’s left grasps the gastrocolic ligament at the same level on the side of the transverse colon. The two assistants apply tension on the fatty tissue in between to allow for the operator standing in between the patient’s legs to divide the gastrocolic ligament to enter the lesser sac (bursa omentalis). While maintaining a distance of 3–4 cm away from the gastroepiploic arcade, the division of the gastrocolic ligament is continued proximally toward the patient’s left. Tissue division is usually performed using a combination of the LigaSure and monopolar diathermy.
The assistant on the right retracts the greater curve in a 10 o’clock position on the video monitor. The assistant on the left retracts the greater omentum in a 4 o’clock position and adjusts in real time so that the appropriate amount of tension is applied on the tissues that are being divided. Care must be taken not to injure the transverse colon; the assistant on the left can grasp the tissues close to the colon while protecting the bowel wall with the grasper as the dissection is progressed toward the spleen.
Division of the Left Gastroepiploic Vessels and Dissection of Number 4sb Lymph Nodes
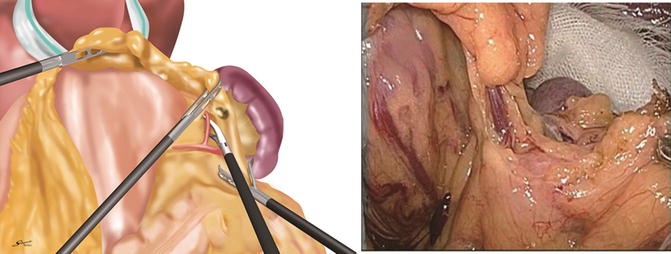
As the left gastroepiploic pedicle is approached, the assistant on the right grasps the posterior wall of the stomach near the greater curve and lifts in a 10 o’clock position to apply tension to the pedicle and gastrosplenic ligament. This helps clarify the anatomy and facilitates dissection around the root of the left gastroepiploic pedicle. Care must be taken not to apply too much tension to avoid traction injury to the spleen. Adhesions to the posterior gastric wall or the gastrocolic ligament are often present and need to be divided sharply with the diathermy or bipolar scissors to improve the exposure. The position of the root of the left gastroepiploic pedicle is determined from the inferomedial side (inside the lesser sac) from where the pedicle can be seen arising vertically from the retroperitoneum and running into the lifted greater curve of the stomach. The peritoneal layer is incised, and the vessels are skeletonized using the Marylands or dissecting forceps. The vessels are then clipped at their roots and divided by coagulation above the clips with the 4sb lymph nodes dissected on the side of the specimen (Fig. 24.10), [1]. The space beneath the gastrosplenic ligament is then entered and an avascular plane on the greater curve identified. Tissues are divided to reach the gastric wall at this point to complete the mobilization from this approach. According to the 13th edition of cancer treatment guidelines, 4sb lymph nodes are considered as 3rd-tier lymph nodes for gastric antrum lesions, and therefore resection is not mandatory in all cases.
Division of the Gastrosplenic Ligament and Dissection of Number 4sa Lymph Nodes
Beyond the left gastroepiploic vessels, the gastrocolic ligament fuses with the gastrosplenic ligament. The gastrosplenic ligament together with short gastric vessels is divided proximally close to the spleen until the fundus of the stomach is disconnected from the spleen (Fig. 24.11). Occasionally, large short gastric arteries are encountered that need to be clipped and coagulated with the LigaSure. Adhesions between the stomach, spleen, and omentum need to be carefully divided with monopolar diathermy or the LigaSure. Any parenchymal bleeding from the spleen caused by traction needs to be avoided as this can be difficult to control. Assistants must take care not to retract on the stomach omentum too strongly as there may be adhesions to the spleen.
Posterior Mobilization of the Proximal Stomach
Adhesions between the retroperitoneum and the posterior wall of proximal stomach are divided to free the stomach and expose the left gastric pedicle from the left side. Gastrodiaphragmatic attachments including those to the left crus of diaphragm are divided. The posterior gastric artery and the left inferior lateral diaphragmatic artery need to be identified and clipped prior to division with the LigaSure [6].
Dissection of 4d Lymph Nodes
Division of the gastrocolic ligament in the same plane parallel to the gastroepiploic arcade is continued distally toward the patient’s right. The assistant on the right grasps the greater curve of the stomach and lifts in a 12 o’clock direction to create space behind the stomach and apply tension on the undivided distal part of the gastrocolic ligament. Adhesions to the anterior surface of the pancreas are divided to allow further lifting of the stomach and dissection toward the duodenum. As the gastrocolic ligament is divided, the plane between the transverse mesocolon and the greater omentum is identified, and any adhesions across this space are divided. The peritoneal reflection at the right lower limit of the lesser sac is then reached, and the fat is separated beyond this laterally in the plane anterior to the transverse mesocolon. The right side assistant adjusts the ventral retraction to apply the right amount of tension on the fat to facilitate division. As the transverse mesocolon becomes tented up, it must be separated from the omentum with a combination of blunt dissection with graspers and sharp dissection with monopolar diathermy to allow it to drop down. As this is continued, the inner wall of the duodenal C-loop on 2nd part is reached with the right gastroepiploic pedicle still attached. The membrane between the duodenum and the pancreas is divided back toward the pylorus defining the lateral limit of number 6 lymph node dissection [1–3, 5–10].
Dissection of Number 6 Lymph Nodes
The position of the pylorus is determined anteriorly, and the dissection is commenced over the anterior surface of the pancreas to identify the right gastroepiploic vessels and dissect the surrounding lymph nodes. The right side assistant lifts the right gastroepiploic pedicle with perigastric fat near the pylorus ventrally to apply tension on the vessels. The root of the right gastroepiploic artery is usually found 2 cm below the pylorus in this configuration. The level of the head of the pancreas and the inferior border of the body are used for orientation during this dissection. As the plane anterior to the transverse mesocolon is followed superiorly toward the pancreas, the accessory right colic vein and gastrocolic trunk can be seen within the mesenteric fat. Going over the anterior surface of the pancreas, the anterior superior pancreaticoduodenal vein comes into view and can be followed to its drainage into the right gastroepiploic vein. Once skeletonized, the right gastroepiploic vein is clipped above the anterior superior pancreaticoduodenal tributary, and the LigaSure V or Harmonic can be used to divide above the clip. The anterior surface of the pancreas can then be exposed further cranially in search of the artery. Care must be taken not to damage the pancreas as its head is tented up by the retraction on the artery. Energy devices in particular can cause thermal injury here and during dissection around the common hepatic and splenic arteries. Any damage can lead to postoperative inflammation. At our unit, we apply ice-cooled wet swabs on the surface of the pancreas during dissection in an attempt to minimize injury. As the fat is divided and the duodenal neck becomes mobilized laterally, small vessels and fibers running between the pancreas and duodenum require pre-coagulation with the LigaSure V or Marylands before division. Once exposed, the gastroduodenal artery on the pancreas can be followed to the origin of the right gastroepiploic artery. Approached from both sides, the artery can be dissected, clipped at its root, and divided above the clip (Fig. 24.12). The infrapyloric artery running to the pylorus can often be identified here and can either be clipped or coagulated. Once more space is created posterior to the duodenum, the remaining tissues connected to the duodenum can be separated toward the pylorus. Further posterior mobilization along the gastroduodenal artery leads to the identification of the branching of the hepatic arteries defining the upper limit of the dissection from this approach. Several arterial branches to the lesser curve of the duodenum can also be opportunistically sealed and divided from this direction [1–3, 5–10].

