Arterial Puncture Sites and One-Time Blood Sampling
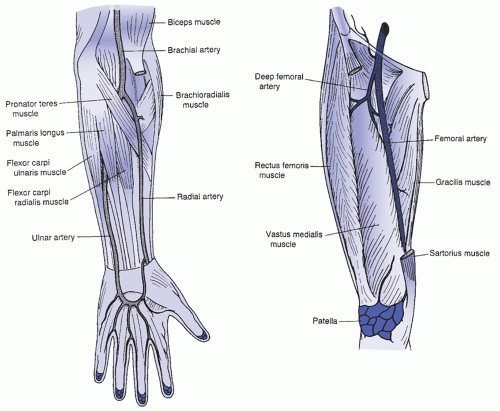
The radial artery is the most common access site for placement of a peripheral arterial catheter. It has the least discomfort, allows freedom of motion, and usually does not require joint immobilization. Radial arterial lines are associated with a low risk of ischemic injury to the hand as there is usually adequate collateral circulation via the ulnar artery. Other sites for monitoring arterial pressure include the femoral, brachial, and dorsalis pedis arteries (
Table 15-1).
The femoral artery, the preferred site for emergency cannulation, is easily cannulated. The femoral artery, located midway between the anterior superior spine of the ilium and the symphysis pubis (
Figure 15-1), is the largest accessible artery and is easily palpated, stabilized, and entered. However, focused digital pressure is required for postpuncture pressure. If postpuncture thrombosis should occur, though this is considered low risk in the femoral artery, a limb- or life-threatening condition may result.
Brachial artery access is the least preferred as it limits mobility of the patient and interferes with nursing care. The ulnar artery is usually much deeper and more difficult to stabilize than is the radial artery, so, although it may be larger, it is usually not the first choice as an entry site. The dorsalis pedis artery of the foot can be used for arterial monitoring but may be the least favorable site due to distal ischemic blood flow issues. This vessel is supported by collateral circulation over the arch of the foot but with comorbid conditions, such as peripheral vascular disease and vascular changes associated with diabetes, this site should be avoided.
Arterial blood is obtained for an arterial blood gas (ABG). Single stick blood sampling can be used for ABG sampling using a rigid needle sampling method. A cannulated arterial line can also be used for continuous arterial monitoring for hemodynamic pressure monitoring and frequent blood sampling using a flexible catheter.
PATIENT PREPARATION
Initially, the nurse reviews the physician/licensed independent practitioner’s (LIP) order. Unless a postexercise blood sample is ordered, the patient also should be at rest for 15 to 20 minutes before the blood sample is drawn. The most comfortable position for the patient should be used for all blood sampling procedures.
The laboratory requisition form should have all identifying patient information plus the oxygenation status of the patient, time of day (important when drawing serial samples), and, if the patient is on a ventilator, all pertinent ventilator settings (i.e., FIO2). In some institutions, the patient’s temperature and hemoglobin count are also required. In any institution, the nurse follows recommended institutional policy.
RADIAL PUNCTURE
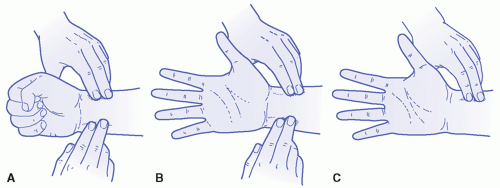
The site is palpated for a pulse, and the condition of the skin and surrounding tissues is inspected particularly for previous arterial puncture marks. Allen test is performed to ensure the adequacy of collateral circulation (
Figure 15-2). Local anesthesia prior to the arterial puncture should be considered, since it appears to prevent pain without adversely impacting the success of the procedure (
Hudson, Dukes, & Reilly, 2006).
The radial artery is best palpated between the distal radius and the tendon of the flexor carpi radialis when the wrist is flexed. A rolled towel may be placed under the wrist, promoting hyperextension of the hand to stretch and stabilize the artery. Taping the forearm and the palm to the insertion field or via an armboard can help maintain the position. The planned puncture site should be sterilely draped. The skin is prepared with chlorhexidine or other agency-specific product by wiping the area in a back and forth friction motion and allowing at least a 30-second drying time at the intended puncture site. Hand hygiene is used, gloves are required, and Occupational Safety and Health Administration standards should be met.
To perform a radial puncture, the nurse uses one gloved hand to palpate the artery and aligns two or three fingertips along the direction the artery follows. A small needle (e.g., 22- to 25-gauge) should then be attached to the syringe. The plunger should be withdrawn 1 to 2 mL before the stick, for two reasons: if the sample is indeed arterial and not venous, the patient’s pressure causes a brisk and often pulsatile reflux of blood into the syringe (unless the patient is severely hypotensive), and it prevents complications such as arterial spasm and blood hemolysis.
Holding the syringe and the needle in a bevel up position at an angle no higher than 30 degrees directly toward the artery, the nurse enters the skin and artery smoothly in one quick motion. Arterial pressure usually causes the blood to pulsate spontaneously back into the syringe. If BP is low or the syringe not free flowing, however, the nurse may need to pull back gently on the plunger or reposition the needle to achieve intralumen artery access. The blood return stops when the blood reaches the automatic shutoff level. If the equipment does not have a shutoff feature, a volume of 1 to 2 mL blood is a sufficient quantity for the blood gas analyzer.
Immediately after quickly withdrawing the needle and blood-filled syringe, the nurse applies digital pressure to the puncture site with a 2 × 2-inch sterile sponge folded to form a pressure point. Then, taking precautions not to encircle the entire wrist, a secure dressing is firmly secured with tape. Additional postprocedure interventions are listed in
Box 15-1.
If the syringe will be capped, the nurse resheaths the needle using a quick-cover cap. The nurse rolls the syringe back and forth between the hands for 5 to 10 seconds to ensure that the blood mixes with the heparin lining the syringe. The unit is then placed in an iced container and taken to the laboratory immediately for analysis. A small amount of cold water added to the ice provides for even cold distribution and facilitates placement of the sample so that all the blood in the barrel is chilled by iced water. Ice bathing ABG blood draws is not needed for transport of samples when using a fast, pneumatic tube system. Lab personnel will process all STAT lab requisitions within the guidelines established by the facility.
FEMORAL PUNCTURE
For femoral artery access, palpate the vessel below the midpoint of the inguinal ligament, when the lower extremity is extended. The needle should be inserted at a 90-degree angle just below the inguinal ligament. The femoral artery is usually easily palpated with the patient in the supine position. If the patient is obese, assistance may be needed to hold the abdomen away or the patient’s buttocks may be placed on an inverted bedpan. A pendulous abdomen may be taped up and away to provide easier access and maintain sterility. Procedures for wearing gloves and preparing the skin are the same as for a radial artery puncture.
The following two techniques may be used for a femoral arterial puncture:
The artery is located and kept between two fingers held in a “V” pattern, allowing pulsation to be felt on both fingers laterally but at the same time allowing enough room between them for the needle entry. The syringe and needle are held almost straight down. When the puncture is made in this manner, care must be taken not to pierce through the other wall of the artery. The acronym “NAV” (nerve, artery, vein) can assist the practitioner in focusing on the right femoral puncture location by remembering the nerve innervating the leg is to the left of the stick, the artery is central, and the vein is in the direction of the pubis symphysis.
Vessel entry may be performed with the same techniques used for a radial artery puncture. Two or three fingertips are placed along the direction of the femoral artery to the left over the ilium, and the syringe and needle are held at an angle no higher than 90 degrees. This method must be used for femoral artery catheter placement due to the need to manipulate more equipment; if used for a one-time needle and syringe sample, there is less chance of artery perforation using this approach.
Regardless of the method used, when pulsation is strong, it is relayed up through the needle and syringe as the needle touches and penetrates the artery. The walls of the femoral artery are usually thick and resistant to puncture, so feeling pulsations can be a good guide to needle tip placement. When the artery is entered, the blood usually pulsates back into and fills the syringe without any traction being applied on the plunger. See
Box 15-1 for postprocedure interventions and nursing responsibilities.
Other Arterial Access Sites
Variations in arterial puncture for the brachial access site include palpation of the vessel medial to the biceps tendon in the antecubital fossa, when the arm is extended in the palm up fashion. The dorsalis pedis artery is best palpated lateral to the extensor hallucis longus tendon. It receives collateral flow from the lateral plantar artery through the arch similar to that of the hand. The needle should be inserted just above the elbow crease or at the level of the dorsal arch, respectively.

 PATIENT SAFETY
 EVIDENCE FOR PRACTICE


